Инструкция для HOOVER JWC60B6 019

(скачивание инструкции бесплатно)
Формат файла: PDF
Доступность: Бесплатно как и все руководства на сайте. Без регистрации и SMS.
Дополнительно: Чтение инструкции онлайн
background image

2.  Switch the on/off switch to the on position. 

[6]

3.  Hold the nozzle against the surface being cleaned and operate the appliance from top to bottom 

to remove excess moisture.

[6]

NOTE: 

For hard to reach area’s, this appliance can be used up-side down or at a limited angle.

The appliance should be switched off when not in operation as this will maximise the running time.

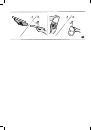
NOzzLEs rEPLAcEmENT* [7]

1.  Ensure the appliance is switched off.

2.  Press nozzle release button and remove the nozzle.

3.  Insert the replacement nozzle into the tank and ensure the release button is locked.

* Available only on certain models.

Emptying Tank [8]

1.  Empty the tank once it has reached the Max level indicated.

2.  Ensure the appliance is switched off.

3.  Pull out the tank emptying plug and empty the tank.

4.  Once the tank is empty, refit the plug.

cleaning Appliance [9]

1. 

Ensure the appliance is switched off.

2. 

Remove the nozzle from main product and pull out the nozzle lip, clean under running water.

3.  Remove the tank from main product body by pressing the tank release button, wash the tank 

with clean water to remove any dirt or debris.

4.  Remove the mop from the mop support frame, and clean under running water.

NOTE:

 Mop can be cleaned in washing machine, no fabric softener.

WArNiNG: 

The main product assembled with battery must not be cleaned under running water!


Ensure all cleaned components are completely dry prior to assembly.

storage of Appliance

Store the appliance with the storage hook in a dry area.

TrOUBLE sHOOTiNG

Appliance does not start

1.  Recharge main product for 16 hours, the charging indicator will be illuminated.

2.  If the charging indicator is not illuminated during charging, contact your dealer.

streaks remain after cleaning

1.  Clean the nozzle lip.

2.  Remove the nozzle lip from side and replace in position upside down.

3.  Replace the nozzle lip if required.

4.  Check the dosing of the detergent.

Water is leaking from the exhaust area

Empty the tank.

DisPOsAL OF APPLiANcEs

End of product life battery disposal.

If the cleaner is to be disposed of the batteries should be removed. Used batteries should be taken 

to a recycling station and not disposed with household waste.

imPOrTANT: 

Always fully discharge the batteries before removal.

8

GB

1
2
3
4
5
6
7
8
9
10
11
12
13
14
15
16
Оглавление инструкции
  • Страница 1 из 17
    INSTRUCTION MANUAL(GB)........... 05 РУКОВОДСТВО ПОЛЬЗОВАТЕЛЯ(RU)....... 10
  • Страница 2 из 17
  • Страница 3 из 17
    E F D B* C* A* P G Q O H N I M L R T U J S K
  • Страница 4 из 17
    1 2 1 2 3 4 5 6 7 8 + 1 2
  • Страница 5 из 17
    1 2 1 2 9
  • Страница 6 из 17
    GB PLEASE READ THESE INSTRUCTIONS THOROUGHLY This appliance should only be used for domestic cleaning, as described in this user guide. Please ensure that this guide is fully understood before operating the appliance. Always switch off and remove the charger from the socket before cleaning the
  • Страница 7 из 17
    GB Do not continue to use your appliance or charger if it appears faulty. Hoover service: To ensure the continued safe and efficient operation of this appliance we recommend that any servicing or repairs are only carried out by an authorised Hoover service engineer. Do not use the appliance to
  • Страница 8 из 17
    GB FEATURES A. 170mm Nozzle Lip * B. 170mm Nozzle Release Button * C. 170mm Nozzle * D. 280mm Nozzle Lips E. 280mm Nozzle Release Button F. 280mm Nozzle G. Tank Release Button H. Main Product I. Charging Indicator J. On/Off Switch K. Storage Hook L. Charger With Cable M. Plug Socket N. Tank O. Tank
  • Страница 9 из 17
    GB 2. Switch the on/off switch to the on position. [6] 3. Hold the nozzle against the surface being cleaned and operate the appliance from top to bottom to remove excess moisture.[6] NOTE: For hard to reach area’s, this appliance can be used up-side down or at a limited angle. The appliance should
  • Страница 10 из 17
    GB Battery removal Remove dust container. Unscrew 3 screws and open the unit. Remove motor assembly and disconnect the cables. Remove the batteries. NOTE: Should you experience any difficulties in dismantling the unit or for more detailed information about treatment, recovery and recycling of this
  • Страница 11 из 17
    RU ВНИМАТЕЛЬНО ИЗУЧИТЕ ДАННУЮ ИНСТРУКЦИЮ Данный прибор предназначен только для домашнего использования в соответствии с описанием, приведенным в настоящем Руководстве пользователя. Прежде чем приступить к эксплуатации данного бытового электроприбора, убедитесь в том, что вы понимаете настоящее
  • Страница 12 из 17
    RU Не используйте прибор для сбора острых предметов, спичек, горячего пепла, окурков или аналогичных объектов. Не распыляйте или не собирайте горючие жидкости, чистящие средства, аэрозоли или прочие пары. В случае неисправности не следует продолжать пользоваться прибором или зарядным устройством.
  • Страница 13 из 17
    RU ОСНОВНЫЕ ЭЛЕМЕНТЫ A. B. C. D. E. F. G. H. I. J. K. Чистящая кромка насадки 170 мм * Кнопка отсоединения насадки 170 мм * Насадка 170 мм * Чистящая кромка насадки 280 мм Кнопка отсоединения насадки 280 мм Насадка 280 мм Кнопка отсоединения бака Главный блок Световой индикатор зарядки
  • Страница 14 из 17
    RU ИСПОЛЬЗОВАНИЕ ПРИБОРА Очистка 1. Нажмите рычаг распылителя на головке распылителя, чтобы равномерно нанести очиститель на очищаемую поверхность. Для удаления стойкой грязи воспользуйтесь тряпкой. [5] 2. Переведите выключатель в положение «включено». [6] 3. Направьте насадку на очищаемую
  • Страница 15 из 17
    RU УТИЛИЗАЦИЯ ПРИБОРА Утилизация аккумуляторной батареи по окончании срока службы изделия В случае утилизации пылесоса, аккумуляторные батареи должны быть извлечены. Использованные аккумуляторные батареи должны быть переданы на станцию переработки, запрещается выбрасывать батареи вместе с бытовым
  • Страница 16 из 17
    PRINTED IN P.R.C. 48014233
  • Страница 17 из 17