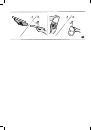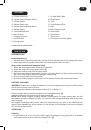
A. 170mm Nozzle Lip *
B. 170mm Nozzle Release Button *
C. 170mm Nozzle *
D. 280mm Nozzle Lips
E. 280mm Nozzle Release Button
F. 280mm Nozzle
G. Tank Release Button
H. Main Product
I. Charging Indicator
J. On/Off Switch
K. Storage Hook
L. Charger With Cable
M. Plug Socket
N. Tank
O. Tank Emptying Plug
P. Mop
Q. Mop Support Frame
R. Spray Head
S. Spray Bottle
T. Spray Lever
U. Concentrate Cleaning Agent
FEATUrEs
Available only on certain models.
HOW TO UsE
PrEPArATiONs
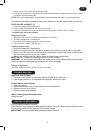
Nozzle assembly [1]
1.
Attach the tank to the main product body ensuring the Tank release button is fully engaged and locked.
2. Attach the nozzle to the tank and ensure the nozzle release button is locked.
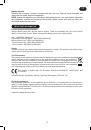
Spray bottle assembly and detergent filling
1. Attach the mop support frame to the spray head.
[2]
2. Attach the mop to the mop support frame.
[2]
3. Remove the spray head from the spray bottle.
4. Add the concentrate cleaning agent (1X20ml) into spray bottle and fill the spray bottle slowly
with clean water (makes 380ml for detergent solution).
[3]
5. Screw the spray head onto spray bottle.
6. Ensure the cleaning agent concentrate is mixed well by Shaking the bottle several times.
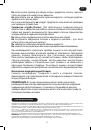
BATTErY cHArGiNG
WArNiNG:
Please check charger is suitable for your main supply before operation.
Before being
charged main product must be turn off.
Never charge the batteries in temperatures above 37°C or below 0°C.
Plug the charger delivered with this appliance into a suitable socket.
[4]
Insert the cable plug into plug socket on main product.
[4]
NOTE:
When being charged, charging indicator will be lighted. For longer running time, the first
time battery should be charged 24 hours. It is normal for the charger to become warm to the touch
when charging.
We suggest recharging main product each time after finishing your work. If the operating time
reduces after repeated use, let the cleaner run until it stops, then recharge for 24 hours and repeat
this monthly for best results.
OPErATiNG
cleaning
1. Press the spray lever on the spray head to apply the detergent, spray the area to be cleaned
evenly and use the mop to loosen any stubborn dirt.
[5]
7
GB