Инструкция для HOTPOINT-ARISTON 7HPC 640

(скачивание инструкции бесплатно)
Формат файла: PDF
Доступность: Бесплатно как и все руководства на сайте. Без регистрации и SMS.
Дополнительно: Чтение инструкции онлайн
background image

GB

7

555 mm

55 mm

475 mm

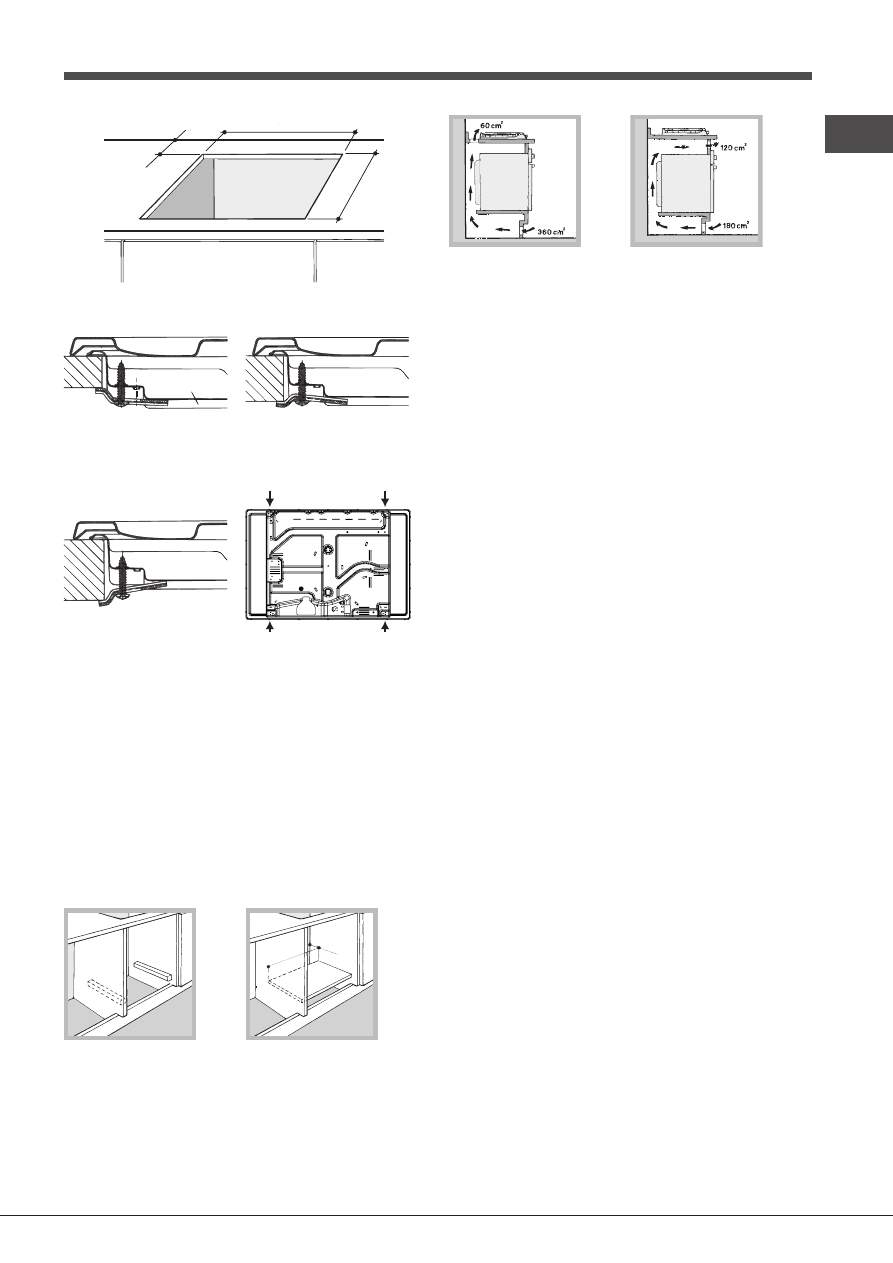
Hook fastening diagram


Hooking position 

Hooking position

for top 

H=20mm


for top 

H=30mm


Front


Hooking position 

Back

for top 

H=40mm

!

 Use the hooks contained in the “accessory pack”.

•  Where the hob is not installed over a built-in oven, a 

wooden panel must be installed as insulation. This must 

be placed at a minimum distance of 20 mm from the lower 

part of the hob.

Ventilation

To ensure adequate ventilation, the back panel of the cabinet 

must be removed. It is advisable to install the oven so that it 

rests on two strips of wood, or on a completely flat surface 

with an opening of at least 45 x 560 mm (see diagrams).


560 mm

.

45 mm.

Where a hob is installed above an oven without a forced 

ventilation cooling system, adequate ventilation must be 

provided inside the cabinet by means of air holes through 

which air can pass (see figure).


Electrical connection

Hobs equipped with a three-pole power supply cable are 

designed to operate with alternating current at the voltage and 

frequency indicated on the data plate (this is located on the 

lower part of the appliance). The earth wire in the cable has a 

green and yellow cover. If the appliance is to be installed above 

a built-in electric oven, the electrical connection of the hob and 

the oven must be carried out separately, both for electrical 

safety purposes and to make extracting the oven easier. 

Connecting the supply cable to the mains

Install a standardised plug corresponding to the load 

indicated on the data plate. 

The appliance must be directly connected to the mains 

using an omnipolar circuit-breaker with a minimum contact 

opening of 3 mm installed between the appliance and the 

mains.  The circuit-breaker must be suitable for the charge 

indicated and must comply with current electrical regulations 

(the earthing wire must not be interrupted by the circuit-

breaker). The supply cable must not come into contact with 

surfaces with temperatures higher than 50°C.

!

 The installer must ensure that the correct electrical 

connection has been made and that it is compliant with 

safety regulations.

Before connecting to the power supply, make sure that:

•  The appliance is earthed and the plug is compliant with 

the law.

•  The socket can withstand the maximum power of the 

appliance, which is indicated on the data plate.

•  The voltage is in the range between the values indicated 

on the data plate.

•  The socket is compatible with the plug of the appliance. 

If the socket is incompatible with the plug, ask an 

authorised technician to replace it. Do not use extension 

cords or multiple sockets.

!

 Once the appliance has been installed, the power supply 

cable and the electrical socket must be easily accessible.

!

 The cable must not be bent or compressed.

!

 The cable must be checked regularly and replaced by 

authorised technicians only (see Assistance).

!

 The manufacturer declines any liability should these safety 

measures not be observed.

Gas connection

The appliance should be connected to the main gas supply 

or to a gas cylinder in compliance with current national 

regulations. Before carrying out the connection, make sure 

the cooker is compatible with the gas supply you wish to 

1
2
3
4
5
6
7
8
9
10
11
12
13
14
15
16
17
18
19
20
Оглавление инструкции
  • Страница 1 из 21
    7HPC 640 T GH /HA 7HPC 640 T R/HA 7HPC 640 T X /HA 7HPC 640 /HA 7HPC 640 X /HA 7HPC 631 X /HA 7HPC 640 GH /HA 7HPC 640 N /HA 7HPC 640 N GH /HA 7HPC 640 N X /HA GPN 64 TA CI RFH GPN 64 TO CI RFH GPN 64 NI RFH GPN 64 NCI RFH GPN 64 NW RFH English Operating Instructions HOB Contents Operating
  • Страница 2 из 21
    Warnings WARNING: The appliance and its accessible parts become hot during use. Care should be taken to avoid touching heating elements. Children less than 8 years of age shall be kept away unless continuously supervised. This appliance can be used by children aged from 8 years and above and
  • Страница 3 из 21
    Предупреждения ВНИМАНИЕ: Данное изделие и его доступные комплектующие сильно нагреваются в процессе эксплуатации. Будьте осторожны и не касайтесь нагревательных элементов. Не разрешайте детям младше 8 лет приближаться к изделию без контроля. Д а н н о е и зд ел и е м ож ет б ы т ь использовано
  • Страница 4 из 21
    Assistance Communicating: • appliance model (Mod.) • serial number (S/N) This information is found on the data plate located on the appliance and/or on the packaging. Сервисное обслуживание Перед тем как обратиться в Центр Технического Обслуживания: • Модель изделия (Мод.) • Номер тех. паспорта
  • Страница 5 из 21
    Description of the appliance Описание изделия Overall view 1. 2. 3. 4. 5. Общии вид Support Grid for COOKWARE GAS BURNERS Control Knobs for GAS BURNERS Ignition for GAS BURNERS SAFETY DEVICES 1. 2. 3. 4. 5. • GAS BURNERS differ in size and power. Use the diameter of the cookware to choose the most
  • Страница 6 из 21
    Installation the event of a leak. As a result LPG cylinders, whether partially or completely full, must not be installed or stored in rooms or storage areas that are below ground level (cellars, etc.). It is advisable to keep only the cylinder being used in the room, positioned so that it is not
  • Страница 7 из 21
    555 mm mm m 475 55 GB m Electrical connection Hobs equipped with a three-pole power supply cable are designed to operate with alternating current at the voltage and frequency indicated on the data plate (this is located on the lower part of the appliance). The earth wire in the cable has a green
  • Страница 8 из 21
    GB use. If this is not the case, follow the instructions indicated in the paragraph “Adapting to different types of gas.” When using liquid gas from a cylinder, install a pressure regulator which complies with current national regulations. ! Check that the pressure of the gas supply is consistent
  • Страница 9 из 21
    DATA PLATE GB Electrical see data plate connections This appliance conforms to the following European Economic Community directives: - 2006/95/EEC dated 12/12/06 (Low Voltage) and subsequent amendments - 2004/108/EEC dated 15/12/04 (Electromagnetic Compatibility) and subsequent amendments -
  • Страница 10 из 21
    GB Burner and nozzle specifications Table 1 Liquid Gas Burner Diameter (mm) Thermal power kW (p.c.s.*) Reduced Thermal power kW (p.c.s.*) Nominal Natural Gas By-pass Nozzle 1/100 1/100 Flow* (g/h) (mm) (mm) *** ** Thermal power kW (p.c.s.*) Nominal Nozzle 1/100 Flow* (l/h) (mm) Fast (R) 100 0,70
  • Страница 11 из 21
    Start-up and use Precautions and tips ! The position of the corresponding gas burner or electric hotplate* is shown on every knob. ! This appliance has been designed and manufactured in compliance with international safety standards. The following warnings are provided for safety reasons and must
  • Страница 12 из 21
    GB • Do not let children play with the appliance. • The appliance is not intended to be operated by means of an external timer or separate remotecontrol system. Disposal • When disposing of packaging material: observe local legislation so that the packaging may be reused. • The European Directive
  • Страница 13 из 21
    ! Важно сохранить данное руководство для его последующих консультации. В случае продажи, передачи изделия или при переезде на новое место жительства необходимо проверить, чтобы руководство оставалось вместе с изделием, для того чтобы его новыи владелец мог ознакомиться с правилами эксплуатации и с
  • Страница 14 из 21
    Вентиляция Для обеспечения надлежащеи вентиляции необходимо снять заднюю панель ниши кухонного элемента. Рекомендуется установить духовои шкаф на два деревянных бруска или на сплошное основание с отверстием диаметром не менее 45 х 560 мм (см чертежи). RU 560 • Размеры ниши кухонного элемента должны
  • Страница 15 из 21
    ! Электромонтер несет ответственность за правильное подключение изделия к электрическои сети и за соблюдение правил безопасности. Перед подключением изделия к сети электропитания проверьте следующее: • розетка должна быть соединена с заземлением и соответствовать нормативам; • сетевая розетка
  • Страница 16 из 21
    RU • Регуляция первичного воздуха конфорок Конфорки не нуждаются в какои-либо регуляции первичного воздуха. • Регуляция минимального пламени 1. Поверните рукоятку-регулятор в положение минимального пламени; 2. Cнимите рукоятку и поверните регуляционныи винт, расположенныи внутри или рядом со
  • Страница 17 из 21
    Характеристики горелок и форсунок RU Таблица 1 Сжиженный газ Kонфорка Диаметр Теплотворная способность кВт (p.c.s.*) Байпас Форсунка 1/100 1/100 Природный газ Расход* г/час Теплотворная Форсунка способность 1/100 кВт (p.c.s.*) Расход* л/час (мм) Номин. Сокращ (мм) (мм) *** ** Сокращ Быстрая (R) 100
  • Страница 18 из 21
    RU Включение и эксплуатация ! На каждом регуляторе показано положение газовои или электрическои конфорки (если имеется), которои данная рукоятка управляет. Предосторожности и рекомендации Газовые конфорки При помощи соответствующего регулятор можно выбрать один из следующих режимов конфорки: !
  • Страница 19 из 21
    • Не закрываите стеклянную крышку варочнои панели (если она имеется), если газовые или электрические конфорки еще горячие. • Не пользуитесь нестабильнои или деформированнои посудои. • Не допускается эксплуатация изделия лицами с ограниченными физическими, сенсориальными или умственными
  • Страница 20 из 21
    195114025.01 10/2013 - XEROX FABRIANO RU Конфорка гаснет в положении малого пламени. Засорены отверстия подачи газа в конфорке. • Сквозняки рядом с газовои варочнои панелью. • Неправильно отрегулировано минимальное пламя. Нестабильные кастрюли Дно кастрюли должно быть идеально плоским. • Кастрюля
  • Страница 21 из 21