Доступность: Бесплатно как и все руководства на сайте. Без регистрации и SMS.
Дополнительно: Чтение инструкции онлайн
68
HU
04/2007 - 195061839.00
Страница: (68 из 68)
навигация
1
2
3
4
5
6
7
8
9
10
11
12
13
14
15
16
17
18
19
20
21
22
23
24
25
26
27
28
29
30
31
32
33
34
35
36
37
38
39
40
41
42
43
44
45
46
47
48
49
50
51
52
53
54
55
56
57
58
59
60
61
62
63
64
65
66
67
68
Оглавление инструкции
Страница 1 из 69 Istruzioni per luso CUCINA IT Italiano, 1 RO Romanian,41 GB English, 15 HU Magyar, 54 RS ÐÓÑÑÊÈÉ, 28 Sommario Installazione, 2-6 Posizionamento e livellamento Collegamento elettrico Collegamento gas Adattamento a diversi tipi di gas Dati tecnici Tabella caratteristiche bruciatori e ugelli
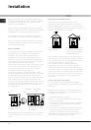
Страница 2 из 69 Installazione IT ! È importante conservare questo libretto per poterlo consultare in ogni momento. In caso di vendita, di cessione o di trasloco, assicurarsi che resti insieme allapparecchio. ! Leggere attentamente le istruzioni: ci sono importanti informazioni sullinstallazione, sulluso e sulla
Страница 3 из 69 420 mm. 420 mm. Min. 600 mm. Min. Min. min. 650 mm. with hood min. 700 mm. without hood HOOD la tensione di alimentazione sia compresa nei valori nella targhetta caratteristiche; la presa sia compatibile con la spina dellapparecchio. In caso contrario sostituire la presa o la spina; non usare
Страница 4 из 69 IT non venga a contatto con corpi taglienti, spigoli vivi, parti mobili e non sia schiacciato; sia facilmente ispezionabile lungo tutto il percorso per poter controllare il suo stato di conservazione; abbia una lunghezza inferiore a 1500 mm; sia ben calzato alle sue due estremità, dove va
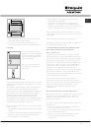
Страница 5 из 69 dellastina del termostato (vedi figure) fino a ottenere una piccola fiamma regolare. ! Nel caso di gas naturale, la vite di regolazione dovrà essere svitata in senso antiorario. DATI TECNICI IT Sostituzione dellugello del bruciatore del grill: 1. rimuovere il bruciatore del grill dopo aver tolto
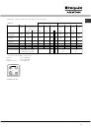
Страница 6 из 69 IT Tabella caratteristiche bruciatori e ugelli Tabella 1 Bruciatore Diametro (mm) Rapido (Grande) (R) Semi Rapido (Medio) (S) Ausiliario (Piccolo) (A) Forno Grill Potenza termica kW (p.c.s.*) Nominale Ridotto By Pass 1/100 (mm) Gas Liquido ugello portata* 1/100 g/h (mm) *** ** Gas Naturale ugello
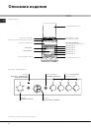
Страница 7 из 69 Descrizione dellapparecchio Vista dinsieme IT Coperchio in vetro* Bruciatore a gas Griglia del piano di lavoro Piano di contenimento per eventuali trabocchi Pannello di controllo GUIDE di scorrimento dei ripiani posizione 5 posizione 4 posizione 3 posizione 2 posizione 1 Ripiano GRIGLIA Ripiano
Страница 8 из 69 Avvio e utilizzo IT Uso del piano cottura Bruciatore Accensione dei bruciatori Rapido (R) In corrispondenza di ogni manopola BRUCIATORE è indicato con un cerchietto pieno il bruciatore associato. Per accendere un bruciatore del piano cottura: 1. avvicinare al bruciatore una fiamma o un accendigas;
Страница 9 из 69 ! Il forno è dotato di un dispositivo di sicurezza per cui è necessario tenere premuta la manopola FORNO per circa 6 secondi. D ! In caso di estinzione accidentale delle fiamme, spegnere il bruciatore e aspettare almeno 1 minuto prima di ritentare laccensione del forno. Regolazione della
Страница 10 из 69 IT Tabella cottura in forno Alimenti Pasta Lasagne Cannelloni Paste gratinate Carne Vitello Pollo Anatra Coniglio Maiale Agnello Pesce Sgombri Dentice Trota al cartoccio Pizza Napoletana Torte Biscotti Crostata Torte salate Torte lievitate Cottura al grill Bistecche di vitello Cotolette Hamburger
Страница 11 из 69 Contaminuti analogico Funzione contaminuti IT Nel funzionamento contaminuti viene impostato un tempo dal quale comincia un conto alla rovescia. Questa funzione non controlla laccensione e lo spegnimento del forno, emette solamente un allarme acustico a tempo scaduto. Impostare orologio e
Страница 12 из 69 Precauzioni e consigli IT ! Lapparecchio è stato progettato e costruito in conformità alle norme internazionali di sicurezza. Queste avvertenze sono fornite per ragioni di sicurezza e devono essere lette attentamente. Sicurezza generale Lapparecchio è stato concepito per un uso di tipo non
Страница 13 из 69 Manutenzione e cura Escludere la corrente elettrica Controllare le guarnizioni del forno Prima di ogni operazione isolare lapparecchio dalla rete di alimentazione elettrica. Controllare periodicamente lo stato della guarnizione attorno alla porta del forno. In caso risulti danneggiata rivolgersi
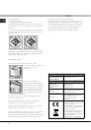
Страница 14 из 69 Assistenza IT ! Non ricorrere mai a tecnici non autorizzati. Comunicare: Il tipo di anomalia; Il modello della macchina (Mod.) Il numero di serie (S/N) Queste ultime informazioni si trovano sulla targhetta caratteristiche posta sullapparecchio Assistenza attiva 7 giorni su 7 In caso di
Страница 15 из 69 Operating Instructions COOKER IT Italiano, 1 RO Romanian,41 GB English,15 HU Magyar, 54 RS ÐÓÑÑÊÈÉ, 28 Contents Installation, 16-20 Positioning and levelling Electrical connection Gas connection Adapting to different types of gas Technical data Table of burner and nozzle specifications Description
Страница 16 из 69 Installation GB ! Before operating your new appliance please read this instruction booklet carefully. It contains important information concerning the safe installation and operation of the appliance. ! Please keep these operating instructions for future reference. Make sure that the instructions
Страница 17 из 69 420 mm. 420 mm. Min. 600 mm. Min. Min. min. 650 mm. with hood min. 700 mm. without hood HOOD The voltage is in the range between the values indicated on the data plate. The socket is compatible with the plug of the appliance. If the socket is incompatible with the plug, ask an authorised
Страница 18 из 69 GB Is easy to inspect along its whole length so that its condition may be checked. Is shorter than 1500 mm. Fits firmly into place at both ends, where it will be fixed using clamps that comply with current regulations. ! If one or more of these conditions is not fulfilled or if the cooker
Страница 19 из 69 TECHNICAL DATA GB Oven Dimensions HxWxD 31x43,5x43,5 cm Volume 58 l Useful measurements relating to the oven compartment width 46 cm depth 42 cm height 8,5 cm 5. Turn the knob from the MAX position to the MIN position quickly or open and shut the oven door, making sure that the burner is not
Страница 20 из 69 GB Table of burner and nozzle specifications Table 1 Burner Diameter (mm) Fast (Large)(R) Semi Fast (Medium)(S) Auxiliary (Small)(A) Oven Grill Thermal Power kW (p.c.s.*) Nominal Reduced By Pass 1/100 (mm) Liquid Gas Nozzle Flow* 1/100 g/h (mm) *** ** Nozzle 1/100 (mm) Natural Gas Flow* Nozzle l/h
Страница 21 из 69 Description of the appliance Overall view GB Glass cover* Gas burner Containment surface for spills Hob grid GUIDE RAILS for the sliding racks position 5 position 4 position 3 position 2 position 1 Control panel GRILL rack DRIPPING PAN Adjustable foot Adjustable foot Control panel OVEN LIGHT and
Страница 22 из 69 Start-up and use GB Using the hob Burner Lighting the burners Fast (R) For each BURNER knob there is a complete ring showing the strength of the flame for the relevant burner. To light one of the burners on the hob: 1. Bring a flame or gas lighter close to the burner. 2. Press the BURNER knob and
Страница 23 из 69 ! The oven is fitted with a safety device and it is therefore necessary to hold the OVEN control knob down for approximately 6 seconds. ! If the flame is accidentally extinguished, switch off the burner and wait for at least 1 minute before attempting to relight the oven. Adjusting the temperature
Страница 24 из 69 GB Oven cooking advice table Foods Pasta Lasagne Cannelloni Gratin dishes Meat Veal Chicken Duck Rabbit Pork Lamb Fish Mackerel Dentex Trout baked in foil Pizza Neapolitan-style Pies Biscuits Tart Savoury pies Leavened cakes Grilled foods Veal steak Cutlets Hamburgers Mackerel Toast Grillling using
Страница 25 из 69 Analogue timer Timer feature GB The timer feature allows you to enter a specific amount of time and counts down from this time to zero. This feature does not switch the oven on or off; it merely sounds when the set time has elapsed. Setting the clock and timer Turn the knob in an anticlockwise
Страница 26 из 69 Precautions and tips GB ! This appliance has been designed and manufactured in compliance with international safety standards. The following warnings are provided for safety reasons and must be read carefully. General safety The appliance was designed for domestic use inside the home and is not
Страница 27 из 69 Care and maintenance Switching the appliance off Inspecting the oven seals Disconnect your appliance from the electricity supply before carrying out any work on it. Cleaning the appliance Check the door seals around the oven regularly. If the seals are damaged, please contact your nearest
Страница 28 из 69 Ðóêîâîäñòâî ïî ýêñïëóàòàöèè ÊÓÕÎÍÍÀß ÏËÈÒÀ RS IT Italiano, 1 RO Romanian,41 GB English, 15 HU Magyar, 54 RS ÐÓÑÑÊÈÉ, 28 Ñîäåðæàíèå Ìîíòàæ, 29-33 Ðàñïîëîæåíèå è íèâåëèðîâêà Ýëåêòðè÷åñêîå ïîäñîåäèíåíèå Ïîäñîåäèíåíèå ê ãàçîïðîâîäó Íàñòðîéêà íà ðàçëè÷íûå òèïû ãàçà Òåõíè÷åñêèå äàííûå Òàáëèöà
Страница 30 из 69 íå çàïðàâëÿéòå çàíàâåñêè çà êóõîííóþ ïëèòó è íå ïðèáëèæàéòå Min. 600 mm. èõ íà ðàññòîÿíèå ìåíüøå 200 ìì. âîçìîæíàÿ êóõîííàÿ âûòÿæêà äîëæíà áûòü óñòàíîâëåíà â ñîîòâåòñòâèè ñ èíñòðóêöèÿìè, ïðèâåäåííûìè â òåõíè÷åñêîì ðóêîâîäñòâå ê âûòÿæêå. 420 mm. Min. min. 650 mm. with hood min. 700 mm. without
Страница 34 из 69 Îïèñàíèå èçäåëèÿ RS Îáùèé âèä Стеклянная крышка* Газовая конфорка Опорная решетка варочной панели Бортики для сбора возможных утечек НАПРАВЛЯЮЩИЕ для противеней и решеток положение 5 положение 4 положение 3 положение 2 положение 1 Панель управления РЕШЕТКА ПРОТИВЕНЬ Регулируемая ножка Регулируемая
Страница 41 из 69 Instructiuni de folosire ARAGAZ RO IT Italiano, 1 RO Romanian,41 GB English, 15 HU Magyar, 54 RS ÐÓÑÑÊÈÉ, 28 Sumar Instalare, 42-46 Pozitionarea si punerea la nivel Racordarea electrica Racordarea la gaze Adaptarea la diferite tipuri de gaz Date tehnice Tabelul cu caracteristicile arzatoarelor si
Страница 42 из 69 Instalare R O ! Este important sa pastrati acest manual pentru a-l putea consulta în orice moment. În caz de vânzare, cedare sau mutare, asigurati-va ca acesta ramâne cu aparatul. ! Cititi cu atentie instructiunile: veti gasi informatii importante cu privire la instalare, la folosire si la
Страница 43 из 69 420 mm. 420 mm. Min. 600 mm. Min. Min. min. 650 mm. with hood min. 700 mm. without hood HOOD priza sa poata suporta sarcina maxima de putere a masinii, indicata pe placuta de caracteristici; tensiunea de alimentare sa fie cuprinsa în valorile indicate pe placuta cu caracteristici; priza sa
Страница 44 из 69 R O nu intra în contact cu obiecte sau colturi ascutite, parti mobile si ca nu este presat; este usor accesibil, pe tot traseul sau, cu scopul de al putea controla; are o lungime sub 1500 mm; este bine introdus la capete si fixat cu coliere de strângere, conform normelor nationale în
Страница 45 из 69 ! în cazul gazelor naturale, surubul de reglare trebuie sa fie desurubat (rotit în sens contrar acelor de ceasornic). 5. verificati daca, rotind repede busonul de la MAX la MIN sau daca închideti si deschideti repede usa cuptorului, flacara ramâne aprinsa. Adaptarea gratarului Înlocuirea duzei
Страница 46 из 69 R O Tabelul cu caracteristicile arzatoarelor si duzelor Gaz lichefiat Tabelul 1 Tipul arzãtorului Diametru (mm) Putere Termicã kW (pcs*) Normala By-pass 1/100 (mm) Ajutaj 1/100 (mm) Redusa Gaz Natural Debit g/h Ajutaj 1/100 (mm) *** Debit l/h ** Rapid (Mare)R 100 3 0,7 41 86 218 214 116 286 Semi
Страница 47 из 69 Descrierea aparatului Vedere de ansamblu RO Capac din sticlă* Arzător pe gaz Grătar aragaz Blat de colectare a eventualelor reziduuri GHIDAJE alunecare rafturi nivelul 5 nivelul 4 nivelul 3 nivelul 2 nivelul 1 Panoul de control Raft GRĂTAR Raft TAVĂ Picior de reglare Picior de reglare Panoul de
Страница 48 из 69 Pornire si utilizare R O Utilizarea aragazului Aprinderea arzatoarelor Fiecare buson al aragazului are, în dreptul sau, schita arzatoarelor; ARZATORUL comandat de buson este reprezentat cu un cerc evidentiat. Pentru a aprinde un arzator al aragazului: 1. apropiati de arzator o flacara sau o
Страница 49 из 69 ! Cuptorul este dotat cu un dispozitiv de siguranta; de aceea este necesar sa tineti apasat busonul CUPTORULUI timp de 6 secunde circa. D ! Daca flacara se stinge accidental, opriti arzatorul si asteptati minim 1 minut înainte sa încercati din nou. Reglarea temperaturii Pentru a obtine temperatura
Страница 50 из 69 R O Tabelul cu recomandari pt coacerea în cuptor Alimente Paste fãinoase Lasagne (Foi de aluat dispuse în straturi, umplute) Cannelloni (macaroane groase umplute) Paste gratinate Carne Viþel Pui Raþã Iepure Porc Miel Peºte Scrumbie Dentex dentex Pãstrãv în folie de aluminiu Pizza Napoletana Tort
Страница 51 из 69 Minutar analogic Functia de cronometrare RO Cronometrul presupune reglarea unui interval de timp de la care pleaca numaratoarea inversa: Aceasta functie nu comanda aprinderea sau stingerea cuptorului, ci indica numai expirarea timpului reglat, prin semnalul sonor. Reglarea ceasului si a minutarului
Страница 52 из 69 Precautii si sfaturi R O ! Aparatul a fost proiectat si construit conform normelor internationale de siguranta. Aceste avertizari sunt furnizate din motive de siguranta si trebuie sa fie citite cu atentie. Nu scoateti stecarul din priza tragând de cablu. Norme de protectie si siguranta generale
Страница 53 из 69 Întretinere si curatire Decuplarea electrica Controlati garniturile cuptorului. Înainte de orice operatie, debransati aparatul de la reteaua de alimentare cu curent electric. Controlati periodic garnitura din jurul usii cuptorului. Daca este deteriorata, apelati la cel mai apropiat Centru de
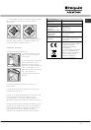
Страница 54 из 69 Használati útmutató TÛZHELY H U IT Italiano, 1 RO Romanian,41 GB English, 15 HU Magyar, 54 RS ÐÓÑÑÊÈÉ, 28 Tartalomjegyzék Üzembe helyezés, 55-59 Elhelyezés és vízszintezés Elektromos csatlakoztatás Gázbekötés Átállítás más gáztípusra Mûszaki adatok A gázégõk és a fúvókák jellemzõ adatai A készülék
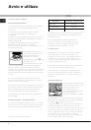
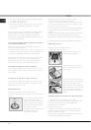
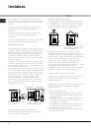
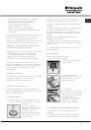
Страница 55 из 69 Üzembe helyezés ! Fontos, hogy megtartsa ezt a kézikönyvet, hogy szükség esetén bármikor belenézhessen. Ha a készüléket eladja, elajándékozza vagy áthelyezi, gyõzõdjön meg róla, hogy a kézikönyvet is átadja vele! ! Olvassa el figyelmesen az utasításokat: fontos információkat tartalmaznak az üzembe
Страница 56 из 69 H U 420 mm. 420 mm. Min. 600 mm. Min. Min. min. 650 mm. with hood min. 700 mm. without hood HOOD ne tegyen függönyt a tûzhely mögé, illetve a tûzhely 200 mm-es körzetébe; az esetleges kürtõket a felhasználói kézikönyv utasításainak megfelelõen kell kialakítani. Vízszintezés Amennyiben
Страница 57 из 69 nem érintkezik vágófelülettel, éles szélekkel, mozgó elemekkel és nincs összenyomva; állapotának ellenõrzése végett a teljes nyomvonalában jól hozzáférhetõ; hossza meghaladja az 1500 mm-t; két végén, az érvényben lévõ nemzeti szabványoknak megfelelõen, csõbilinccsel jól fel van rögzítve! !
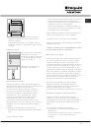
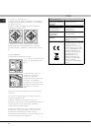
Страница 58 из 69 H U 3. húzza ki a tekerõgombot; 4. csavarja a tekerõgomb tengelyén kívül található szabályozócsavart addig (lásd ábra), míg szabályos kis lángot nem kap! ! Földgáz esetén a szabályozócsavart órairánnyal ellentétesen kell kicsavarni. MÛSZAKI ADATOK A sütõ méretei magasság x szélesség x mélység.
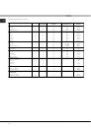
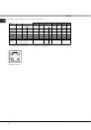
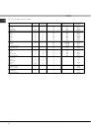
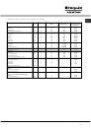
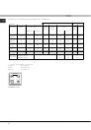
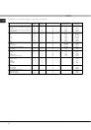
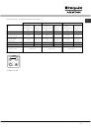
Страница 59 из 69 A gázégõk és a fúvókák jellemzõ adatai Égõ Gyors (nagy) (R) Közepes (közepes) (S) Segéd égõ (kicsi) (A) Sütõ: Grill: Névleges csatlakozási nyomás: S R G 20 (2H) Névl. Fúvóka hõterhelés méret kW (mm) 3,30 1,16 HU G 25.1(2S) Névl. Fúvóka hõterhelés méret kW (mm) 3,30 1,43 G 30 (3B/P) Névl. Fúvóka
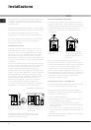
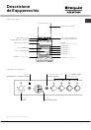
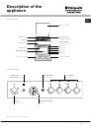
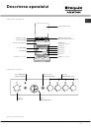
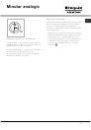
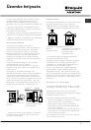
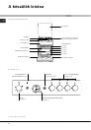
Страница 60 из 69 A készülék leírása H U A készülék áttekintése Üvegtető* Gázégő Az esetlegesen kiömlött ételeket felfogó felület Főzőlap rács Kezelőpanel TÁLCASÍNEK 5. szint 4. szint 3. szint 2. szint 1. szint GRILLRÁCS ZSÍRFELFOGÓ tálca Állítható lábazat Állítható lábazat Kezelõpanel FORGÓNYÁRS és SÜTŐVILÁGÍTÁS
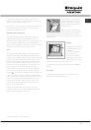
Страница 61 из 69 Bekapcsolás és használat A fõzõlap használata Az égõfej meggyújtása A GÁZÉGÕ tekerõgombok esetében a gombhoz tartozó gázégõt tele kör jelzi. A fõzõlap tetszõleges gázégõjének meggyújtása: 1. közelítsen egy gyufát vagy gázgyújtót a gázégõhöz; 2. nyomja be, és ezzel egyidejûleg csavarja a GÁZÉGÕ
Страница 62 из 69 H U ! A sütõ biztonsági szerkezettel rendelkezik, melynek bekapcsolásához a SÜTÕ tekerõgombot legalább 6 másodpercig lenyomva kell tartani. D ! Abban az esetben, ha a láng véletlenül kialudna, zárja el a gázégõt, és mielõtt a sütõt újra begyújtaná, várjon 1 percet! A hõmérséklet beállítása A kívánt
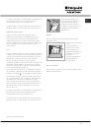
Страница 64 из 69 Analóg percszámláló Percszámláló funkció H U A percszámláló üzemmódban a számláló a beállított idõbõl visszafele számlál. Ez a funkció nem vezérli a sütõ be-, illetve kikapcsolását, a beállított idõ leteltekor csak hangjelzést ad ki. Az óra és a percszámláló beállítása A sütõt elektromosan be kell
Страница 65 из 69 Óvintézkedések és tanácsok ! A készülék a nemzetközi biztonsági szabványokkal összhangban lett tervezve és gyártva. Ezen figyelmeztetéseket biztonsági megfontolásból közöljük, kérjük olvassa el õket figyelmesen! Általános biztonság A készüléket otthoni, háztartási használtra szánták. A sütõ nem
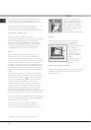
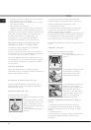
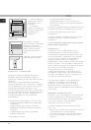
Страница 66 из 69 Karbantartás és ápolás H U Áramtalanítás A sütõt megvilágító lámpa kicserélése Minden mûvelet elõtt áramtalanítsa a készüléket! 1. A sütõ áramtalanítása után húzza le a lámpafoglalat üvegfedelét (lásd ábra)! 2. Csavarja ki a lámpát és cserélje ki egy ugyanolyanra: feszültség: 230 V, teljesítmény: