Инструкция для HOTPOINT-ARISTON FH 82 C IX

(скачивание инструкции бесплатно)
Формат файла: PDF
Доступность: Бесплатно как и все руководства на сайте. Без регистрации и SMS.
Дополнительно: Чтение инструкции онлайн
background image

20

GB

Installation

!

 Please keep this instruction booklet in a safe place for future reference. If 

the appliance is sold, given away or moved, please make sure the booklet is 

also passed on to the new owners so that they may benefit from the advice 

contained within it.

!

 Please read this instruction manual carefully: it contains important information 

concerning the safe operation, installation and maintenance of the appliance.

Positioning

!

 Do not let children play with the packaging material; it should be disposed 

of in accordance with local separated waste collection standards (see 

Precautions and tips).

!

 The appliance must be installed by a qualified professional in accordance 

with the instructions provided. Incorrect installation may damage property or 

cause harm to people or animals.

Built-in appliances

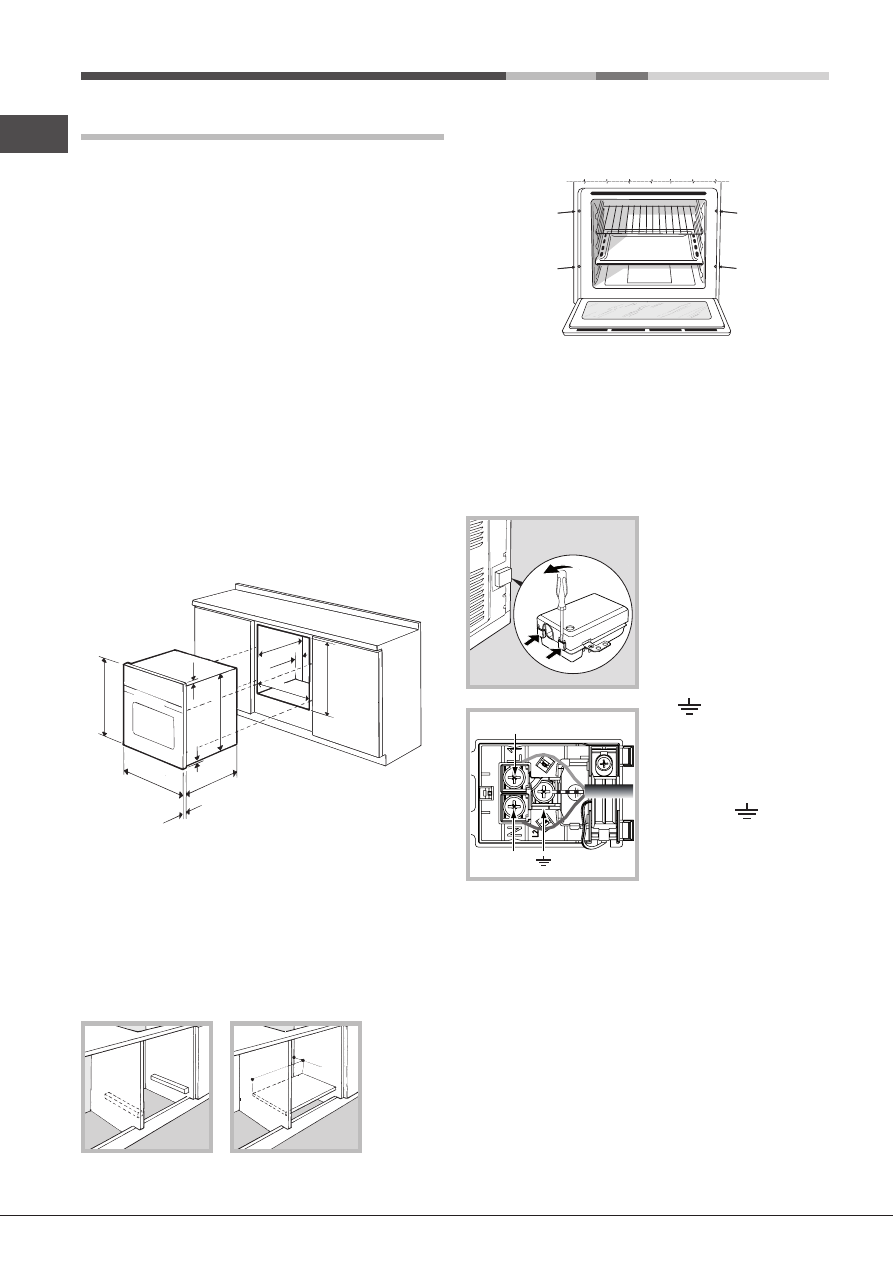
Use an appropriate cabinet to ensure that the appliance operates properly:

•  The panels adjacent to the oven must be made of heat-resistant material.

•  Cabinets with a veneer exterior must be assembled with glues which can 

withstand temperatures of up to 100°C.

•  To install the oven 

under the counter

 (see diagram) or in a 

kitchen unit

the cabinet must have the following dimensions:

595 mm.

595 mm.

25 mm.

545 mm.

5 mm.

567 mm.

23 mm.

575-585 mm.

45 mm.

558 mm.

547 mm. min.

!

 The appliance must not come into contact with electrical parts once it has 

been installed. The indications for consumption given on the data plate have 

been calculated for this type of installation.

Ventilation

To ensure adequate ventilation, the back panel of the cabinet must be 

removed. It is advisable to install the oven so that it rests on two strips of 

wood, or on a completely flat surface with an opening of at least 45 x 560 

mm (see diagrams).


560 mm

.

45 mm.

Centring and fixing

Secure the appliance to the cabinet by opening the oven door and inserting 

4 screws into the 4 holes on the outer frame.

!

 All parts which ensure the safe operation of the appliance must not be 

removable without the aid of a tool.

Electrical connection

Ovens equipped with a three-pole power supply cable are designed to operate 

with alternating current at the voltage and frequency indicated on the data 

plate located on the appliance (see below).

Fitting the power supply cable

1. Open the terminal board by 

inserting a screwdriver into the side 

tabs of the cover. Use the screwdriver 

as a lever by pushing it down to open 

the cover (see diagram).

2. Install the power supply cable by 

loosening the cable clamp screw 

and the three wire contact screws  
L-N-

.

Connect the wires to the 

corresponding terminals: the Blue 

wire to the terminal marked (N), the 

Brown wire to the terminal marked 

(L) and the Yellow/Green wire to the 
terminal marked 

 (see diagram).

3. Secure the cable by fastening the 

clamp screw.

4. Close the cover of the terminal 

board.

Connecting the supply cable to the mains

Install a standardised plug corresponding to the load indicated on the data 

plate (see table). 

The appliance must be directly connected to the mains using an omnipolar 

switch with a minimum contact opening of 3 mm installed between the 

appliance and the mains.  The switch must be suitable for the charge indicated 

and must comply with current electrical regulations (the earthing wire must not 

be interrupted by the switch). The supply cable must be positioned so that it 

does not come into contact with temperatures higher than 50°C at any point 

(the back panel of the oven, for example).

!

 The installer must ensure that the correct electrical connection has been 

performed and that it is fully compliant with safety regulations.

N

L

1
2
3
4
5
6
7
8
9
10
11
12
13
14
15
16
17
18
19
20
21
22
23
24
25
26
27
28
29
30
31
32
33
34
35
36
37
38
39
40
41
42
43
44
45
46
47
48
49
50
51
52
53
54
55
56
57
58
59
60
61
62
63
64
65
66
67
68
Оглавление инструкции
  • Страница 1 из 69
    FH 82 C IX/HA S Français Mode d’emploi FOUR Sommaire Mode d’emploi,1 Avertissements,4 Assistance,7 Description de l’appareil,9 Description de l’appareil,11 Installation,27 Mise en marche et utilisation,29 Programmes,29 Précautions et conseils,32 Nettoyage et entretien,33 Italiano Español Istruzioni
  • Страница 2 из 69
    Deutsch Bedienungsanleitung BACKOFEN Inhaltsverzeichnis Bedienungsanleitung,2 Hinweise,5 Kundendienst,8 Beschreibung Ihres Gerätes,10 Beschreibung Ihres Gerätes,12 Installation,48 Inbetriebsetzung und Gebrauch,50 Programme,50 Vorsichtsmaßregeln und Hinweise,53 Reinigung und Pflege,54 Nederlands
  • Страница 3 из 69
    Avvertenze Warnings ATTENZIONE: Questo apparecchio e le sue parti accessibili diventano molto caldi durante l’uso. Bisogna fare attenzione ed evitare di toccare gli elementi riscaldanti. Tenere lontani i bambini inferiori agli 8 anni se non continuamente sorvegliati. Il presente apparecchio può
  • Страница 4 из 69
    Avertissements Advertencias ATTENTION : Cet appareil ainsi que ses parties accessibles deviennent très chauds pendant leur fonctionnement. Il faut faire attention à ne pas toucher les éléments chauffants. Ne pas faire approcher les enfants de moins de 8 ans à moins qu’ils ne soient sous
  • Страница 5 из 69
    Advertências Hinweise ATENÇÃO: Este aparelho e as suas partes acessíveis aquecem muito durante a utilização. É preciso ter atenção e evitar tocar os elementos que aquecem. Manter afastadas as crianças com menos de 8 anos, caso não estejam a ser vigiadas. O presente aparelho pode ser utilizado por
  • Страница 6 из 69
    Belangrijk Предупреждения PAS OP: Dit apparaat en zijn bereikbare onderdelen worden tijdens gebruik zeer heet. Zorg ervoor de verwarmende elementen niet aan te raken. Zorg ervoor dat kinderen die kleiner dan 8 jaar oud zijn niet dichtbij het apparaat kunnen komen, tenzij onder constant toezicht.
  • Страница 7 из 69
    Assistenza Assistance ! Non ricorrere mai a tecnici non autorizzati. ! Never use the services of an unauthorised technician. Comunicare: • Il tipo di anomalia; • Il modello della macchina (Mod.) • Il numero di serie (S/N) Queste ultime informazioni si trovano sulla targhetta caratteristiche posta
  • Страница 8 из 69
    En el SAT encontrará recambios, accesorios y productos específicos para la limpieza y mantenimiento de su electrodoméstico a precios competitivos. ESTAMOS A SU SERVICIO Сервисное обслуживание ! Никогда не обращайтесь к неуполномоченным техникам. Assistência ! Nunca recorra a técnicos não
  • Страница 9 из 69
    Descrizione dell’apparecchio Descripción del aparato Vista d’insieme Vista en conjunto 1 2 3 4 5 6 7 8 9 1 2 3 4 5 6 7 8 9 POSIZIONE 1 POSIZIONE 2 POSIZIONE 3 POSIZIONE 4 POSIZIONE 5 GUIDE di scorrimento dei ripiani Ripiano LECCARDA Ripiano GRIGLIA Pannello di controllo POSICIÓN 1 POSICIÓN 2
  • Страница 10 из 69
    Beschreibung Ihres Gerätes Geräteansicht 1 2 3 4 5 6 7 8 9 EINSCHUBHÖHE 1 EINSCHUBHÖHE 2 EINSCHUBHÖHE 3 EINSCHUBHÖHE 4 EINSCHUBHÖHE 5 GLEITFÜHRUNGEN für die Einschübe Einschub FETTPFANNE Einschub BACKOFENROST Bedienfeld Beschrijving van het apparaat Algemeen aanzicht 1 2 3 4 5 6 7 8 9 POSITIE 1
  • Страница 11 из 69
    Descrizione dell’apparecchio Pannello di controllo 1 2 3 4 Spia TERMOSTATO Manopola PROGRAMMI Manopola TERMOSTATO Manopola TIMER DI FINE COTTURA . Description of the appliance Control panel 1 2 3 4 THERMOSTAT indicator light SELECTOR knob THERMOSTAT knob COOKING TIMER knob Description de l’appareil
  • Страница 12 из 69
    Descrição do aparelho Painel de comandos 1 2 3 4 Indicador luminoso TERMOSTATO Selector PROGRAMAS Selector do TERMÓSTATO Botão TIMER DE FIM DE COZEDURA Beschreibung Ihres Gerätes Bedienfeld 1 2 3 4 Kontrollleuchte THERMOSTAT Drehknopf PROGRAMME Drehknopf THERMOSTAT Drehknopf TIMER ZUR EINSTELLUNG
  • Страница 13 из 69
    Installazione ! È importante conservare questo libretto per poterlo consultare in ogni momento. In caso di vendita, di cessione o di trasloco, assicurarsi che resti insieme all’apparecchio per informare il nuovo proprietario sul funzionamento e sui relativi avvertimenti. Centraggio e fissaggio Per
  • Страница 14 из 69
    IT Prima di effettuare l’allacciamento accertarsi che: • la presa abbia la messa a terra e sia a norma di legge; • la presa sia in grado di sopportare il carico massimo di potenza della macchina, indicato nella targhetta caratteristiche (vedi sotto); • la tensione di alimentazione sia compresa nei
  • Страница 15 из 69
    Avvio e utilizzo Programmi ATTENZIONE ! Il forno è dotato di un sistema di arresto griglie che consente di estrarle senza che queste fuoriescano dal forno. (1) Per estrarre completamente le griglie è sufficiente, come indicato sul disegno, alzarle, prendendole dalla parte anteriore e tirarle. (2) !
  • Страница 16 из 69
    IT Consigli pratici di cottura ! Nelle cotture ventilate non utilizzare le posizioni dei ripiani 1 e 5: sono investite direttamente dall’aria calda, che potrebbe provocare bruciature sui cibi delicati. ! Nelle cotture BARBECUE e GRATIN, disporre la leccarda in posizione 1 per raccogliere i residui
  • Страница 17 из 69
    Tabella cottura Programmi Alimenti Peso (Kg) Posizione dei ripiani Preriscaldamento (minuti) Temperatura consigliata Durata cottura (minuti) 1 1 1 1 2 2 2 2 2 15 15 15 15 15 200 200 200 180 180 65-75 70-75 70-80 15-20 30-35 Crostate Torta di frutta Plum-cake Pan di spagna Crêpes farcite (su 2
  • Страница 18 из 69
    IT Precauzioni e consigli ! L’apparecchio è stato progettato e costruito in conformità alle norme internazionali di sicurezza. Queste avvertenze sono fornite per ragioni di sicurezza e devono essere lette attentamente. Sicurezza generale • L’apparecchio è stato concepito per un uso di tipo non
  • Страница 19 из 69
    Manutenzione e cura Escludere la corrente elettrica Prima di ogni operazione isolare l’apparecchio dalla rete di alimentazione elettrica. Pulire l’apparecchio • Le parti esterne smaltate o inox e le guarnizioni in gomma possono essere pulite con una spugnetta imbevuta di acqua tiepida, e sapone
  • Страница 20 из 69
    Installation ! Please keep this instruction booklet in a safe place for future reference. If the appliance is sold, given away or moved, please make sure the booklet is also passed on to the new owners so that they may benefit from the advice contained within it. Centring and fixing Secure the
  • Страница 21 из 69
    Before connecting the appliance to the power supply, make sure that • The appliance is earthed and the plug is compliant with the law. • The socket can withstand the maximum power of the appliance, which is indicated on the data plate. • The voltage is in the range between the values indicated on
  • Страница 22 из 69
    GB Start-up and use Cooking modes WARNING! The oven is provided with a stop system to extract the racks and prevent them from coming out of the oven (1). As shown in the drawing, to extract them completely, simply lift the racks, holding them on the front part, and pull (2). ! The first time you
  • Страница 23 из 69
    Practical cooking advice GB ! Do not place racks in position 1 and 5 during fan-assisted cooking. This is because excessive direct heat can burn temperature sensitive foods. ! In the BARBECUE and GRATIN cooking modes, particularly when using the rotisserie spit, place the dripping pan in position 1
  • Страница 24 из 69
    GB Cooking advice table Cooking modes Foods Leavening process of dough made with yeast or baking powder (brioches, bread, sugar pie, croissants, etc.) Duck Traditional Roast veal or beef Pork roast Oven Biscuits (short pastry) Tarts Tarts Fruit cakes Plum cake Sponge cake Baking Stuffed pancakes
  • Страница 25 из 69
    Precautions and tips ! This appliance has been designed and manufactured in compliance with international safety standards. The following warnings are provided for safety reasons and must be read carefully. General safety • The appliance was designed for domestic use inside the home and is not
  • Страница 26 из 69
    GB Maintenance and care Switching the appliance off Disconnect your appliance from the electricity supply before carrying out any work on it. Cleaning the appliance • The stainless steel or enamel-coated external parts and the rubber seals may be cleaned using a sponge that has been soaked in
  • Страница 27 из 69
    Installation ! Conservez ce mode d’emploi pour pouvoir le consulter à tout moment. En cas de vente, de cession ou de déménagement, veillez à ce qu’il suive l’appareil pour informer le nouveau propriétaire sur son fonctionnement et lui fournir les conseils correspondants. Centrage et fixation Pour
  • Страница 28 из 69
    FR Avant de procéder au branchement, assurez-vous que : • la prise est bien munie d’une terre conforme à la loi; • la prise est bien apte à supporter la puissance maximale de l’appareil, indiquée sur la plaquette signalétique; • la tension d’alimentation est bien comprise entre les valeurs
  • Страница 29 из 69
    Mise en marche et utilisation ATTENTION ! Le four est équipé d’un système d’arrêts de grilles qui permet de les retirer sans que ces dernières sortent entièrement du four (1). Pour sortir complètement les grilles il suffit, comme illustré, de les soulever en les saisissant par l’avant et de les
  • Страница 30 из 69
    FR Conseils de cuisson ! Pour les cuissons ventilées ne pas utiliser les gradins 1et 5: ils sont directement frappés par l’air chaud qui pourrait brûler les mets délicats. ! Pour les cuissons BARBECUE et GRATIN, notamment au tournebroche, placer la lèchefrite au gradin 1 pour récupérer les graisses
  • Страница 31 из 69
    Tableau de cuisson Programmes Aliments Poids (Kg) Levage de pâtes à base de levure de boulanger (brioches, pain, tarte au sucre, croissants, etc.) Canard 1 Rôti de veau ou de bœuf 1 Four Rôti de porc 1 Tradition Biscuits (pâte brisée) Tartes 1 Tartes 0.5 Tarte aux fruits 1 Plum-cake 0.7 Génoise 0.5
  • Страница 32 из 69
    FR Précautions et conseils ! Cet appareil a été conçu et fabriqué conformément aux normes internationales de sécurité. Ces conseils sont fournis pour des raisons de sécurité et doivent être lus attentivement. Sécurité générale • Cet appareil a été conçu pour un usage familial, de type non
  • Страница 33 из 69
    Nettoyage et entretien Mise hors tension Avant toute opération de nettoyage ou d’entretien coupez l’alimentation électrique de l’appareil. Nettoyage de l’appareil • Nettoyer l’extérieur émaillé ou inox et les joints en caoutchouc à l’aide d’une éponge imbibée d’eau tiède additionnée de savon neutre
  • Страница 34 из 69
    Instalación ! Es importante conservar este manual para poder consultarlo en todo momento. En caso de venta, de cesión o de mudanza, verifique que permanezca junto al aparato para informar al nuevo propietario sobre su funcionamiento y sobre las advertencias correspondientes. ! Lea atentamente las
  • Страница 35 из 69
    aparato y la red, un interruptor omnipolar con una distancia mínima entre los contactos de 3 mm., dimensionado para esa carga y que responda a las normas vigentes (el cable a tierra no debe ser interrumpido por el interruptor). El cable de alimentación eléctrica se debe colocar de modo tal que no
  • Страница 36 из 69
    ES Puesta en funcionamiento y uso ATENCIÓN! El horno está dotado de un sistema de bloqueo de las parrillas que permite quitarlas sin que sobresalgan del horno (1).Para quitar completamente las parrillas, como se indica en el dibujo, es suficiente levantarlas cogiéndolas de la parte delantera y
  • Страница 37 из 69
    ES / Programa GRATIN Se enciende el elemento calentador superior y se ponen en funcionamiento el ventilador y el asador automático (cuando existe). Une a la irradiación térmica unidireccional, la circulación forzada del aire en el interior del horno. Esto impide que se quemen superficialmente los
  • Страница 38 из 69
    ES Tabla de cocción Programas Alimentos Leudado de los amasijos con levadura natural (brioche, pan, torta de azúcar, croissant, etc. Pato Asado de ternera o de vaca Horno Asado de cerdo Tradiciónal Bizcochos (de pastaflora) Tortas glaseadas Tortas glaseadas Torta de fruta Plum-cake Bizcocho Creps
  • Страница 39 из 69
    Precauciones y consejos ! El aparato ha sido proyectado y fabricado en conformidad con las normas internacionales de seguridad. Estas advertencias se suministran por razones de seguridad y deben ser leídas atentamente. Seguridad general • El aparato ha sido fabricado para un uso de tipo no
  • Страница 40 из 69
    ES Mantenimiento y cuidados Cortar la corriente eléctrica Antes de realizar cualquier operación, desconecte el aparato de la red de alimentación eléctrica. Limpiar el aparato • Las partes externas esmaltadas o de acero inoxidable y las juntas de goma se pueden limpiar con una esponja empapada en
  • Страница 41 из 69
    Instalação ! É importante guardar este folheto para poder consultá-lo a qualquer momento. No caso de venda, cessão ou mudança, assegure-se que o mesmo permanece com o aparelho para informar o novo proprietário sobre o funcionamento e sobre as respectivas advertências. ! Leia com atenção as
  • Страница 42 из 69
    PT Antes de efectuar a ligação, certifique-se que: • a tomada tenha uma ligação à terra e seja em conformidade com a legislação; • a tomada tenha a capacidade de suportar a carga máxima de potência da máquina, indicada na placa de identificação; • a tensão de alimentação seja entre os valores da
  • Страница 43 из 69
    Início e utilização ! Para utilizar o forno com funcionamento manual, ou seja com o timer de fim de cozedura desactivado, é necessário rodar o botão TIMER DE FIM DE ATENÇÃO! O forno está equipado com um sistema de bloqueio das grelhas que permite retirá-las sem que estas ressaiam do forno (1).Para
  • Страница 44 из 69
    PT / Programa de GRATIN Activa-se o elemento aquecedor superior e começam a funcionar a ventoinha e o espeto rotatório (se houver). Une a irradiação térmica unidirecional com a circulação forçada do ar no interior do forno. Deste modo impede-se a queimadura da superfície dos alimentos ao
  • Страница 45 из 69
    Tabela de cozedura Programmas Levitação Forno Tradicional Forno para Pastéis Cozinha Rápida Cozedura Múltipla Forno para Pizza Barbecue Gratinado Alimentos Fermentação das massas com lêvedo natural (bolos, pão, tortas doces, croissant etc.) Pato Carne de vitela ou vaca assada Carne de porco assada
  • Страница 46 из 69
    PT Precauções e conselhos ! Este aparelho foi projectado e fabricado em conformidade com as normas internacionais de segurança. Estas advertências são fornecidas por razões de segurança e devem ser lidas com atenção. Segurança geral • Este aparelho foi concebido para utilização de tipo não
  • Страница 47 из 69
    Manutenção e cuidados Desligar a corrente eléctrica Antes de realizar qualquer operação, desligue o aparelho da alimentação eléctrica. Limpeza do aparelho • As partes externas esmaltadas ou inoxidáveis e as guarnições de borracha podem ser limpas com uma esponja molhada com água morna e sabão
  • Страница 48 из 69
    Installation ! Bewahren Sie diese Bedienungsanleitung bitte sorgfältig auf, damit Sie sie jederzeit zu Rate ziehen können. Sorgen Sie dafür, dass sie im Falle eines Verkaufs, eines Umzugs oder einer Übergabe an einen anderen Benutzer das Gerät stets begleitet, damit auch der Nachbesitzer die
  • Страница 49 из 69
    Vor dem Anschluss stellen Sie bitte sicher, dass: • die Steckdose geerdet ist und den gesetzlichen Bestimmungen entspricht; • die Netzsteckdose für die auf dem Typenschild angegebene maximale Leistungsaufnahme des Gerätes ausgelegt ist; • die Netzspannung im Bereich der auf dem Typenschild
  • Страница 50 из 69
    DE Inbetriebsetzung und Gebrauch 4. Bei abgeschaltetem Backofen kann der TIMER ZUR EINSTELLUNG DES GARZEITENDES als normaler Kurzzeitwecker eingesetzt werden. ACHTUNG! Der Ofen ist mit einem Arretierungssystem der Roste ausgestattet. Damit lassen diese sich ausziehen, ohne aus dem Ofen
  • Страница 51 из 69
    DE / Programm GRILL Das obere Heizelement schaltet sich ein, und der Bratspieß (falls vorhanden) wird in Betrieb gesetzt. Die sehr hohe Temperatur und die direkt auf das Grillgut gerichtete Hitze empfiehlt sich für Lebensmittel, die zur optimalen Garung einer hohen Temperatur auf der Oberseite
  • Страница 52 из 69
    DE Tabelle der Garzeiten Programme Speisen HefeteigFunktion Hefeteig gehen lassen (Brioche, Brot, süße Kuchen, Croissants usw.) Ente Kalbs- oder Rinderbraten Standard Schweinebraten Plus Gebäck Torten Torten Obstkuchen Plum Cake Biskuitböden Gefüllte Crêpes (auf 2 Ebenen) Kleingebäck (auf 2 Ebenen)
  • Страница 53 из 69
    Vorsichtsmaßregeln und Hinweise ! Das Gerät wurde entsprechend den strengsten internationalen Sicherheitsvorschriften entworfen und gebaut. Nachstehende Hinweise werden aus Sicherheitsgründen geliefert und sollten aufmerksam gelesen werden. Allgemeine Sicherheit • Dieses Gerät ist für den nicht
  • Страница 54 из 69
    DE Reinigung und Pflege Abschalten Ihres Gerätes vom Stromnetz Vor jeder Reinigung und Pflege ist das Gerät vom Stromnetz zu trennen. Reinigung Ihres Gerätes • Die emaillierten oder aus Edelstahl gefertigten Außenteile des Gerätes sowie die Gummidichtungen können mit einem mit lauwarmem Wasser und
  • Страница 55 из 69
    Het installeren ! Bewaar dit boekje zorgvuldig voor eventuele verdere raadpleging. Wanneer u het product weggeeft, verkoopt, of wanneer u verhuist, dient u dit boekje bij het apparaat te bewaren zodat alle nodige informatie voorhanden blijft. Centreren en bevestigen Om het apparaat aan het
  • Страница 56 из 69
    NL Voor het aansluiten moet u controleren dat: • het stopcontact geaard is en voldoet aan de geldende normen; • het stopcontact in staat is het maximale vermogen van het apparaat te dragen, zoals aangegeven op het typeplaatje; • de spanning zich bevindt tussen de waarden die staan aangegeven op het
  • Страница 57 из 69
    Starten en gebruik Programma’s BELANGRIJK! De oven is uitgerust met een blokkeringssysteem voor de grill dat het mogelijk maakt om de gril naar buiten te trekken zonder dat deze buiten de oven komt (1). Om de grill volledig te verwijderen, de grill aan de voorkant optillen en naar buiten trekken,
  • Страница 58 из 69
    NL Praktische kooktips ! Gebruik voor het koken met de heteluchtoven nooit de standen 1 en 5: in deze standen zou de hete lucht de fijne gerechten kunnen verbranden. ! Bij de functies BARBECUE of GRATINEREN, in het bijzonder wanneer u het draaispit gebruikt, raden wij u aan de lekplaat op stand 1
  • Страница 59 из 69
    Kooktabel Programma's Rijzen Traditionele Oven Gebak Oven Fast cooking Multikoken Pizza oven Barbecue Gratineren Gerechten Rijzen van deeg met bakkersgist (brioches, brood, suikertaart, croissants, enz.) Eend Braadstuk Varkensrollade Koekjes (kruimeldeeg) Vruchtentaart Taarten Vruchtentaart
  • Страница 60 из 69
    NL Voorzorgsmaatregelen en advies ! Dit apparaat is ontworpen en vervaardigd volgens de geldende internationale veiligheidsvoorschriften. Deze aanwijzingen zijn geschreven voor uw veiligheid en u dient ze derhalve goed door te nemen. Algemene veiligheidsmaatregelen • Dit apparaat is vervaardigd
  • Страница 61 из 69
    Onderhoud en verzorging De elektrische stroom afsluiten Sluit altijd eerst de stroom af voordat u tot enige handeling overgaat. Schoonmaken van het apparaat • De buitenkant, dus zowel het email en het roestvrij staal als de rubberen afdichtingen, kunnen met een spons en een neutrale zeep worden
  • Страница 62 из 69
    Установка ! Важно сохранить данное руководство для его последующих консультации. В случае продажи, передачи изделия или при переезде на новое место жительства необходимо проверить, чтобы руководство оставалось вместе с изделием, для того чтобы его новыи владелец мог ознакомиться с правилами
  • Страница 63 из 69
    Подсоединение сетевого шнура изделия к сети электропитания Установите на сетевой кабель нормализованную штепсельную вилку, расчитанную на нагрузку, указанную на паспортной табличке (см. сбоку). В случае прямого подключения к сети электропитания между изделием и сетью необходимо установить
  • Страница 64 из 69
    RU Включение и эксплуатация 4. Когда духовой шкаф выключен, таймер программирования окончания приготовления может быть использован в качестве обычного таймера. ВНИМАНИЕ! Духовой шкаф у к о м п л е к то ва н с и с те м о й блокировки решеток, позволяющей вынимать их из духовки не полностью (1). Для
  • Страница 65 из 69
    RU / Программа ГРИЛЬ Включается верхний нагревательный элемент и вертел (если он имеется). Высокая температура и жар прямого действия гриля рекомендуется для приготовления продуктов, нуждающихся в высокой поверхностной температуре. Готовьте блюда с закрытой дверцей духового шкафа. / Программа
  • Страница 66 из 69
    RU Таблица приготовления Программы Расстойка Традициональная духовка Кондитерская выпечка Быстрое приготовление Одновременное приготовление Пицца ГРИЛЬ Gratin (Подрумянивание) 66 Продукты Расстойка дрожжевого теста (булочки, хлеб, торты, круассаны и т.д.) Утка Жаркое из телятины или говядины Жаркое
  • Страница 67 из 69
    Предосторожности и рекомендации ! Изделие спроектировано и изготовлено в соответствии с международными нормативами по безопасности. Необходимо внимательно прочитать настоящие предупреждения, составленные в целях вашеи безопасности. Общие требования к безопасности • Данное изделие предназначается
  • Страница 68 из 69
    195120147.00 12/2013 - XEROX FABRIANO RU Техническое обслуживание и уход Отключение электропитания Перед началом какой-либо операции по обслуживанию или чистке отсоедините изделие от сети электропитания. Чистка изделия • Наружные эмалированные элементы или детали из нержавеющей стали, а также
  • Страница 69 из 69