Инструкция для HOTPOINT-ARISTON FHR 540

(скачивание инструкции бесплатно)
Формат файла: PDF
Доступность: Бесплатно как и все руководства на сайте. Без регистрации и SMS.
Дополнительно: Чтение инструкции онлайн
background image

18

GB

Installation

!

 Please keep this instruction booklet in a safe place for future reference. If 

the appliance is sold, given away or moved, please make sure the booklet is 

also passed on to the new owners so that they may benefit from the advice 

contained within it.

!

 Please read this instruction manual carefully: it contains important information 

concerning the safe operation, installation and maintenance of the appliance.

Positioning

!

 Do not let children play with the packaging material; it should be disposed 

of in accordance with local separated waste collection standards (see 

Precautions and tips).

!

 The appliance must be installed by a qualified professional in accordance 

with the instructions provided. Incorrect installation may damage property or 

cause harm to people or animals.

Built-in appliances

Use an appropriate cabinet to ensure that the appliance operates properly:

•  The panels adjacent to the oven must be made of heat-resistant material.

•  Cabinets with a veneer exterior must be assembled with glues which can 

withstand temperatures of up to 100°C.

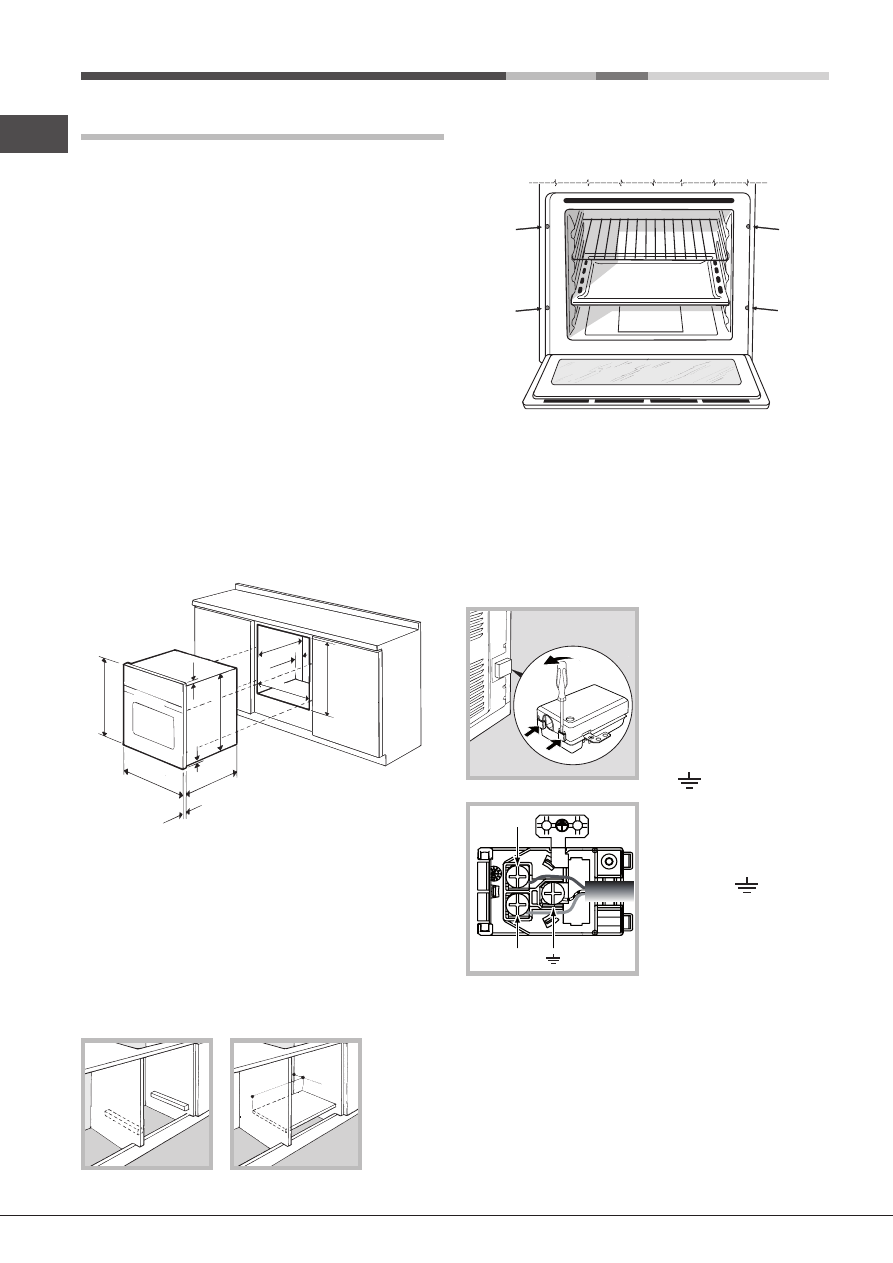
•  To install the oven 

under the counter

 (see diagram) or in a 

kitchen unit

the cabinet must have the following dimensions:

595 mm.

595 mm.

25 mm.

545 mm.

5 mm.

567 mm.

23 mm.

575-585 mm.

45 mm.

558 mm.

547 mm. min.

!

 The appliance must not come into contact with electrical parts once it has 

been installed. 

The indications for consumption given on the data plate have been calculated 

for this type of installation.

Ventilation

To ensure adequate ventilation, the back panel of the cabinet must be 

removed. It is advisable to install the oven so that it rests on two strips of 

wood, or on a completely flat surface with an opening of at least 45 x 560 

mm (see diagrams).


560 mm

.

45 mm.

Centring and fixing

Secure the appliance to the cabinet by opening the oven door and inserting 

4 screws into the 4 holes on the outer frame.

!

 All parts which ensure the safe operation of the appliance must not be 

removable without the aid of a tool.

Electrical connection

Ovens equipped with a three-pole power supply cable are designed to operate 

with alternating current at the voltage and frequency indicated on the data 

plate located on the appliance (see below).

Fitting the power supply cable

1. Open the terminal board by 

inserting a screwdriver into the side 

tabs of the cover. Use the screwdriver 

as a lever by pushing it down to open 

the cover (see diagram).

2. Install the power supply cable by 

loosening the cable clamp screw 

and the three wire contact screws  
L-N-

.

Connect the wires to the 

corresponding terminals: the Blue 

wire to the terminal marked (N), the 

Brown wire to the terminal marked 

(L) and the Yellow/Green wire to the 
terminal marked 

 (see diagram).

3. Secure the cable by fastening the 

clamp screw.

4. Close the cover of the terminal 

board.

Connecting the supply cable to the mains

Install a standardised plug corresponding to the load indicated on the data 

plate (see table). 

The appliance must be directly connected to the mains using an omnipolar 

switch with a minimum contact opening of 3 mm installed between the 

appliance and the mains.  The switch must be suitable for the charge indicated 

and must comply with current electrical regulations (the earthing wire must not 

be interrupted by the switch). The supply cable must be positioned so that it 

does not come into contact with temperatures higher than 50°C at any point 

(the back panel of the oven, for example).

L

N

N

L

1
2
3
4
5
6
7
8
9
10
11
12
13
14
15
16
17
18
19
20
21
22
23
24
25
26
27
28
29
30
31
32
33
34
35
36
37
38
39
40
41
42
43
44
45
46
47
48
49
50
51
52
53
54
55
56
Оглавление инструкции
  • Страница 1 из 57
    FHR 540 (AN)/HA S Français Mode d’emploi FOUR Sommaire Mode d’emploi,1 Avertissements,4 Assistance,7 Description de l’appareil,9 Description de l’appareil,11 Installation,24 Mise en marche et utilisation,26 Programmes,26 Précautions et conseils,28 Nettoyage et entretien,28 Italiano Español
  • Страница 2 из 57
    Deutsch Bedienungsanleitung BACKOFEN Inhaltsverzeichnis Bedienungsanleitung,2 Hinweise,5 Kundendienst,8 Beschreibung Ihres Gerätes,10 Beschreibung Ihres Gerätes,11 Installation,42 Inbetriebsetzung und Gebrauch,44 Programme,44 Vorsichtsmaßregeln und Hinweise,46 Reinigung und Pflege,46 Русскии
  • Страница 3 из 57
    Avvertenze Warnings ATTENZIONE: Questo apparecchio e le sue parti accessibili diventano molto caldi durante l’uso. Bisogna fare attenzione ed evitare di toccare gli elementi riscaldanti. Tenere lontani i bambini inferiori agli 8 anni se non continuamente sorvegliati. Il presente apparecchio può
  • Страница 4 из 57
    Avertissements Advertencias ATTENTION : Cet appareil ainsi que ses parties accessibles deviennent très chauds pendant leur fonctionnement. Il faut faire attention à ne pas toucher les éléments chauffants. Ne pas faire approcher les enfants de moins de 8 ans à moins qu’ils ne soient sous
  • Страница 5 из 57
    Advertências Hinweise ATENÇÃO: Este aparelho e as suas partes acessíveis aquecem muito durante a utilização. É preciso ter atenção e evitar tocar os elementos que aquecem. Manter afastadas as crianças com menos de 8 anos, caso não estejam a ser vigiadas. O presente aparelho pode ser utilizado por
  • Страница 6 из 57
    Предупреждения ВНИМАНИЕ: Данное изделие и его доступные комплектующие сильно нагреваются в процессе эксплуатации. Будьте осторожны и не касайтесь нагревательных элементов. Не разрешайте детям младше 8 лет приближаться к изделию без контроля. Данное изделие может быть использовано детьми старше 8
  • Страница 7 из 57
    Assistenza Assistance ! Non ricorrere mai a tecnici non autorizzati. ! Never use the services of an unauthorised technician. Comunicare: • Il tipo di anomalia; • Il modello della macchina (Mod.) • Il numero di serie (S/N) Queste ultime informazioni si trovano sulla targhetta caratteristiche posta
  • Страница 8 из 57
    En el SAT encontrará recambios, accesorios y productos específicos para la limpieza y mantenimiento de su electrodoméstico a precios competitivos. ESTAMOS A SU SERVICIO Assistência ! Nunca recorra a técnicos não autorizados. Comunique: • o tipo de avaria; • o modelo da máquina (Mod.); • o número de
  • Страница 9 из 57
    Descrizione dell’apparecchio Descripción del aparato Vista d’insieme Vista en conjunto 1 2 3 4 5 6 7 8 9 1 2 3 4 5 6 7 8 9 POSIZIONE 1 POSIZIONE 2 POSIZIONE 3 POSIZIONE 4 POSIZIONE 5 GUIDE di scorrimento dei ripiani Ripiano LECCARDA Ripiano GRIGLIA Pannello di controllo POSICIÓN 1 POSICIÓN 2
  • Страница 10 из 57
    Beschreibung Ihres Gerätes Geräteansicht 1 2 3 4 5 6 7 8 9 EINSCHUBHÖHE 1 EINSCHUBHÖHE 2 EINSCHUBHÖHE 3 EINSCHUBHÖHE 4 EINSCHUBHÖHE 5 GLEITFÜHRUNGEN für die Einschübe Einschub FETTPFANNE Einschub BACKOFENROST Bedienfeld Описание изделия Общии вид 1 2 3 4 5 6 7 8 9 ПОЛОЖЕНИЕ 1 ПОЛОЖЕНИЕ 2 ПОЛОЖЕНИЕ
  • Страница 11 из 57
    Descrizione dell’apparecchio Descrição do aparelho Pannello di controllo Painel de comandos 1 2 3 4 1 2 4 5 Spia TERMOSTATO Manopola TERMOSTATO Manopola PROGRAMMI Manopola TIMER RUSTICO Indicador luminoso TERMOSTATO Selector do TERMÓSTATO Selector PROGRAMAS Selector do TIMER RÚSTICO Description of
  • Страница 12 из 57
    Installazione ! È importante conservare questo libretto per poterlo consultare in ogni momento. In caso di vendita, di cessione o di trasloco, assicurarsi che resti insieme all’apparecchio per informare il nuovo proprietario sul funzionamento e sui relativi avvertimenti. Centraggio e fissaggio Per
  • Страница 13 из 57
    ! L’installatore è responsabile del corretto collegamento elettrico e dell’osservanza delle norme di sicurezza. Prima di effettuare l’allacciamento accertarsi che: • la presa abbia la messa a terra e sia a norma di legge; • la presa sia in grado di sopportare il carico massimo di potenza della
  • Страница 14 из 57
    IT Avvio e utilizzo ATTENZIONE ! Il forno è dotato di un sistema di arresto griglie che consente di estrarle senza che queste fuoriescano dal forno. (1) Per estrarre completamente le griglie è sufficiente, come indicato sul disegno, alzarle, prendendole dalla parte anteriore e tirarle. (2) ! Alla
  • Страница 15 из 57
    ostacolando la fuoriuscita dei liquidi, li mantiene più teneri internamente. La cottura al grill è particolarmente consigliata per quei piatti che necessitano di elevata temperatura superficiale: bistecche di vitello e manzo, entrecôte, filetto, hamburger etc... Alcuni esempi di utilizzo sono
  • Страница 16 из 57
    IT Precauzioni e consigli ! L’apparecchio è stato progettato e costruito in conformità alle norme internazionali di sicurezza. Queste avvertenze sono fornite per ragioni di sicurezza e devono essere lette attentamente. Sicurezza generale • L’apparecchio è stato concepito per un uso di tipo non
  • Страница 17 из 57
    Rimontare la porta seguendo il procedimento in senso contrario. IT Controllare le guarnizioni Controllare periodicamente lo stato della guarnizione attorno alla porta del forno. In caso risulti danneggiata rivolgersi al Centro Assistenza più vicino (vedi Assistenza). È consigliabile non usare il
  • Страница 18 из 57
    Installation ! Please keep this instruction booklet in a safe place for future reference. If the appliance is sold, given away or moved, please make sure the booklet is also passed on to the new owners so that they may benefit from the advice contained within it. Centring and fixing Secure the
  • Страница 19 из 57
    ! The installer must ensure that the correct electrical connection has been performed and that it is fully compliant with safety regulations. APPLIANCE SPECIFICATIONS GB Before connecting the appliance to the power supply, make sure that • The appliance is earthed and the plug is compliant with the
  • Страница 20 из 57
    GB Start-up and use WARNING! The oven is provided with a stop system to extract the racks and prevent them from coming out of the oven (1). As shown in the drawing, to extract them completely, simply lift the racks, holding them on the front part, and pull (2). ! The first time you use your
  • Страница 21 из 57
    veal, rib steak, filets, hamburgers etc... Some grilling examples are included in the “Practical Cooking Advice” paragraph. Always cook in this mode with the oven door closed. MULTI-COOKING • Use position 2 and 4, placing the food that requires more heat on 2. • Place the dripping pan on the bottom
  • Страница 22 из 57
    GB Precautions and tips ! This appliance has been designed and manufactured in compliance with international safety standards. The following warnings are provided for safety reasons and must be read carefully. General safety • The appliance was designed for domestic use inside the home and is not
  • Страница 23 из 57
    GB Grip the door on the two external sides and close it approximately half way.Pull the door towards you lifting it out of its seat (see diagram). To replace the door, reverse this sequence. Inspecting the seals Check the door seals around the oven regularly. If the seals are damaged, please
  • Страница 24 из 57
    Installation Centrage et fixation ! Conservez ce mode d’emploi pour pouvoir le consulter à tout moment. En cas de vente, de cession ou de déménagement, veillez à ce qu’il suive l’appareil pour informer le nouveau propriétaire sur son fonctionnement et lui fournir les conseils correspondants. Pour
  • Страница 25 из 57
    ! L’installateur est responsable du bon raccordement électrique de l’appareil et du respect des normes de sécurité. Avant de procéder au branchement, assurez-vous que : • la prise est bien munie d’une terre conforme à la loi; • la prise est bien apte à supporter la puissance maximale de l’appareil,
  • Страница 26 из 57
    FR Mise en marche et utilisation ATTENTION ! Le four est équipé d’un système d’arrêts de grilles qui permet de les retirer sans que ces dernières sortent entièrement du four (1). Pour sortir complètement les grilles il suffit, comme illustré, de les soulever en les saisissant par l’avant et de les
  • Страница 27 из 57
    Programme CHALEUR VOÛTE Mise en marche de la résistance de voûte. Cette fonction est conseillée pour parfaire la cuisson des aliments. Conseils de cuisson Programme GRIL Mise en marche de la résistance de voûte. La température élevée et directe du gril permet de saisir l’aliment en surface pour
  • Страница 28 из 57
    FR Précautions et conseils ! Cet appareil a été conçu et fabriqué conformément aux normes internationales de sécurité. Ces conseils sont fournis pour des raisons de sécurité et doivent être lus attentivement. Sécurité générale • Cet appareil a été conçu pour un usage familial, de type non
  • Страница 29 из 57
    FR 3. (Avec contre-porte en verre) saisissez la porte par les côtés, refermez-la lentement mais pas complètement.Tirez la porte vers vous en la dégageant de ses charnières (voir figure). Remonter la porte en refaisant en sens inverse les mêmes opérations. Contrôle des joints Contrôler
  • Страница 30 из 57
    Instalación ! Es importante conservar este manual para poder consultarlo en todo momento. En caso de venta, de cesión o de mudanza, verifique que permanezca junto al aparato para informar al nuevo propietario sobre su funcionamiento y sobre las advertencias correspondientes. ! Lea atentamente las
  • Страница 31 из 57
    Conexión del cable de alimentación eléctrica a la red Instale en el cable un enchufe normalizado para la carga indicada en la placa de características (ver al costado). En el caso de conexión directa a la red, es necesario interponer entre el aparato y la red, un interruptor omnipolar con una
  • Страница 32 из 57
    ES Puesta en funcionamiento y uso ATENCIÓN! El horno está dotado de un sistema de bloqueo de las parrillas que permite quitarlas sin que sobresalgan del horno (1). Para quitar completamente las parrillas, como se indica en el dibujo, es suficiente levantarlas cogiéndolas de la parte delantera y
  • Страница 33 из 57
    Programa HORNO “SUPERIOR” Se enciende el elemento calentador superior. Esta función se puede utilizar para retoques de cocción. Programa GRILL Se enciende el elemento calentador superior. La temperatura muy elevada y directa del asador eléctrico permite el inmediato tostado superficial de los
  • Страница 34 из 57
    ES Precauciones y consejos ! El aparato ha sido proyectado y fabricado en conformidad con las normas internacionales de seguridad. Estas advertencias se suministran por razones de seguridad y deben ser leídas atentamente. Seguridad general • El aparato ha sido fabricado para un uso de tipo no
  • Страница 35 из 57
    ES 3. (Con contrapuerta de vidrio) sujete la puerta de los costados externos y ciérrela lenta pero no completamente.Tire la puerta hacia sí mismo, extrayéndola de las bisagras (ver la figura). Controlar las juntas Controle periódicamente el estado de la junta que rodea la puerta del horno. Si se
  • Страница 36 из 57
    Instalação ! É importante guardar este folheto para poder consultá-lo a qualquer momento. No caso de venda, cessão ou mudança, assegure-se que o mesmo permanece com o aparelho para informar o novo proprietário sobre o funcionamento e sobre as respectivas advertências. ! Leia com atenção as
  • Страница 37 из 57
    Ligação do cabo de fornecimento à rede eléctrica Monte no cabo uma ficha em conformidade com as normas para a carga indicada na placa de identificação (veja ao lado). No caso de uma ligação directa à rede, será necessário interpor, entre o aparelho e a rede, um interruptor omnipolar com abertura
  • Страница 38 из 57
    PT Início e utilização ATENÇÃO! O forno está equipado com um sistema de bloqueio das grelhas que permite retirá-las sem que estas ressaiam do forno (1). Para retirar completamente as grelhas, tal como indicado no desenho, basta levantá-las, segurando-as pela parte da frente, e puxá-las (2). !
  • Страница 39 из 57
    forno, o ar coze e cora os alimentos de maneira uniforme. É possível utilizar até duas prateleiras no máximo contemporaneamente. Programa FORNO DE CIMA Acende-se o elemento aquecedor superior. Esta função pode ser utilizada para retoques na cozedura. Programade GRILL Acende-se o elemento aquecedor
  • Страница 40 из 57
    PT Precauções e conselhos ! Este aparelho foi projectado e fabricado em conformidade com as normas internacionais de segurança. Estas advertências são fornecidas por razões de segurança e devem ser lidas com atenção. Segurança geral • Este aparelho foi concebido para utilização de tipo não
  • Страница 41 из 57
    PT 3. (Com contra-porta de vidro) segure a porta dos dois lados exteriores e feche-a novamente devagar mas não inteiramente; uxe a porta para a frente e retire-a das dobradiças (veja a figura). Vuelva a colocar la puerta siguiendo el mismo procedimiento pero en sentido contrario. Verificação das
  • Страница 42 из 57
    Installation ! Bewahren Sie diese Bedienungsanleitung bitte sorgfältig auf, damit Sie sie jederzeit zu Rate ziehen können. Sorgen Sie dafür, dass sie im Falle eines Verkaufs, eines Umzugs oder einer Übergabe an einen anderen Benutzer das Gerät stets begleitet, damit auch der Nachbesitzer die
  • Страница 43 из 57
    Vor dem Anschluss stellen Sie bitte sicher, dass: • die Steckdose geerdet ist und den gesetzlichen Bestimmungen entspricht; • die Netzsteckdose für die auf dem Typenschild angegebene maximale Leistungsaufnahme des Gerätes ausgelegt ist; • die Netzspannung im Bereich der auf dem Typenschild
  • Страница 44 из 57
    DE Inbetriebsetzung und Gebrauch ACHTUNG! Der Ofen ist mit einem Arretierungssystem der Roste ausgestattet. Damit lassen diese sich ausziehen, ohne aus dem Ofen hervorzustehen (1). Um die Roste komplett auszuziehen, braucht man sie nur, wie auf der Zeichnung zu sehen, vorne zu greifen und zu ziehen
  • Страница 45 из 57
    Programm ECHTE HEISSLUFT Es schalten sich beide Heizelemente (das obere und das untere) ein, und das Gebläse wird in Betrieb genommen. Da die Hitze im gesamten Backofen konstant ist, werden die Speisen sehr gleichmäßig gegart und gebräunt. Es kann auf maximal zwei Einschubhöhen gleichzeitig gegart
  • Страница 46 из 57
    DE Vorsichtsmaßregeln und Hinweise ! Das Gerät wurde entsprechend den strengsten internationalen Sicherheitsvorschriften entworfen und gebaut. Nachstehende Hinweise werden aus Sicherheitsgründen geliefert und sollten aufmerksam gelesen werden. Allgemeine Sicherheit • Dieses Gerät ist für den nicht
  • Страница 47 из 57
    Backofentür reinigen DE Reinigen Sie die Backofentür aus Glas bitte nur mit einem weichen Schwamm und mildem Spülmittel und trocknen Sie sie abschließend mit einem weichen Tuch. Verwenden Sie keine rauen, scheuernden Materialien oder scharfkantige, metallische Schaber, da diese Kratzer auf ihrer
  • Страница 48 из 57
    Установка ! Важно сохранить данное руководство для его последующих консультации. В случае продажи, передачи изделия или при переезде на новое место жительства необходимо проверить, чтобы руководство оставалось вместе с изделием, для того чтобы его новыи владелец мог ознакомиться с правилами
  • Страница 49 из 57
    Подсоединение сетевого шнура изделия к сети электропитания Установите на сетевой кабель нормализованную штепсельную вилку, расчитанную на нагрузку, указанную на паспортной табличке (см. сбоку). В случае прямого подключения к сети электропитания между изделием и сетью необходимо установить
  • Страница 50 из 57
    RU Включение и эксплуатация ВНИМАНИЕ! Духовой шкаф у к о м п л е к то ва н с и с те м о й блокировки решеток, позволяющей вынимать их из духовки не полностью (1). Для полного вынимания решеток достаточно поднять их, как показано на схеме, взяв их за передний край, и потянуть на себя (2). ! При
  • Страница 51 из 57
    Программа ОДНОВРЕМЕННОЕ ПРИГОТОВЛЕНИЕ Включаются все нагревательные элементы (верхнии и нижнии) и вентилятор. Так как жар является постоянным во всем духовом шкафу, воздух обеспечивает однородное приготовление и подрумянивание продукта. Одновременно можно использовать не более двух уровнеи духового
  • Страница 52 из 57
    RU Таблица приготовления Программы Традициональная духовка Одновременное приготовление Верхнии нагреватель Гриль Подрумянивание 52 Вес (кг) Уровень 1 1 3 3 Время нагревания (мин.) 15 15 1 1 1 1 1 1+1 3 3 3 2и4 3 2 2и4 1 1 0.5 0.5 0.5 1 1.5 Доведение доготовности Камбала и каракатицы Кальмары и
  • Страница 53 из 57
    Предосторожности и рекомендации ! Изделие спроектировано и изготовлено в соответствии с международными нормативами по безопасности. Необходимо внимательно прочитать настоящие предупреждения, составленные в целях вашеи безопасности. Общие требования к безопасности • Данное изделие предназначается
  • Страница 54 из 57
    RU ! Не используйте паровые чистящие агрегаты или агрегаты под высоким давлением для чистки изделия. Чистка дверцы Для чистки стекла дверцы используйте неабразивные губки и чистящие средства, затем вытрите насухо мягкой тряпкой. Не используйте твердые абразивные материалы или острые металлические
  • Страница 55 из 57
    RU 55
  • Страница 56 из 57
    195119816.00 12/2013 - XEROX FABRIANO RU 56
  • Страница 57 из 57