Инструкция для HOTPOINT-ARISTON FHS 51 IX

(скачивание инструкции бесплатно)
Формат файла: PDF
Доступность: Бесплатно как и все руководства на сайте. Без регистрации и SMS.
Дополнительно: Чтение инструкции онлайн
background image

GB

17

Installation

Please keep this instruction booklet in a safe place for future reference. If 

the appliance is sold, given away or moved, please make sure the booklet is 

also passed on to the new owners so that they may benefit from the advice 

contained within it.

!

 Please read this instruction manual carefully: it contains important information 

concerning the safe operation, installation and maintenance of the appliance.

Positioning

Do not let children play with the packaging material; it should be disposed 

of in accordance with local separated waste collection standards (see 

Precautions and tips).

The appliance must be installed by a qualified professional in accordance 

with the instructions provided. Incorrect installation may damage property or 

cause harm to people or animals.

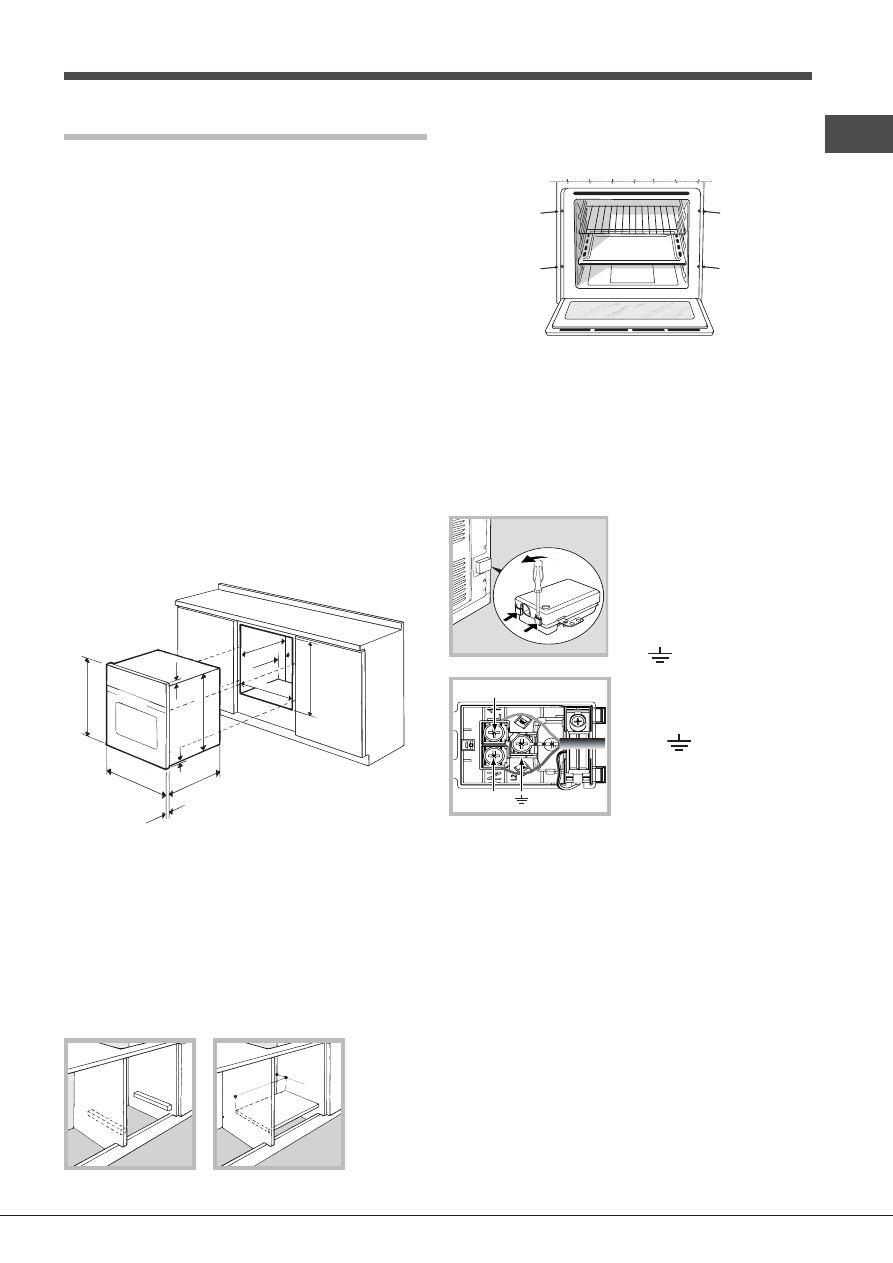
Built-in appliances

Use an appropriate cabinet to ensure that the appliance operates properly:

•  The panels adjacent to the oven must be made of heat-resistant material.

•  Cabinets with a veneer exterior must be assembled with glues which can 

withstand temperatures of up to 100°C.

•  To install the oven 

under the counter

 (see diagram) or in a 

kitchen unit

the cabinet must have the following dimensions:

595 mm.

595 mm.

25 mm.

545 mm.

5 mm.

567 mm.

23 mm.

575-585 mm.

45 mm.

558 mm.

547 mm. min.

!

 The appliance must not come into contact with electrical parts once it has 

been installed. 

The indications for consumption given on the data plate have been calculated 

for this type of installation.

Ventilation

To ensure adequate ventilation, the back panel of the cabinet must be 

removed. It is advisable to install the oven so that it rests on two strips of 

wood, or on a completely flat surface with an opening of at least 45 x 560 

mm (see diagrams).


560 mm

.

45 mm.

Centring and fixing

Secure the appliance to the cabinet by opening the oven door and inserting 

4 screws into the 4 holes on the outer frame.

!

 All parts which ensure the safe operation of the appliance must not be 

removable without the aid of a tool.

Electrical connection

Ovens equipped with a three-pole power supply cable are designed to operate 

with alternating current at the voltage and frequency indicated on the data 

plate located on the appliance (see below).

Fitting the power supply cable

1. Open the terminal board by inserting 

a screwdriver into the side tabs of the 

cover. Use the screwdriver as a lever by 

pushing it down to open the cover (see 

diagram).

2. Install the power supply cable by 

loosening the cable clamp screw 

and the three wire contact screws  
L-N-

.Connect the wires to the 

corresponding terminals: the Blue wire 

to the terminal marked (N), the Brown 

wire to the terminal marked (L) and 

the Yellow/Green wire to the terminal 
marked 

 (see diagram).

3. Secure the cable by fastening the 

clamp screw.

4. Close the cover of the terminal board.

Connecting the supply cable to the mains

Install a standardised plug corresponding to the load indicated on the data 

plate (see table). 

The appliance must be directly connected to the mains using an omnipolar 

switch with a minimum contact opening of 3 mm installed between the 

appliance and the mains.  The switch must be suitable for the charge indicated 

and must comply with current electrical regulations (the earthing wire must not 

be interrupted by the switch). The supply cable must be positioned so that it 

does not come into contact with temperatures higher than 50°C at any point 

(the back panel of the oven, for example).

!

 The installer must ensure that the correct electrical connection has been 

performed and that it is fully compliant with safety regulations.

Before connecting the appliance to the power supply, make sure that

•  The appliance is earthed and the plug is compliant with the law.

•  The socket can withstand the maximum power of the appliance, which is 

indicated on the data plate.

•  The voltage is in the range between the values indicated on the data plate.

•  The socket is compatible with the plug of the appliance. If the socket is 

incompatible with the plug, ask an authorised technician to replace it. Do 

not use extension cords or multiple sockets.

N

L

1
2
3
4
5
6
7
8
9
10
11
12
13
14
15
16
17
18
19
20
21
22
23
24
25
26
27
28
29
30
31
32
33
34
35
36
37
38
39
40
41
42
43
44
45
46
47
48
49
50
51
52
Оглавление инструкции
  • Страница 1 из 53
    FH 51 /HA FH 51 IX/HA FHS 51 IX/HA Français Mode d’emploi FOUR Sommaire Mode d’emploi,1 Avertissements,3 Assistance,6 Description de l’appareil,8 Description de l’appareil,10 Installation,23 Mise en marche et utilisation,25 Programmes,25 Précautions et conseils,27 Nettoyage et entretien,27 Italiano
  • Страница 2 из 53
    Deutsch Bedienungsanleitung BACKOFEN Inhaltsverzeichnis Bedienungsanleitung,2 Hinweise,5 Kundendienst,7 Beschreibung Ihres Gerätes,9 Beschreibung Ihres Gerätes,10 Installation,41 Inbetriebsetzung und Gebrauch,43 Programme,43 Vorsichtsmaßregeln und Hinweise,45 Reinigung und Pflege,45 Русскии
  • Страница 3 из 53
    Avvertenze ATTENZIONE: Questo apparecchio e le sue parti accessibili diventano molto caldi durante l’uso. Bisogna fare attenzione ed evitare di toccare gli elementi riscaldanti. Tenere lontani i bambini inferiori agli 8 anni se non continuamente sorvegliati. Il presente apparecchio può essere
  • Страница 4 из 53
    en verre, sous peine d’érafler la surface et de briser le verre. esté dirigido hacia arriba y en la parte posterior de la cavidad. Ne jamais nettoyer l’appareil avec des nettoyeurs vapeur ou haute pression. ATTENTION : s’assurer que l’appareil est éteint avant de procéder au remplacement de
  • Страница 5 из 53
    Es ist darauf zu achten, dass die Heizelemente nicht berührt werden. Kinder unter 8 Jahren, die nicht ständig beaufsichtigt sind, von dem Gerät fernhalten. Das Gerät darf von Kindern ab 8 Jahren und Personen mit eingeschränkten körperlichen, geistigen oder Wahrnehmungsfähigkeiten oder aber ohne
  • Страница 6 из 53
    Assistance Assistenza ! Non ricorrere mai a tecnici non autorizzati. Comunicare: • Il tipo di anomalia; • Il modello della macchina (Mod.) • Il numero di serie (S/N) Queste ultime informazioni si trovano sulla targhetta caratteristiche posta sull’apparecchio Assistenza Attiva 7 giorni su 7 ! Never
  • Страница 7 из 53
    Assistência ! Nunca recorra a técnicos não autorizados. Comunique: • o tipo de avaria; • o modelo da máquina (Mod.); • o número de série (S/N); Estas últimas informações encontram-se na placa de identificação situada no aparelho. Kundendienst ! Wenden Sie sich auf keinen Fall an nicht autorisierte
  • Страница 8 из 53
    Descrizione dell’apparecchio Descripción del aparato Vista d’insieme Vista en conjunto 1 2 3 4 5 6 7 8 9 1 2 3 4 5 6 7 8 9 POSIZIONE 1 POSIZIONE 2 POSIZIONE 3 POSIZIONE 4 POSIZIONE 5 GUIDE di scorrimento dei ripiani Ripiano LECCARDA Ripiano GRIGLIA Pannello di controllo POSICIÓN 1 POSICIÓN 2
  • Страница 9 из 53
    Descrição do aparelho Vista de conjunto 1 2 3 4 5 6 7 8 9 POSIÇÃO 1 POSIÇÃO 2 POSIÇÃO 3 POSIÇÃO 4 POSIÇÃO 5 GUIAS de escorrimento das prateleiras Prateleira BANDEJA PINGADEIRA Prateleira GRADE Painel de comandos Beschreibung Ihres Gerätes Geräteansicht 1 2 3 4 5 6 7 8 9 EINSCHUBHÖHE 1 EINSCHUBHÖHE
  • Страница 10 из 53
    Descrizione dell’apparecchio Descrição do aparelho Pannello di controllo Painel de comandos 1 2 3 4 1 2 3 4 Spia TERMOSTATO Manopola TERMOSTATO Manopola CONTAMINUTI Manopola PROGRAMMI Description of the appliance Control panel 1 2 3 4 THERMOSTAT indicator light THERMOSTAT knob MINUTE MINDER knob
  • Страница 11 из 53
    Installazione ! È importante conservare questo libretto per poterlo consultare in ogni momento. In caso di vendita, di cessione o di trasloco, assicurarsi che resti insieme all’apparecchio per informare il nuovo proprietario sul funzionamento e sui relativi avvertimenti. Centraggio e fissaggio Per
  • Страница 12 из 53
    IT ! Ad apparecchio installato, il cavo elettrico e la presa della corrente devono essere facilmente raggiungibili. TARGHETTA CARATTERISTICHE ! Il cavo non deve subire piegature o compressioni. Dimensioni* larghezza cm 43,5 altezza cm 32,4 profondità cm 41,5 ! Il cavo deve essere controllato
  • Страница 13 из 53
    Avvio e utilizzo • GRATIN (si consiglia di non superare la temperatura di 200°C). ATTENZIONE ! Il forno è dotato di un sistema di arresto griglie che consente di estrarle senza che queste fuoriescano dal forno. (1) Per estrarre completamente le griglie è sufficiente, come indicato sul disegno,
  • Страница 14 из 53
    IT Tabella cottura Programmi Alimenti Forno Tradizionale Anatra Arrosto di vitello o manzo Arrosto di maiale Biscotti (di frolla) Crostate Multicottura Pizza (su 2 ripiani) Lasagne Agnello Pollo arrosto + patate Sgombro Plum-cake Bignè (su 2 ripiani) Biscotti(su 2 ripiani) Pan di spagna (su 1
  • Страница 15 из 53
    Precauzioni e consigli ! L’apparecchio è stato progettato e costruito in conformità alle norme internazionali di sicurezza. Queste avvertenze sono fornite per ragioni di sicurezza e devono essere lette attentamente. Sicurezza generale • L’apparecchio è stato concepito per un uso di tipo non
  • Страница 16 из 53
    IT Pulire la porta Pulire il vetro della porta con spugne e prodotti non abrasivi e asciugare con un panno morbido; non usare materiali ruvidi abrasivi o raschietti metallici affilati che possono graffiare la superficie e causare la frantumazione del vetro. Per una pulizia più accurata è possibile
  • Страница 17 из 53
    Installation ! Please keep this instruction booklet in a safe place for future reference. If the appliance is sold, given away or moved, please make sure the booklet is also passed on to the new owners so that they may benefit from the advice contained within it. Centring and fixing Secure the
  • Страница 18 из 53
    GB ! Once the appliance has been installed, the power supply cable and the electrical socket must be easily accessible. APPLIANCE SPECIFICATIONS ! The cable must not be bent or compressed. Dimensions* ! The cable must be checked regularly and replaced by authorised technicians only (see
  • Страница 19 из 53
    Start-up and use • GRATIN (recommended: do not exceed 200°C). WARNING! The oven is provided with a stop system to extract the racks and prevent them from coming out of the oven (1). As shown in the drawing, to extract them completely, simply lift the racks, holding them on the front part, and pull
  • Страница 20 из 53
    GB Cooking advice table Cooking modes Convection Oven Multi-cooking Top oven Grill Gratin 20 Foods Weight (in kg) Rack position Pre-heating time (min) Recommended temperature Duck Roast veal or beef Pork roast Biscuits (short pastry) Tarts Pizza (on 2 racks) Lasagne Lamb Roast chicken + potatoes
  • Страница 21 из 53
    Precautions and tips ! This appliance has been designed and manufactured in compliance with international safety standards. The following warnings are provided for safety reasons and must be read carefully. General safety • The appliance was designed for domestic use inside the home and is not
  • Страница 22 из 53
    GB Cleaning the oven door Clean the glass part of the oven door using a sponge and a non-abrasive cleaning product, then dry thoroughly with a soft cloth. Do not use rough abrasive material or sharp metal scrapers as these could scratch the surface and cause the glass to crack. For more thorough
  • Страница 23 из 53
    Installation Centrage et fixation ! Conservez ce mode d’emploi pour pouvoir le consulter à tout moment. En cas de vente, de cession ou de déménagement, veillez à ce qu’il suive l’appareil pour informer le nouveau propriétaire sur son fonctionnement et lui fournir les conseils correspondants. FR
  • Страница 24 из 53
    FR • la prise est bien compatible avec la fiche de l’appareil. Si ce n’est pas le cas, remplacez la prise ou la fiche, n’utilisez ni rallonges ni prises multiples. ! Après installation de l’appareil, le câble électrique et la prise de courant doivent être facilement accessibles ! Le câble ne doit
  • Страница 25 из 53
    Mise en marche et utilisation ATTENTION ! Le four est équipé d’un système d’arrêts de grilles qui permet de les retirer sans que ces dernières sortent entièrement du four (1). Pour sortir complètement les grilles il suffit, comme illustré, de les soulever en les saisissant par l’avant et de les
  • Страница 26 из 53
    FR Tableau de cuisson Programmes Four Traditionnel Multicuisson Aliments Canard Rôti de veau ou de bœuf Rôti de porc Biscuits (pâte brisée) Tartes Pizza (sur 2 niveaux) Lasagnes Agneau Poulet rôti + pommes de terre Maquereau Cake aux fruits Profiteroles (sur 2 niveaux) Biscuits (sur 2 niveaux)
  • Страница 27 из 53
    Précautions et conseils ! Cet appareil a été conçu et fabriqué conformément aux normes internationales de sécurité. Ces conseils sont fournis pour des raisons de sécurité et doivent être lus attentivement. Sécurité générale • Cet appareil a été conçu pour un usage familial, de type non
  • Страница 28 из 53
    FR Nettoyage de la porte Nettoyer la vitre de la porte avec des produits non abrasifs et des éponges non grattantes, essuyer ensuite avec un chiffon doux. Ne pas utiliser de matériaux abrasifs ou de racloirs métalliques aiguisés qui risquent de rayer la surface et de briser le verre. Pour nettoyer
  • Страница 29 из 53
    Instalación ES ! Es importante conservar este manual para poder consultarlo en todo momento. En caso de venta, de cesión o de mudanza, verifique que permanezca junto al aparato para informar al nuevo propietario sobre su funcionamiento y sobre las advertencias correspondientes. ! Lea atentamente
  • Страница 30 из 53
    ES alcance en ningún punto una temperatura que supere en 50°C la temperatura ambiente (por ejemplo, la parte posterior del horno). ! El instalador es responsable de la correcta conexión eléctrica y del cumplimiento de las normas de seguridad. Antes de efectuar la conexión verifique que: • la toma
  • Страница 31 из 53
    Puesta en funcionamiento y uso ATENCIÓN! El horno está dotado de un sistema de bloqueo de las parrillas que permite quitarlas sin que sobresalgan del horno (1).Para quitar completamente las parrillas, como se indica en el dibujo, es suficiente levantarlas cogiéndolas de la parte delantera y tirar
  • Страница 32 из 53
    ES PIZZA • Per una buona cottura della pizza ultilizzate il programma MULTICOTTURA. • Utilice una bandeja para pizza de aluminio liviano apoyándola sobre la parrilla suministrada con el horno. Utilizando la grasera se aumenta el tiempo de cocción y difícilmente se obtiene una pizza crocante. • En
  • Страница 33 из 53
    Precauciones y consejos ! El aparato ha sido proyectado y fabricado en conformidad con las normas internacionales de seguridad. Estas advertencias se suministran por razones de seguridad y deben ser leídas atentamente. Seguridad general • El aparato ha sido fabricado para un uso de tipo no
  • Страница 34 из 53
    ES Limpiar la puerta Limpie el vidrio de la puerta con esponjas y productos no abrasivos y séquelo con un paño suave; no utilice materiales ásperos abrasivos o raederas metálicas afiladas que puedan rayar la superficie y quebrar el vidrio. Para lograr una limpieza más profunda es posible desmontar
  • Страница 35 из 53
    Instalação ! É importante guardar este folheto para poder consultá-lo a qualquer momento. No caso de venda, cessão ou mudança, assegure-se que o mesmo permanece com o aparelho para informar o novo proprietário sobre o funcionamento e sobre as respectivas advertências. ! Leia com atenção as
  • Страница 36 из 53
    PT • a tomada seja compatível com a ficha do aparelho. Em caso contrário, substitua a tomada ou a ficha; não empregue extensões nem tomadas múltiplas. PLACA DAS CARACTERÍSTICAS Medidas* largura 43,5 cm altura 32,4 cm profundidade 41,5 cm Volume* Litros 59 Medidas** ! O cabo deve ser verificado
  • Страница 37 из 53
    Início e utilização Programas ATENÇÃO! O forno está equipado com um sistema de bloqueio das grelhas que permite retirá-las sem que estas ressaiam do forno (1). Para retirar completamente as grelhas, tal como indicado no desenho, basta levantá-las, segurando-as pela parte da frente, e puxá-las (2).
  • Страница 38 из 53
    PT PIZZA • Para cozer bem uma pizza utilize o programa de COZEDURA MÚLTIPLA. • Utilize uma forma de alumínio leve, apoie-a na grelha do forno. Se utilizar a bandeja pingadeira aumentará os tempos de cozedura e dificilmente será obtida uma pizza crocante. • No caso de pizzas com muita cobertura é
  • Страница 39 из 53
    Precauções e conselhos ! Este aparelho foi projectado e fabricado em conformidade com as normas internacionais de segurança. Estas advertências são fornecidas por razões de segurança e devem ser lidas com atenção. Segurança geral • Este aparelho foi concebido para utilização de tipo não
  • Страница 40 из 53
    PT Limpeza da porta Limpe o vidro da porta com esponjas e produtos não abrasivos e enxugue com um pano macio; não use materiais ásperos, abrasivos ou espátulas metálicas afiadas que podem arranhar a superfície e quebrar o vidro. Para uma limpeza mais cuidadosa é possível desmontar a porta do forno:
  • Страница 41 из 53
    Installation ! Bewahren Sie diese Bedienungsanleitung bitte sorgfältig auf, damit Sie sie jederzeit zu Rate ziehen können. Sorgen Sie dafür, dass sie im Falle eines Verkaufs, eines Umzugs oder einer Übergabe an einen anderen Benutzer das Gerät stets begleitet, damit auch der Nachbesitzer die
  • Страница 42 из 53
    DE Leistungsaufnahme des Gerätes ausgelegt ist; • die Netzspannung im Bereich der auf dem Typenschild angegebenen Werte liegt; • die Netzsteckdose mit dem Netzstecker kompatibel ist. Sollte dies nicht der Fall sein, wechseln Sie bitte die Netzsteckdose oder den Netzstecker aus; verwenden Sie keine
  • Страница 43 из 53
    Inbetriebsetzung und Gebrauch Programme ACHTUNG! Der Ofen ist mit einem Arretierungssystem der Roste ausgestattet. Damit lassen diese sich ausziehen, ohne aus dem Ofen hervorzustehen (1). Um die Roste komplett auszuziehen, braucht man sie nur, wie auf der Zeichnung zu sehen, vorne zu greifen und zu
  • Страница 44 из 53
    DE GRILL • Schieben Sie den Grillrost in die Führung 3 oder 4 ein, und legen Sie die zu garenden Speisen auf die Mitte des Grillrostes. • Es empfiehlt sich, die höchste Energiestufe zu verwenden. Im Übrigen ist es bei dieser Funktion völlig normal, dass das obere Heizelement nicht ständig rot
  • Страница 45 из 53
    Vorsichtsmaßregeln und Hinweise ! Das Gerät wurde entsprechend den strengsten internationalen Sicherheitsvorschriften entworfen und gebaut. Nachstehende Hinweise werden aus Sicherheitsgründen geliefert und sollten aufmerksam gelesen werden. Allgemeine Sicherheit • Dieses Gerät ist für den nicht
  • Страница 46 из 53
    DE Backofentür reinigen Reinigen Sie die Backofentür aus Glas bitte nur mit einem weichen Schwamm und mildem Spülmittel und trocknen Sie sie abschließend mit einem weichen Tuch. Verwenden Sie keine rauen, scheuernden Materialien oder scharfkantige, metallische Schaber, da diese Kratzer auf ihrer
  • Страница 47 из 53
    Установка RU ! Важно сохранить данное руководство для его последующих консультации. В случае продажи, передачи изделия или при переезде на новое место жительства необходимо проверить, чтобы руководство оставалось вместе с изделием, для того чтобы его новыи владелец мог ознакомиться с правилами
  • Страница 48 из 53
    RU минимальным расстоянием между контактами 3 мм, расчитанный на данную нагрузку и соответствующий действующим нормативам (выключатель не должен размыкать провод заземления). Сетевой кабель должен быть расположен таким образом, чтобы ни в одной точке его температура не превышала температуру
  • Страница 49 из 53
    Включение и эксплуатация Программы RU ВНИМАНИЕ! Духовой шкаф у к о м п л е к то ва н с и с те м о й блокировки решеток, позволяющей вынимать их из духовки не полностью (1).Для полного вынимания решеток достаточно поднять их, как показано на схеме, взяв их за передний край, и потянуть на себя (2). !
  • Страница 50 из 53
    RU ГРИЛЬ • Установите решетку на уровень 3 или 4, поместите продукты в центр решетки. • Рекомендуется выбрать максимальную мощность духовки. Не беспокойтесь, если верхний элемент не остается постоянно включенным: его работа управляется термостатом. ПИЦЦА • Используйте противень из легкого алюминия,
  • Страница 51 из 53
    Предосторожности и рекомендации ! Изделие спроектировано и изготовлено в соответствии с международными нормативами по безопасности. Необходимо внимательно прочитать настоящие предупреждения, составленные в целях вашеи безопасности. Общие требования к безопасности • Данное изделие предназначается
  • Страница 52 из 53
    195114208.01 11/2013 - XEROX FABRIANO RU • Съемные детали можно легко вымыть как любую другую посуду, также в посудомоечной машине за исключением выдвижных направляющих. ! Не используйте паровые чистящие агрегаты или агрегаты под высоким давлением для чистки изделия. Чистка дверцы Для чистки стекла
  • Страница 53 из 53