Инструкция для INDESIT K6C107

(скачивание инструкции бесплатно)
Формат файла: PDF
Доступность: Бесплатно как и все руководства на сайте. Без регистрации и SMS.
Дополнительно: Чтение инструкции онлайн
background image

14

GB

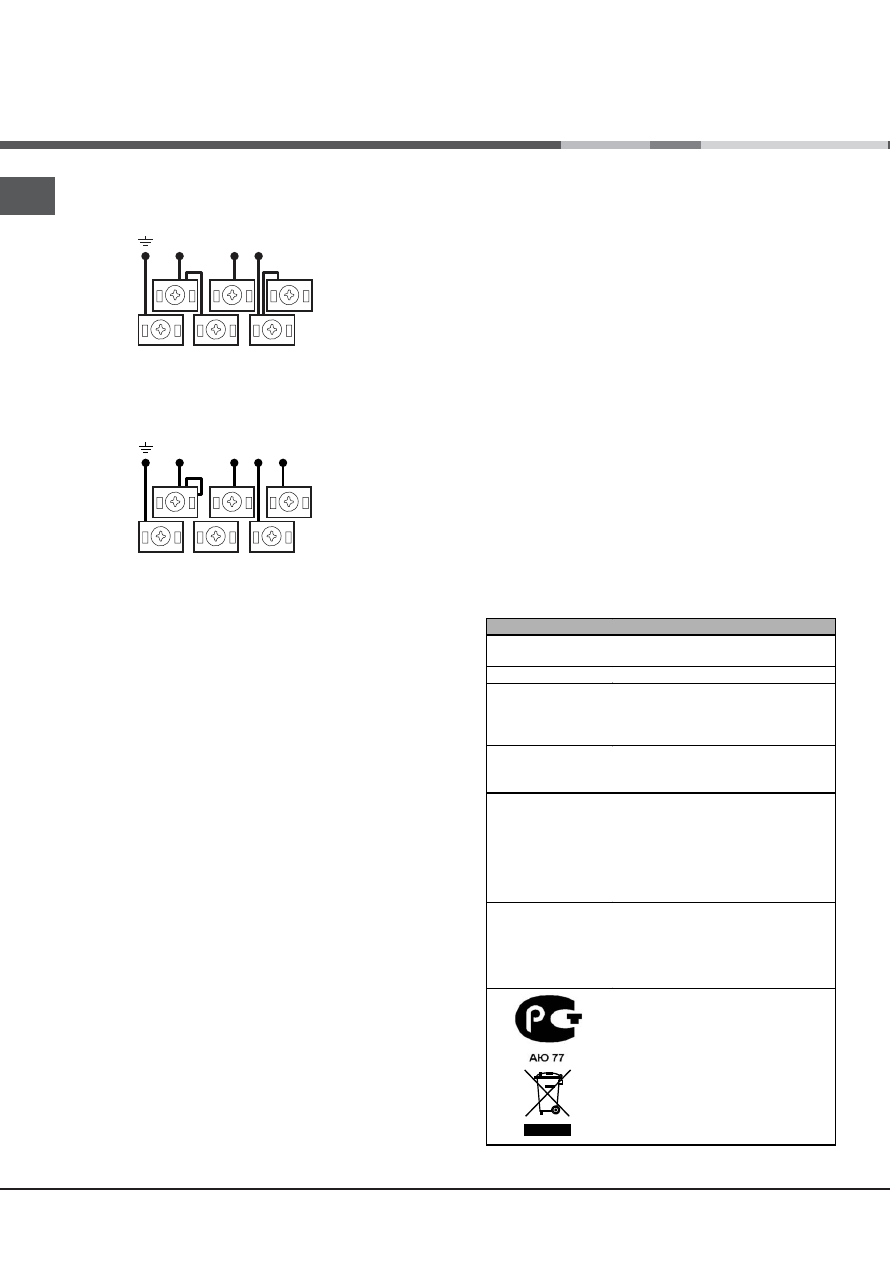
Connecting the supply cable to the mains

Install a standardised plug corresponding to the
load indicated on the data plate located on the
appliance.
The appliance must be directly connected to the
mains using an omnipolar circuit-breaker with a
minimum contact opening of 3 mm installed between
the appliance and the mains.  The circuit-breaker
must be suitable for the charge indicated and must
comply with current electrical regulations (the
earthing wire must not be interrupted by the circuit-
breaker). The supply cable must be positioned so
that it does not come into contact with temperatures
higher than 50°C at any point.

Before connecting the appliance to the power
supply, make sure that:
• The appliance is earthed and the plug is compliant

with the law.

• The socket can withstand the maximum power of

the appliance, which is indicated by the data
plate.

• The voltage is in the range between the values

indicated on the data plate.

• The socket is compatible with the plug of the

appliance. If the socket is incompatible with the
plug, ask an authorised technician to replace it.
Do not use extension cords or multiple sockets.

!

 Once the appliance has been installed, the power

supply cable and the electrical socket must be
easily accessible.

!

 The cable must not be bent or compressed.

The cable must be checked regularly and replaced

by authorised technicians only.

!


The manufacturer declines any liability should

these safety measures not be observed.

*

 Only available in certain models.

TECHNICAL DATA 


Oven dimensions 
(WxDxH) 

40,5x39,5x32 cm 


Volume 

lt. 60


Useful 
measurements 
relating to the 
oven compartment 

width 42 cm  

depth 44 cm  
height 23 cm  

Power supply 
voltage and 
frequency 

see data plate 

Ceramic hob


Front Left 
Back Left 

Back Right 

Front Right 

Max. ceramic hob 
consumption


1700 W 

1200 W 

2100 W 

1200 W 
 

6200 W


ENERGY LABEL 
 

Directive 2002/40/EC on the label of 

electric ovens. Standard EN 50304


Declared energy consumption for 

Natural convection Class – heating 
mode: 

a

 Static;


EC Directives: 06/95/EC dated 
12/12/06 (Low Voltage) and 

subsequent amendments - 

04/108/EC dated 15/12/04 

(Electromagnetic Compatibility) and 
subsequent amendments - 

93/68/EEC dated 22/07/93 and 

subsequent amendments -

2002/96/EC. 

1275/2008 (Stand-by/ Off mode)


• Secure the power supply cable by fastening the

cable clamp screw then put the cover back on.

N

L3

L1

L2

400V 3N~

H05RR-F 5x2.5 CEI-UNEL 35363

1

3

2

4

5

N

L2 L1

400V 2N~

H05RR-F 4x4 CEI-UNEL 35363

1

3

2

4

5

H05VV-F 4x4 CEI-UNEL 357  46

H05VV-F 5x2.5 CEI-UNEL 35746

1
2
3
4
5
6
7
8
9
10
11
12
13
14
15
16
17
18
19
20
21
22
23
24
Оглавление инструкции
  • Страница 1 из 25
    Руководство по эксплуатации ЭЛЕКТРИЧЕСКАЯ ПЛИТА Содержание RS РУССКИЙ,1 GB English, 12 Информация для потребителя, 2 Установка, 3-4 Размещение и выравнивание Подключение к электросети Технические характеристики Описание оборудования, 5 Внешний вид Панель управления Включение и использование, 6-8
  • Страница 2 из 25
    Информация для потребителя Изделие: RS Электрическая плита Торговая марка: Торговый знак изготовителя: Модели: K6C107/RU ; KN6C107 /RU ; KN6C117 /RU ;MVK6 V21 RF Изготовитель: Indesit Company Страна-изготовитель: Польша Номинальное значение напряжения электропитания или диапазон напряжения 230 /
  • Страница 3 из 25
    Установка ! Перед установкой и подключением вашего нового оборудования внимательно прочитайте данное руководство: в нем содержатся важные сведения по установке, безопасной эксплуатации и обслуживанию оборудования. ! Сохраните руководство как источник справочной информации по оборудованию и для
  • Страница 4 из 25
    Описание изделия . RS 400V 2N~ H05VV-F 4x4 CEI-UNEL 357 46 400V 3N~ H05VV-F 5x2.5 CEI-UNEL 35746 • Зафиксируйте питающий кабель прижимным винтом и закройте крышку клеммника. Подсоединение питающего кабеля к сети Оснастите питающий кабель стандартной вилкой, соответствующей нагрузке, указанной в
  • Страница 5 из 25
    Описание оборудования Внешний вид RS Стеклокерамическая поверхность Позиции (уровни духовки) Панель управления Направляющие для решетки / противня (поддона) 5 4 3 2 1 Решетка духовки Противень (поддон) Регулируемые ножки Регулируемые ножки Панель управления Индикатор термостата Рукоятка селектора
  • Страница 6 из 25
    Включение и использование RS ! Перед первым использованием в течение получаса прокалите пустую духовку с закрытой дверцей при максимальной температуре. Затем откройте дверцу и проветрите помещение. Появившийся во время прокаливания неприятный запах вызван сгоранием защитных веществ, используемых
  • Страница 7 из 25
    Режимы приготовления Таймер* ! Значение температуры от 50 °С до Max может быть установлено для всех режимов приготовления за исключением режима ГРИЛЬ, для которого рекомендуется установка только максимального (Max) уровня мощности. 1. Чтобы завести звонок таймера, поверните рукоятку ТАЙМЕРА на один
  • Страница 8 из 25
    Вспомогательная таблица по приготовлению в духовке RS Режим приготовления Статическая духовка Блюдо Лазанья Канеллони Макронная запеканка Телятина Курица Утка Кролик Свинина Баранина Скумбрия Макрель Форель в фольге Неаполитанская пицца Печенье и мелкая выпечка Сладкие открытые пироги из
  • Страница 9 из 25
    Использование стеклокерамической рабочей поверхности ! Перед использованием оборудования удалите остатки клея со стеклокерамической рабочей поверхности плиты с помощью специального неабразивного чистящего средства. В течение первых часов использования рабочей поверхности Вы можете почувствовать
  • Страница 10 из 25
    Предупреждения и рекомендации RS ! Оборудование разработано и изготовлено в соответствии с международными нормами безопасности. Внимательно прочитайте настоящие предупреждения, приводимые в целях вашей безопасности. Основные правила безопасности • Стеклокерамическая рабочая поверхность плиты
  • Страница 11 из 25
    Обслуживание и уход Отключение оборудования ! Перед любыми работами по обслуживанию оборудования отключайте его от электросети. ! Никогда не используйте для чистки духовки пароочистители и аэрозоли. Чистка духовки • Эмалированные внешние части или поверхности из нержавеющей стали, а также резиновые
  • Страница 12 из 25
    Operating Instructions COOKER AND OVEN RS РУССКИЙ,1 GB Contents Installation, 13-14 English, 12 Positioning and levelling Electrical connections Technical data Description of the appliance, 15 Overall view Control panel Start-up and use, 16-18 Starting the oven Cooking modes Timer Practical cooking
  • Страница 13 из 25
    Installation ! Before operating your new appliance please read this instruction booklet carefully. It contains important information concerning the safe installation and operation of the appliance. ! Please keep these operating instructions for future reference. Make sure that the instructions are
  • Страница 14 из 25
    400V 2N~ H05RR-F 4x4 CEI-UNEL 35363 H05VV-F 4x4 CEI-UNEL 357 46 GB N L2 L1 1 3 5 ! The cable must not be bent or compressed. 2 4 ! The cable must be checked regularly and replaced by authorised technicians only. 400V 3N~ H05RR-F 5x2.5 CEI-UNEL 35363 H05VV-F 5x2.5 CEI-UNEL 35746 N ! Once the
  • Страница 15 из 25
    Description of the appliance Overall view GB Glass ceramic hob GUIDE RAILS for the sliding racks position 5 position 4 position 3 position 2 position 1 Control panel GRILL rack DRIPPING PAN Adjustable foot Adjustable foot Control panel THERMOSTAT indicator light SELECTOR knob THERMOSTAT indicator
  • Страница 16 из 25
    Start-up and use GB ! The first time you use your appliance, heat the empty oven with its door closed at its maximum temperature for at least half an hour. Ensure that the room is well ventilated before switching the oven off and opening the oven door. The appliance may emit a slightly unpleasant
  • Страница 17 из 25
    Cooking modes ! A temperature value can be set for all cooking modes between 50°C and MAX, except for the GRILL programme, for which only the MAX power level is recommended. STATIC OVEN mode Both the top and bottom heating elements will come on. When using this traditional cooking mode, it is best
  • Страница 18 из 25
    GB Oven cooking advice table Cooking modes Foods Lasagne Cannelloni Baked pasta Veal Chicken Duck Rabbit Pork Lamb Static Mackerel Mackerel Trout baked in foil Neapolitan-style pizza Biscuits and small cakes Sweet unleavened flans and desserts Savoury pies Leavened cakes Fruit cakes Oven bottom
  • Страница 19 из 25
    Using the glass ceramic hob ! The glue applied on the gaskets leaves traces of grease on the glass. Before using the appliance, we recommend you remove these with a special nonabrasive cleaning product. During the first few hours of use there may be a smell of rubber which will disappear very
  • Страница 20 из 25
    Precautions and tips GB ! This appliance has been designed and manufactured in compliance with international safety standards. The following warnings are provided for safety reasons and must be read carefully. General safety • The glass ceramic hob is resistant to temperature fluctuations and
  • Страница 21 из 25
    Respecting and conserving the environment GB • You can help to reduce the peak load of the electricity supply network companies by using the oven in the hours between late afternoon and the early hours of the morning. • Always keep the oven door closed when using the GRILL and DOUBLE GRILL modes.
  • Страница 22 из 25
    Care and maintenance GB Switching the appliance off Disconnect your appliance from the electricity supply before carrying out any work on it. ! Never use steam cleaners or pressure cleaners on the appliance. Cleaning the oven • The stainless steel or enamel-coated external parts and the rubber
  • Страница 23 из 25
    GB 23
  • Страница 24 из 25
    01/2012 - 195079736.03 XEROX FABRIANO GB 24
  • Страница 25 из 25