Доступность: Бесплатно как и все руководства на сайте. Без регистрации и SMS.
Дополнительно: Чтение инструкции онлайн
Страница: (63 из 64)
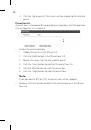
навигация
1
2
3
4
5
6
7
8
9
10
11
12
13
14
15
16
17
18
19
20
21
22
23
24
25
26
27
28
29
30
31
32
33
34
35
36
37
38
39
40
41
42
43
44
45
46
47
48
49
50
51
52
53
54
55
56
57
58
59
60
61
62
63
64
Оглавление инструкции
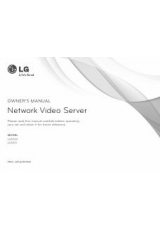
Страница 1 из 65 OWNER'S MANUAL LVS201 Please read this manual carefully before operating your set and retain it for future reference. P/NO : MFL62591939
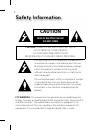
Страница 2 из 65 2 Safety Information CAUTION RISK OF ELECTRIC SHOCK DO NOT OPEN CAUTION: TO REDUCE THE RISK OF ELECTRIC SHOCK DO NOT REMOVE COVER (OR BACK) NO USER-SERVICEABLE PARTS INSIDE REFER SERVICING TO QUALIFIED SERVICE PERSONNEL. This lightning flash with arrowhead symbol within an equilateral triangle is
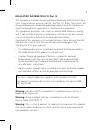
Страница 3 из 65 3 REGULATORY INFORMATION: FCC Part 15 This equipment has been tested and found to comply with the limits for a Class A digital device, pursuant to Part 15 of the FCC Rules. These limits are designed to provide reasonable protection against harmful interference when the equipment is operated in a
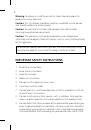
Страница 4 из 65 4 Warning: To reduce a risk of fire or electric shock, do not expose this product to rain or moisture. Caution: This installation should be made by a qualified service person and should conform to all local codes. Caution: To avoid electrical shock, do not open the cabinet. Refer servicing to
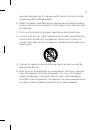
Страница 5 из 65 5 provided plug does not fit into your outlet, consult an electrician for replacement of the obsolete outlet. 10. Protect the power cord from being walked on or pinched particularly at plugs, convenience receptacles, and the point where they exit from the apparatus. 11. Only use
Страница 6 из 65 6 LG Electronics hereby declares that this/these product(s) is/are in compliance with the essential requirements and other relevant provisions of Directive 2004/108/EC, 2006/95/EC, and 2009/125/ EC. European representative : LG Electronics Service Europe B.V. Veluwezoom 15, 1327 AE Almere. The
Страница 7 из 65 7 Cautions for Safe Operation Handling of the unit Be careful not to spill water or other liquids on the unit. Be cautions not to get combustible or metallic material inside the body. If used with foreign matter inside, the device is liable to fail or to get cause of fire or electric shock. • Use a
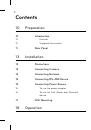
Страница 8 из 65 8 Contents 10 10 Preparation Introduction 10 Features 10 Supplied Accessories 11 13 Rear Panel Installation 13 Precautions 13 Connecting Camera 14 Connecting Network 15 Connecting RS-485 Device 15 Connecting Power Source 15 To use the power adapter 16 To use the PoE (Power over Ethernet) device 17
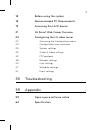
Страница 9 из 65 9 18 Before using the system 18 Recommended PC Requirements 19 Accessing the LG IP device 21 LG Smart Web Viewer Overview 24 Configuring the LG video server 24 Accessing the Configuration menu 24 Configuration menu overview 25 System settings 29 Audio & Video settings 32 PTZ protocol 38 Network
Страница 10 из 65 10 Preparation Introduction The LG Video Server is designed to use on an Ethernet network and must be assigned an IP address to make it accessible. This manual contains instructions on how to install and manage the Video Server in your networking environment. Some knowledge of networking
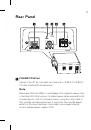
Страница 11 из 65 11 Rear Panel a b c d e a ETHERNET/POE Port Connects to a PC or a network via a hub with a 10 BASE-T/100 BASETX cable attached RJ-45 connector. Note: Power over Ethernet (PoE) is a technology that integrates power into a standard LAN infrastructure. It enables power to be provided to the network
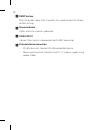
Страница 12 из 65 12 b RESET button Push the button more than 3 seconds, this would restore the factory default settings. c Power indicator Lights when the camera is powered. d VIDEO INPUT Connect the camera’s video output to this BNC connector. e External device connectors • RS-485 Terminals: Connect RS-485
Страница 13 из 65 13 Installation Precautions • Be sure to switch off the unit before installation and connection. • The installation should be made by qualified service personnel or system installers. • Do not expose the power and connection cables to moisture, which may cause damage to the unit. Connecting Camera
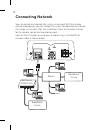
Страница 14 из 65 14 Connecting Network You can control and monitor the system via network. With the remote control (monitoring), you can change the system configuration or monitor the image via network. After the installation, check the network settings for the remote control and monitoring work. Connect the LG
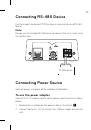
Страница 15 из 65 15 Connecting RS-485 Device Use these ports to connect PTZ Device or an external device of RS-485 format. Note: Do not use the multiple RS-485 device to connect the unit, it may cause the malfunction. TRX+ TRX- RS-485 device Connecting Power Source Connect power, using one of the methods listed
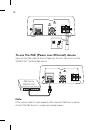
Страница 16 из 65 16 T To use the PoE (Power over Ethernet) device Connect the PoE cable to the LAN port on the unit. You must use the “IEEE802.3af” standard PoE device. PoE Device (IEEE802.3af ) Note: If the camera doesn’t work properly after connect PoE device, please check if the PoE device is supplying enough
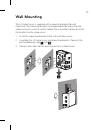
Страница 17 из 65 17 Wall Mounting The LG Video Server is supplied with a mounting bracket for wall mounting. The mounting bracket can be positioned for mounting the video server on a vertical surface. Follow the instructions below to attach the brackets to the video server: 1. Install the mounting bracket to the
Страница 18 из 65 18 Operation Before using the system • Before using the LG IP device make sure the connections are correct and verify whether proper power supply is used. • Check the connections of the LG IP device for the correct conditions. • Check that the LG IP device is(are) connected to the network and that
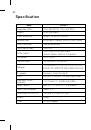
Страница 19 из 65 19 Items Operating System CPU Web Browser Requirements Windows XP Professional or above Intel Core2 Quard Q6700 (2.66 GHz) or above Microsoft Internet Explorer 6.0 or 7.0 DirectX DirectX 9.0 or above Memory 2 GB or above RAM Graphics Card Resolution 256 MB or above Video RAM 1280 x1024 (with 32 bit
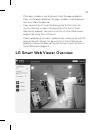
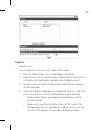
Страница 20 из 65 20 2.2 Click the [Search] icon or select the [Search] option in the Device search menu. After a few seconds the found LG IP devices are displayed in the IP Utility window. 3. Logging in to the LG Smart Web Viewer The LG Smart Web Viewer can be used with most web browsers. The recommended browser is
Страница 21 из 65 21 • If the login window is not displayed, check the pop-up blocker. If you set the pop-up blocker, the login window is not displayed. You must allow the pop-ups. • If you connect the LG Smart Web Viewer for the first time, the Security Warning window is displayed to install the LG Smart Web Viewer
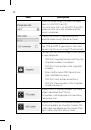
Страница 22 из 65 22 Item Description Select the video image size from the dropdown list. (AUTO, D1 or CIF) The initial view size is set to AUTO. The AUTO option sets the view size according to the Server’s resolution. Displays the current video codec of the selected video stream (Master or Slave). Check this option
Страница 23 из 65 23 Select the video stream. From the Live view drop-down list, select the desired video image source between [Master-0] and [Slave-0]. Note: Master and Slave are output video streams. You can set the stream configurations independently for either Master or Slave stream. This would facilitate the
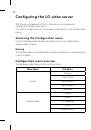
Страница 24 из 65 24 Configuring the LG video server The features and options of the LG video server are configured through the Configuration menu. Only administrator-level users have permission to access the Configuration menu. Accessing the Configuration menu Click the [Configuration] button to display the LG Smart
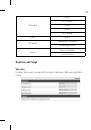
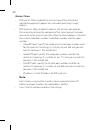
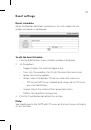
Страница 25 из 65 25 Basic RTP stream Network TCP/IP DDNS IP filtering User Schedule Event Basic Recording schedule Recording server Event schedule Event server System settings Version Displays the current version of Firmware, Hardware, Software and Web Client.
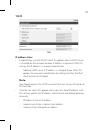
Страница 26 из 65 26 Date & Time Time zone Set the time difference from GMT in the area where the IP device is installed. Select the time zone in the area where the IP device is installed from the drop down list. Time mode • Synchronize with NTP Server: Select if you want to synchronize the IP device’s date and time
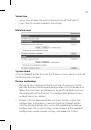
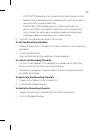
Страница 27 из 65 27 Server time • Server time: Displays the current date and time of the IP device. • Save: Click this button to confirm the settings. Maintenance System reboot Click the [Reboot] button to restart the IP device. It takes some minutes for the IP device to start again. Restore and backup • Backup: To
Страница 28 из 65 28 Notes: • Backup and Restore can happen on IP device having the same version of firmware. This feature is not intended for multiconfigurations or for firmware upgrades. • [Backup] function is allowed in HTTP protocol but not in HTTPS protocol. Firmware • Upgrade 1. Click the [Browse] button 2.
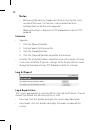
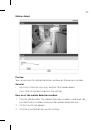
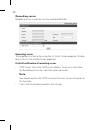
Страница 29 из 65 29 Language Language list Select a language for the LG Smart Web Viewer configuration menu and information display. • Save: Click this button to confirm the settings. Audio & Video settings Camera
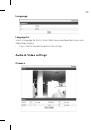
Страница 30 из 65 30 Preview You can preview the camera image on the preview window. General • Contrast: Edit the contrast value in steps of 1, from 0 to 100. Selecting 100 provides the image with the highest contrast. • Brightness: Edit to fine adjust the brightness of the camera. It is brighter when a large value
Страница 31 из 65 31 Master/Slave • Enable: Click to activate the stream function. • Video codec: Select the video mode (Codec) from the drop-down list. The viewer can choose between MJPEG and H.264. • Resolution: Select the image size to be sent from the camera. • • NTSC: D1 (704 x 480), HALF D1 (704 x 240), CIF
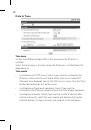
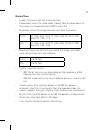
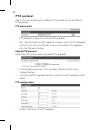
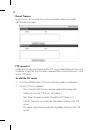
Страница 32 из 65 32 PTZ protocol Allows the user to configure to different PTZ controls by using different PTZ protocols. PTZ protocol list • PTZ protocol: Displays the selected PTZ protocol. • Edit: Click to display the PTZ protocol window. Select the PTZ protocol and then click the [Save] button. If you want to
Страница 33 из 65 33 • Camera ID: Enter the PTZ device ID. Make the same ID as the PTZ Device. • Pan speed: Enter the panning speed of the PTZ device in the edit box. Default value for the LG Multix Protocol is 60 and ranges from 0 to 127. • Tilt speed: Enter the tilting speed of the PTZ device in the edit box.
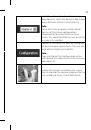
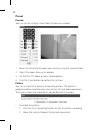
Страница 34 из 65 34 Preset Preview You can see the settings screen from the preview window. 1. Move the camera to the point you want by using the arrow buttons. 2. Adjust the zoom, focus or iris options. 3. Set the Pan, Tilt, Zoom or Focus speed options. 4. Click the [Save] button to confirm the settings. Pattern
Страница 35 из 65 35 3. Click the [Stop recording] button to stop the pattern recording. Note: The available total time of pattern differs depending on connected PTZ device and operation. • To play the pattern 1. Click the [Play] button to play the programmed pattern. 2. Click the [Stop] button to stop playing.
Страница 36 из 65 36 2. Click the [Go to preset]. The camera will be moved to the selected preset. Preset tour list A preset tour is composed of a group of preset positions that the operator can link together in a sequence. • To tour the preset positions 1. Choose the preset in the [Preset list]. 2. Click the [Add]
Страница 37 из 65 37 Motion detect Preview You can preview the motion detection window on the preview window. General • Sensitivity: Enter the sensitivity to detect the motion object. • Save: Click this button to confirm the settings. How to set the motion detection window 1. Click the [Add] button. The motion
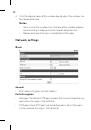
Страница 38 из 65 38 4. Click the edge or coner of the window box to adjust the window size for motion detection. Notes: • You can reset the window size. Click one of the window edge or coner and drag & drop to reset the motion detection area. • Motion detection function is available for H.264 codec. Network
Страница 39 из 65 39 • Network encryption: Select the HTTP or HTTPS option for security. Note: The RTSP port number should not be same with the web port number. TTL • TTL: This option indicates the Time-To-Live of multicast packets. The default setting is 7, and the allowed TTL range is 1 to 255. ARP Ping • Enable
Страница 40 из 65 40 Master / Slave • RTP unicast: When enabled the transmission of the data to the specified equipment happens on a network specifying a single address. • RTP multicast: When enabled it reduces the transmission load on the camera by making the computer of the same segment network receive the same
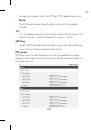
Страница 41 из 65 41 TCP/IP IP address status • Automatically set with DHCP: Select this option when a DHCP server is installed on the network to allow IP address assignment. With this setting, the IP address is assigned automatically. - Notify to SMTP server, if IP address is changed: If you select this option, the
Страница 42 из 65 42 DNS server status • DNS server: Enter the Primary domain name server that translates the hostnames into IP address. • Secondary DNS server: Enter the Secondary DNS server address that backups the Primary DNS. • Save: Click this button to confirm the settings. DDNS This free service is very
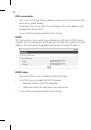
Страница 43 из 65 43 IP filtering The access of the IP addresses in the list are allowed or denied according to the choice made in the drop-down list of the Basic policy option. The administrator can add up to 10 IP address entries to the list (a single entry can contain multiple IP addresses). The users from these
Страница 44 из 65 44 2. Set the IP options. - Alias: Enter the alias. - From: Enter the start IP address for the IP filtering. - To: Enter the end IP address for the IP filtering. Note: If you want to deny or to allow a range of IP addresses, enter the start IP address to “From” and the end IP address to “To”. You
Страница 45 из 65 45 User list • Add the User You can register a new user with various access rights. 1. Click the [Add] button. User setting dialog is displayed. 2. Enter the new User ID and Password. (Should have a minimum of 4 characters and preferably a combination of alphanumeric). 3. To confirm the password,
Страница 46 из 65 46 - Normal user: Provides the lowest level of access. Allows to view live images only. - Custom user: The user can login and view the live stream image only when the “Enable anonymous login” option is checked to enable it. Note: Remember the password. • Edit the registered user You can change the
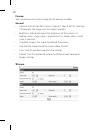
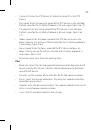
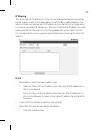
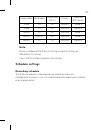
Страница 47 из 65 47 Video Codec Resolution Frame Rate (NTSC) Quality Maximum RTP stream H.264 D1 30 HIGHEST Up to 5 H.264 D1 30 MEDIUM Up to 10 MJPEG D1 30 MEDIUM Up to 1 MJPEG Half D1 30 MEDIUM Up to 2 MJPEG D1 15 MEDIUM Up to 10 Note: Preview window of the IP device setting and preset setting are affected by this
Страница 48 из 65 48 To set the Recording Schedule 1. Click the [Add] button. Recording schedule setting window is displayed. 2. Set the [Pre alarm] and/or [Post alarm] option. • Pre alarm: Specifies the maximum recording time before the event detection. • Post alarm: Specifies the maximum recording time after the
Страница 49 из 65 49 • CONTINUITY: Recording starts automatically from the preset time. • Motion Detect: Recording starts automatically when the motion is detected within a designated time. • DUPLICATED (C,M): Recording starts automatically from the preset time. When the motion is detected within a designated time,
Страница 50 из 65 50 Recording server Recording server is used to save the recorded data files. Recording server These options can be set by using the LG Smart Station program. (Display only in this LG Smart Web Viewer program.) Disk full notification of recording server. • SMTP server: Select the SMTP server
Страница 51 из 65 51 Event settings Event schedule When the Modtion detection event occurs, this unit records the live images and routes as configured. To edit the Event Schedule 1. Click the [Edit] button. Event schedule window is displayed. 2. Set the options. • Trigger: Displays the selected trigger event. •
Страница 52 из 65 52 Event Server Event Servers are used to receive the recorded video clip and/or notification messages. FTP server list Image files can be transferred to the FTP server depending on the event schedule. Image file that has been recorded for an external event is sent to the FTP server. To add the FTP
Страница 53 из 65 53 • Folder: Type the path with the folder that is shared in the FTP server. • Test: Select [Test] to test the FTP server. 3. Click the [Save] button to confirm the settings. To edit the FTP server 1. Choose the FTP server in the FTP server list. 2. Click the [Edit] button. You can check or edit
Страница 54 из 65 54 - Receiving address: Type the recipients e-mail address. You can specify only one recipient e-mail address. - Administrator address: Type the e-mail address of the administrator. - Subject: Enter the subject/title of the e-mail. - Message: This message can describe the information of the
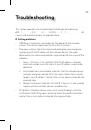
Страница 55 из 65 55 Troubleshooting This section provides useful information to help you to resolve any difficulty l you might i h h have with i h your LG IP d device. i Fault F l symptoms, possible ibl causes and remedial actions are provided here. IP Setting problems • ARP/Ping: Disconnect and reconnect the power
Страница 56 из 65 56 Cannot access the camera from browser: • Reconnect the network camera with power and check the ping operation to know if the IP is used by others. • Disable the proxy setting in the Browser if you are using a proxy server. • Check for proper cabling and network connections, try to ping after
Страница 57 из 65 57 • Check for the RJ45 cables that are used for the network connectivity. • If POE is used check if the power is got by the network camera when connected to it. Login Password lost • Reset the camera by pressing the Reset button for more than 3 seconds to restore default settings. • After the
Страница 58 из 65 58 • Select the Night mode if the network camera is connected at a place where surrounding light is less or dark. • If we obtain lower frame rate than set we need to check from the system administrator for sufficient bandwidth available or reduce the number of applications running on the client
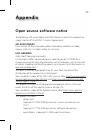
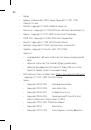
Страница 59 из 65 59 Appendix Open source software notice The following GPL executables and LGPL libraries used in this product are subject to the GPL2.0/LGPL2.1 License Agreements: GPL EXECUTABLES: Linux kernel 2.6, bash, busybox, gdbm, libreadline, module-init-tools, mount, mtd-utils, net-tools, quftp, tar,