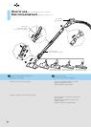
STEAM
SUPPLY
WATER
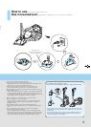
Unloc
k
Loc
k
STEAM
SUPPLY
WATER
18
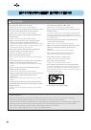
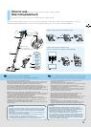
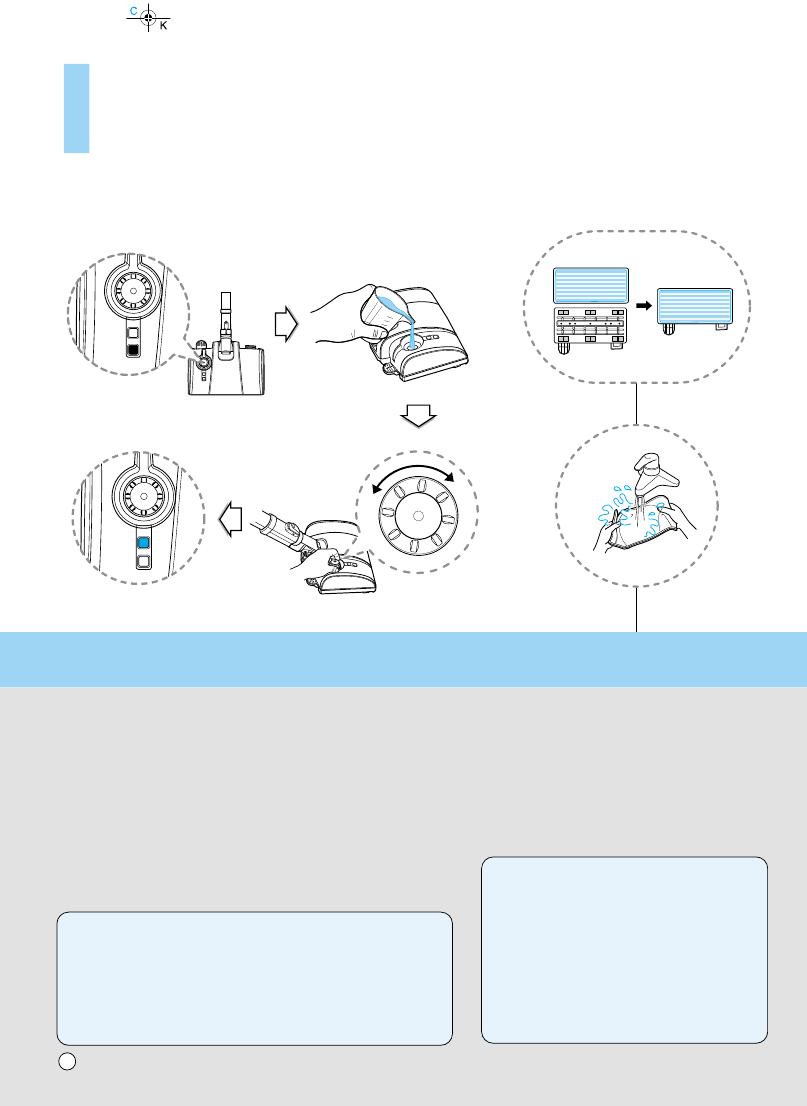
How to supply water
ä‡Í Á‡ÎË‚‡Ú¸ ‚Ó‰Û
• When the "SUPPLY WATER" light is turn on the LED display window of the nozzle, stop operating the steam
cleaning vacuum tool and unplug the power.
• Open the water hole cap of the nozzle and use the measuring cup (water supply cup) to pour the water.
(Appropriate amount: 250cc)
• Lock the water hole cap of the vacuum tool in the arrow direction as shown in the picture.
- Turn the cap to the right direction until you hear a clicking sound as the fuel cap of an automobile.
• After turning on the power again, start cleaning when the "STEAM" lamp on the LED display window is turned on.
- When the "SUPPLY WATER" LED is turned on, it will be turned off after 30 seconds to 1 minute after
supplying the water and the "STEAM" lamp will be turned on.
• ÖÒÎË ‚ ÓÍÌ ‰ËÒÔÎÂfl Ô‡Ó‚ÓÈ Ì‡Ò‡‰ÍË „ÓËÚ Ë̉Ë͇ÚÓ «SUPPLY WATER» (Á‡ÎËÚ¸ ‚Ó‰Û), ÌÂÓ·ıÓ‰ËÏÓ
‚˚Íβ˜ËÚ¸ Ô‡Ó‚Û˛ ̇҇‰ÍÛ Ë ÓÚÒÓ‰ËÌËÚ¸ ÛÒÚ‡ÌÓ‚ÍÛ ÓÚ ÒÂÚË ÔËÚ‡ÌËfl.
• éÚÍÓÈÚ Í˚¯ÍÛ Á‡ÎË‚ÌÓ„Ó ÓÚ‚ÂÒÚËfl ̇҇‰ÍË Ë ÔË ÔÓÏÓ˘Ë ÏÂÌÓ„Ó Òڇ͇̇ (ÒÚ‡Í‡Ì ‰Îfl Á‡ÎË‚ÍË
‚Ó‰˚) Á‡ÎÂÈÚ ‚Ó‰Û. (äÓ΢ÂÒÚ‚Ó: 250 ÒÏ3)
• á‡ÍÓÈÚ Í˚¯ÍÛ Á‡ÎË‚ÌÓ„Ó ÓÚ‚ÂÒÚËfl ‚‡ÍÛÛÏÌÓÈ Ì‡Ò‡‰ÍË ‚ ̇ԇ‚ÎÂÌËË ÒÚÂÎÍË, Í‡Í ÔÓ͇Á‡ÌÓ Ì‡
ËÒÛÌÍÂ. - èÓ‚ÂÌËÚ Í˚¯ÍÛ ‚Ô‡‚Ó ‰Ó ˘ÂΘ͇, Í‡Í Í˚¯ÍÛ „ÓÎÓ‚ËÌ˚ ‡‚ÚÓÏÓ·ËθÌÓ„Ó ·‡Í‡.
• èÓÒΠ‚Íβ˜ÂÌËfl ÔËÚ‡ÌËfl ̇˜Ë̇ÈÚ ۷ÓÍÛ ÔÓÒΠÔÓfl‚ÎÂÌËfl ̇ ˝Í‡Ì ‰ËÒÔÎÂfl Ë̉Ë͇ˆËË «STEAM» (Ô‡).
- à̉Ë͇ÚÓ «SUPPLY WATER» (Á‡ÎËÚ¸ ‚Ó‰Û) „‡ÒÌÂÚ ˜ÂÂÁ 30 – 60 ÒÂÍÛ̉ ÔÓÒΠÁ‡ÎË‚ÍË ‚Ó‰˚, Á‡ÚÂÏ
Á‡„Ó‡ÂÚÒfl ·ÏÔ‡ «STEAM» (Ô‡).
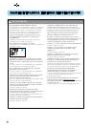
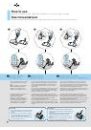
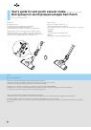
How to replace and clean the microfiber cloth
ä‡Í ÏÂÌflÚ¸ Ë ˜ËÒÚËÚ¸ ̇Í·‰ÍË ËÁ ÏËÍÓÙË·˚
When replacing the microfiber cloth, always make sure the power is turned
off.
• Detach the cloth board from the steam cleaning vacuum tool and replace the
microfiber cloth. Attach the white side of the microfiber cloth on the cloth
board on the bottom surface of the cleaner.
• Reuse the dirty cloth by cleaning it with clean water, soap, detergent etc.
and then by completely drying the cloth in the shade.
è‰ Á‡ÏÂÌÓÈ Ì‡Í·‰ÍË Û·Â‰ËÚÂÒ¸, ˜ÚÓ ÔËÚ‡ÌË ÛÒÚ‡ÌÓ‚ÍË ‚˚Íβ˜ÂÌÓ.
• ëÌËÏËÚ Ô·ÒÚËÌÛ Ò Ô‡Ó‚ÓÈ Ì‡Ò‡‰ÍË Ë Á‡ÏÂÌËÚ ̇Í·‰ÍÛ ËÁ
ÏËÍÓÙË·˚. ÅÂÎÓÈ ÒÚÓÓÌÓÈ ÛÒÚ‡ÌÓ‚ËÚ ̇Í·‰ÍÛ Ì‡ Ô·ÒÚËÌÛ, ‡
Ô·ÒÚËÌÛ Ì‡ ÌËÊÌ˛˛ ÔÓ‚ÂıÌÓÒÚ¸ Ô‡Ó‚ÓÈ Ì‡Ò‡‰ÍË.
• èÓÒÚˇÈÚ Á‡„flÁÌÂÌÌÛ˛ ̇Í·‰ÍÛ ‚ ‚Ó‰Â Ò Ï˚ÎÓÏ, ÏÓ˛˘ËÏ
Ò‰ÒÚ‚ÓÏ Ë Ô., ‡ Á‡ÚÂÏ ÔÓÒÛ¯ËÚ ̇Í·‰ÍÛ ‚ ÚÂÌË.
How to use
How to supply water, How to replace and clean the microfiber cloth
ä‡Í ÔÓθÁÓ‚‡Ú¸Òfl
ä‡Í Á‡ÎË‚‡Ú¸ ‚Ó‰Û, ä‡Í ÏÂÌflÚ¸ Ë ˜ËÒÚËÚ¸ ̇Í·‰ÍË ËÁ ÏËÍÓÙË·˚
CAUTION,
ÇÌËχÌËÂ
• To reduce the alien particles formed inside the water tank as much as possible, use clean
water.
• When supplying the water, you must stop operating the steam cleaning vacuum tool and
unplug the power.
• When supplying the water, pull down the hose handle to the floor and supply the water.
• óÚÓ·˚ ÒÌËÁËÚ¸ ÒÓ‰ÂʇÌË ‚ ÂÏÍÓÒÚË ‰Îfl ‚Ó‰˚ ÔÓÒÚÓÓÌÌËı ˜‡ÒÚˈ, ÌÂÓ·ıÓ‰ËÏÓ
ËÒÔÓθÁÓ‚‡Ú¸ ÚÓθÍÓ ˜ËÒÚÛ˛ ‚Ó‰Û.
• ÇÓ ‚ÂÏfl Á‡ÎË‚ÍË ‚Ó‰˚ ÌÂÓ·ıÓ‰ËÏÓ ‚˚Íβ˜ËÚ¸ Ô‡Ó‚Û˛ ̇҇‰ÍÛ Ë ÓÚÒÓ‰ËÌËÚ¸
ÛÒÚ‡ÌÓ‚ÍÛ ÓÚ ÒÂÚË ÔËÚ‡ÌËfl.
• è‰ Á‡ÎË‚ÍÓÈ ‚Ó‰˚ ÌÂÓ·ıÓ‰ËÏÓ ÔÓÎÓÊËÚ¸ ÛÍÓflÚÍÛ ¯Î‡Ì„‡ ̇ ÔÓÎ.
CAUTION,
ÇÌËχÌËÂ
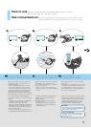
• If you do not completely remove the moisture when using the microfiber cloth,
it can cause electric shock and damage the main unit.
• When the microfiber cloth deviates from the attaching surface, it will not be fixated.
• Attach the microfiber cloth so that the vacuum hole of the steam cleaning
vacuum tool is not covered.
• The cloth can get wet faster depending on how the steam vacuum tool is used and
the time. At this time, when you replace the cloth, you can clean with a dry cloth.
• ÖÒÎË Ì‡Í·‰Í‡ ÔÓÒÛ¯ÂÌ ‡ ̉ÓÒÚ‡ÚÓ˜ÌÓ, ˝ÚÓ ÏÓÊÂÚ ÔË‚ÂÒÚË Í
ÔÓ‡ÊÂÌ˲ ˝ÎÂÍÚ˘ÂÒÍËÏ ÚÓÍÓÏ Ë ÔÓ‚ÂʉÂÌ˲ ÛÒÚ‡ÌÓ‚ÍË.
• ÖÒÎË Ì‡Í·‰Í‡ ÌÂÔÎÓÚÌÓ ÔË΄‡ÂÚ Í ÔÓ‚ÂıÌÓÒÚË, Ó̇ Ì ·Û‰ÂÚ
Á‡ÙËÍÒËÓ‚‡Ì‡.
• ìÒÚ‡ÌÓ‚ËÚ ̇Í·‰ÍÛ ËÁ ÏËÍÓÙË·˚ Ú‡Í, ˜ÚÓ·˚ ‚Ò‡Ò˚‚‡˛˘Â ÓÚ‚ÂÒÚËÂ
Ô‡Ó‚ÓÈ Ì‡Ò‡‰ÍË Ì ·˚ÎÓ Á‡Í˚ÚÓ.
• îËÎ¸Ú ÏÓÊÂÚ Ì‡ÏÓ͇ڸ ·˚ÒÚ ‚ Á‡‚ËÒËÏÓÒÚË ÓÚ ‚ÂÏÂÌË Ë ÒÔÓÒÓ·‡
ËÒÔÓθÁÓ‚‡ÌËfl Ô‡Ó‚ÓÈ ‚‡ÍÛÛÏÌÓÈ Ì‡Ò‡‰ÍË. èÓ˝ÚÓÏÛ ÔË Á‡ÏÂÌ ÙËθڇ
‚ÓÁÏÓÊ̇ ˜ËÒÚ͇ ÔË ÔÓÏÓ˘Ë ÒÛıÓÈ Ì‡Í·‰ÍË.