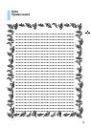
MAX
MIN
STEAM
(ON/OFF)
OFF
Handle
êÛÍÓflÚ͇
How to supply water, ä‡Í Á‡ÎË‚‡Ú¸ ‚Ó‰Û
How to attach the microfiber cloth
ä‡Í ÛÒÚ‡ÌÓ‚ËÚ¸ ̇Í·‰ÍÛ ËÁ ÏËÍÓÙË·˚
Steam safety switch
Ä‚‡ËÈÌ˚È
‚˚Íβ˜‡ÚÂθ Ô‡‡
Hose
ò·̄
Extension pipe
ê„ÛÎflÚÓ ‰ÎËÌ˚
ÚÂÎÂÒÍÓÔ˘ÂÒÍÓÈ ÚÛ·ÍË
3
2
1
4
5
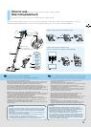
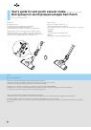
How to use
Basic using method of the steam cleaner
ä‡Í ÔÓθÁÓ‚‡Ú¸Òfl
éÒÌÓ‚ÌÓÈ ÒÔÓÒÓ· ËÒÔÓθÁÓ‚‡ÌËfl Ô‡Ó‚ÓÈ Ì‡Ò‡‰ÍË
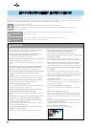
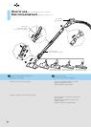
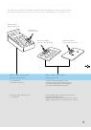
Assembly and power ON/OFF
ë·Ó͇ Ë ‚Íβ˜ÂÌË ÔËÚ‡ÌËfl (ON/OFF)
Always hold the steam safety switch during steam cleaning.
• Align the extension pipe (2) and the terminal part of the steam cleaning vacuum tool (3), and connect the
two completely until you hear the “Click”. If the steam cleaning vacuum tool and the extension are not
completely connected, the nozzle will be pulled out or the steam will not be generated.
• Connect the hose (1) and the extension pipe (2) completely unit you hear the “Click” sound.
• When you press the "STEAM" button (4) on the function control button on the handle part of the hose (1),
the steam will be generated. Initial steam generation time is about 4.5 minutes and it will take a little
longer for the cloth to get wet. You must operate the "STEAM" button after filling the water.
• When you press the "STEAM" button (4) one more time or press the "OFF" button (5), the steam will stop.
ÇÓ ‚ÂÏfl Ô‡Ó‚ÓÈ ˜ËÒÚÍË ‚Ò„‰‡ ‰ÂÊËÚ ÛÍÛ Ì‡ ‡‚‡ËÈÌÓÏ ‚˚Íβ˜‡ÚÂΠԇ‡.
• ëÓ‚ÏÂÒÚËÚ ÚÂÎÂÒÍÓÔ˘ÂÒÍÛ˛ ÚÛ·ÍÛ (2) Ë Ô‡Ó‚Û˛ ̇҇‰ÍÛ (3), ‡ Á‡ÚÂÏ ÒÓ‰ËÌËÚ ӷ ‰ÂÚ‡ÎË ‰Ó
˘ÂΘ͇. ÖÒÎË Ô‡Ó‚‡fl ̇҇‰Í‡ Ë Û‰ÎËÌËÚÂθ̇fl Ú۷͇ ÒÓ‰ËÌÂÌ˚ Ì ÔÓÎÌÓÒÚ¸˛, ÔÓËÁÓȉÂÚ
ÓÚÒÓ‰ËÌÂÌË ̇҇‰ÍË ËÎË Ì ·Û‰ÂÚ ‚˚ÔÓÎÌflÚ¸Òfl „Â̇ˆËfl Ô‡‡.
• ëÓ‰ËÌËÚ ¯Î‡Ì„ (1) ÚÂÎÂÒÍÓÔ˘ÂÒÍÛ˛ ÚÛ·ÍÛ (2) ‰Ó ˘ÂΘ͇.
• èË Ì‡Ê‡ÚËË ÍÌÓÔÍË "STEAM" (Ô‡) (4), ‡ÒÔÓÎÓÊÂÌÌÓÈ Ì‡ Ô‡ÌÂÎË ÛÍÓflÚÍË ¯Î‡Ì„‡ (1)
̇˜Ë̇ÂÚÒfl „Â̇ˆËfl Ô‡‡. ÇÂÏfl Ô‚Ó̇˜‡Î¸ÌÓÈ „Â̇ˆËË Ô‡‡ ÒÓÒÚ‡‚ÎflÂÚ ÔËÏÂÌÓ 4,5
ÏËÌÛÚ˚, ̇ ۂ·ÊÌÂÌË ̇Í·‰ÍË Ú·ÛÂÚÒfl ÌÂÏÌÓ„Ó ·Óθ¯Â ‚ÂÏÂÌË. ç‡ÊËχڸ ÍÌÓÔÍÛ
"STEAM" ÏÓÊÌÓ ÚÓθÍÓ ÔÓÒΠÁ‡ÔÓÎÌÂÌËfl ÛÒÚ‡ÌÓ‚ÍË ‚Ó‰ÓÈ.
• èÓÒΠÔÓ‚ÚÓÌÓ„Ó Ì‡Ê‡ÚËfl ÍÌÓÔÍË "STEAM" (4) ËÎË Ì‡Ê‡ÚËfl ÍÌÓÔÍË "OFF" (ÓÒÚ‡ÌÓ‚) (5) ÔÓ‰‡˜‡
Ô‡‡ ÔÂ͇˘‡ÂÚÒfl.
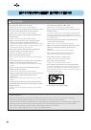
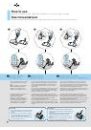
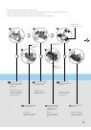
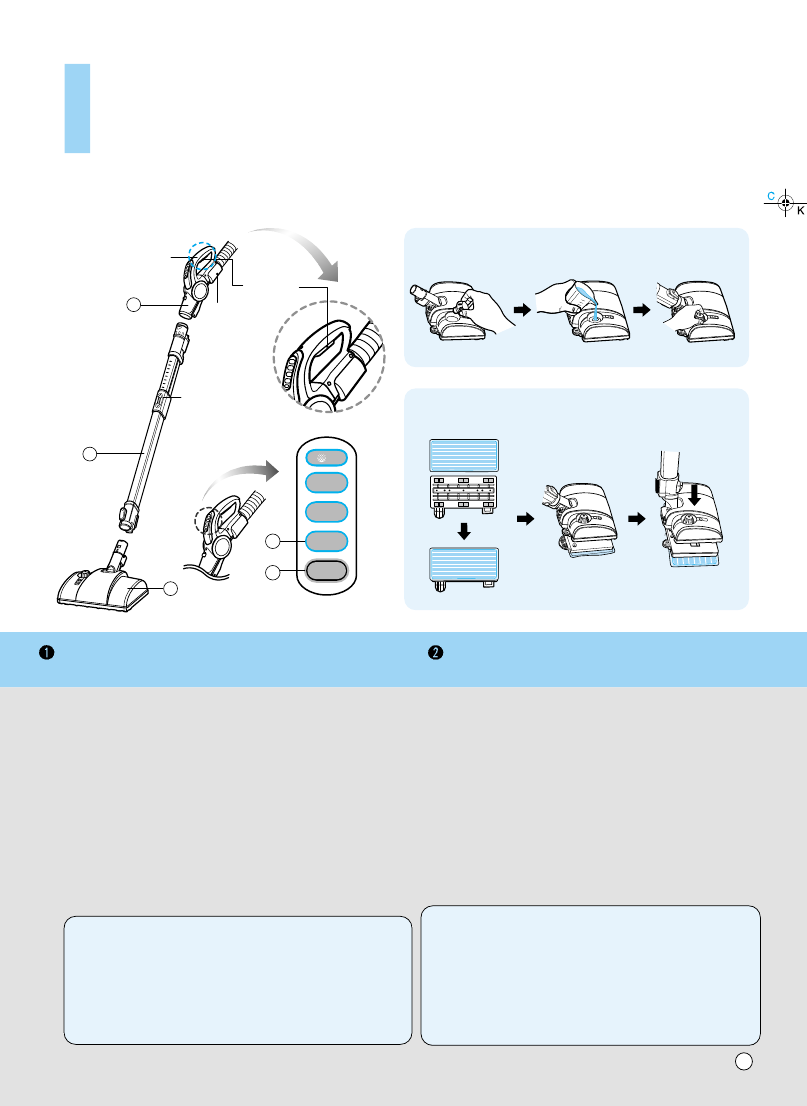
How to supply water, How to attach the microfiber cloth
ä‡Í Á‡ÎË‚‡Ú¸ ‚Ó‰Û, ä‡Í ÛÒÚ‡ÌÓ‚ËÚ¸ ̇Í·‰ÍÛ ËÁ ÏËÍÓÙË·˚
To supply water, always unplug the power and put the hose handle on the floor.
And then pour the water into the unit.
• Open the water hole cap of the steam cleaning vacuum tool.
• Use the measuring cup to pour 250cc of water and then close the water hole cap tightly.
When attaching the cloth, you must always turn off the system power.
• After attaching the cloth on the cloth board, install it on the nozzle for steam cleaning.
Be careful because the cloth board can be hot.
• After aligning the vacuum tool with the cloth board, press it from the top. Connect after
you hear the clicking sound. The cloth must be attached on the cloth board for the
vacuum tool and the cloth board to be connected.
è‰ Á‡ÎË‚ÍÓÈ ‚Ó‰˚ ‚Ó‰˚ ÌÂÓ·ıÓ‰ËÏÓ ‚Ò„‰‡ ÓÚÍβ˜‡Ú¸ ÔËÚ‡ÌËÂ Ë Í·ÒÚ¸
ÛÍÓflÚÍÛ ¯Î‡Ì„‡ ̇ ÔÓÎ. á‡ÚÂÏ ÏÓÊÌÓ Á‡ÎË‚‡Ú¸ ‚Ó‰Û ‚ ÛÒÚ‡ÌÓ‚ÍÛ.
• éÚÍÓÈÚ Í˚¯ÍÛ Á‡ÎË‚ÌÓ„Ó ÓÚ‚ÂÒÚËfl ‚Ó‰˚ Ô‡Ó‚ÓÈ Ì‡Ò‡‰ÍË.
• èË ÔÓÏÓ˘Ë ÏÂÌÓ„Ó Òڇ͇̇ Á‡ÎÂÈÚ 250 ÒÏ3 ‚Ó‰˚, ‡ Á‡ÚÂÏ ÔÎÓÚÌÓ Á‡ÍÓÈÚ Í˚¯ÍÛ.
ÇÓ ‚ÂÏfl ÛÒÚ‡ÌÓ‚ÍË Ì‡Í·‰ÍË ÌÂÓ·ıÓ‰ËÏÓ ‚Ò„‰‡ ‚˚Íβ˜‡Ú¸ ÔËÚ‡ÌËÂ
èÓÒΠÛÒÚ‡ÌÓ‚ÍË Ì‡Í·‰ÍË Ì‡ ÒÔˆˇθÌÛ˛ Ô·ÒÚËÌÛ ÛÒÚ‡ÌÓ‚ËÚ ̇҇‰ÍÛ ‰Îfl
Ô‡Ó‚ÓÈ ˜ËÒÚÍË.
ëӷ≇ÈÚ ÓÒÚÓÓÊÌÓÒÚ¸, Ú‡Í Í‡Í Ì‡Ò‡‰Í‡ ÏÓÊÂÚ ·˚Ú¸ „Ófl˜ÂÈ.
• èÓÒΠÒÓ‚Ï¢ÂÌËfl ̇҇‰ÍË Ò Ô·ÒÚËÌÓÈ Ì‡ÊÏËÚ ̇ Ì ı‡‡ÍÚÂÌÓ„Ó ˘ÂΘ͇.
ç‡Í·‰ÍÛ ÌÂÓ·ıÓ‰ËÏÓ ÛÒÚ‡ÌÓ‚ËÚ¸ ̇ Ô·ÒÚËÌÛ ‰Îfl ÒÓ‰ËÌÂÌËfl Ò Ì‡Ò‡‰ÍÓÈ.
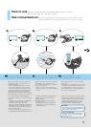
CAUTION
To prevent safety accidents during steam cleaning, if you do not press the steam safety
switch within 30 seconds, the unit will recognize that the cleaning has been completed
and turn off the power. If you want to use the steam again, press the "STEAM" button
one more time.
• During initial steam nozzle operation, it will operate for 270 seconds (4.5 minutes) even
when you do not press the steam safety switch.
• About 4 minutes after pressing the "STEAM" button, you can start the cleaning and
after about 4.5 minutes, you can check the steam with your eyes.
• The cloth can get wet faster depending on how the steam vacuum tool is used and the
time. At this time, when you replace the cloth, you can clean with a dry cloth.
ÇÌËχÌËÂ
ÖÒÎË ‡‚‡ËÈÌ˚È ‚˚Íβ˜‡ÚÂθ Ô‡‡ ÌÂ Ì‡Ê‡Ú ‚ Ú˜ÂÌË 30 ÒÂÍÛ̉, ‚Ó
ËÁ·ÂʇÌË ÔÓËÒ¯ÂÒÚ‚ËÈ ‚Ó ‚ÂÏfl Ô‡Ó‚ÓÈ ˜ËÒÚÍË ÔË·Ó ÓÔ‰ÂÎËÚ, ˜ÚÓ
˜ËÒÚ͇ Á‡ÍÓ̘Â̇, ÔËÚ‡ÌË ·Û‰ÂÚ ‚˚Íβ˜ÂÌÓ. ÖÒÎË ÌÂÓ·ıÓ‰ËÏÓ ÔÓ‚ÚÓÌÓÂ
ËÒÔÓθÁÓ‚‡ÌË ԇ‡, ̇ÊÏËÚ ÍÌÓÔÍÛ "STEAM" (Ô‡) ¢ ‡Á.
• è‚Ó̇˜‡Î¸Ì‡fl ÔÓ‰‡˜‡ Ô‡‡ ÓÒÛ˘ÂÒÚ‚ÎflÂÚÒfl ‚ Ú˜ÂÌË 270 ÒÂÍÛ̉ (4,5
ÏËÌÛÚ˚), ‰‡Ê ÂÒÎË ‡‚‡ËÈÌ˚È ÔÂÂÍβ˜‡ÚÂθ Ô‡‡ Ì ̇ʇÚ.
• Ç Ú˜ÂÌË ÔËÏÂÌÓ 4 ÏËÌÛÚ ÔÓÒΠ̇ʇÚËfl ÍÌÓÔÍË "STEAM" (Ô‡) ÏÓÊÌÓ
̇˜‡Ú¸ ÏÓÈÍÛ, ‡ ˜ÂÂÁ 4,5 ÏËÌÛÚ˚ ÒÚÛfl Ô‡‡ ÒÚ‡ÌÓ‚ËÚÒfl ‚ËÁۇθÌÓ ‚ˉ̇.
• ç‡Í·‰Í‡ ÏÓÊÂÚ Ì‡ÏÓ͇ڸ ·˚ÒÚ ‚ Á‡‚ËÒËÏÓÒÚË ÓÚ ‚ÂÏÂÌË Ë ÒÔÓÒÓ·‡
ËÒÔÓθÁÓ‚‡ÌËfl Ô‡Ó‚ÓÈ Ì‡Ò‡‰ÍË. èÓ˝ÚÓÏÛ ÔË Á‡ÏÂÌ ̇Í·‰ÍË ‚ÓÁÏÓÊ̇
˜ËÒÚ͇ Ò ËÒÔÓθÁÓ‚‡ÌËÂÏ ÒÛıÓÈ Ì‡Í·‰ÍË.
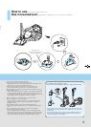
By using the steam cleaning vacuum tool, you can do vacuum cleaning and steam cleaning simultaneously or individually, in an easy way.
èË ÔÓÏÓ˘Ë Ô‡Ó‚ÓÈ Ì‡Ò‡‰ÍË ÏÓÊÌÓ Î„ÍÓ Ô˚ÎÂÒÓÒËÚ¸ Ë ÔÓ‚Ó‰ËÚ¸ Ô‡Ó‚Û˛ ˜ËÒÚÍÛ ÔÓ ÓÚ‰ÂθÌÓÒÚË ËÎË Ó‰ÌÓ‚ÂÏÂÌÌÓ.
15