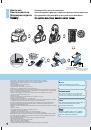
• Connect the steam cleaning vacuum tool to the extension pipe.
• When you lift the extension pipe up as shown in the arrow, the extension pipe will be fixed after the “ Click” sound.
When you press the steam vacuum tool button, you can freely use the extension pipe.
•
T
o use both the vacuum cleaning and steam cleaning simultaneously, press the function button for vacuum cleaning
and function button for steam cleaning respectively. When you press the “OFF” button, the operation will stop.
21