Инструкция для M-AUDIO Axiom AIR 49

(скачивание инструкции бесплатно)
Формат файла: PDF
Доступность: Бесплатно как и все руководства на сайте. Без регистрации и SMS.
Дополнительно: Чтение инструкции онлайн
background image


43 


MIDI Panic 


Quando si attiva un messaggio MIDI Panic, invia un messaggio "All Notes Off" su tutti i canali e attraverso tutte le 
uscite. Ciò è utile quando un sintetizzatore hardware o software collegato ha una nota On bloccata.  


Per inviare un messaggio MIDI Panic:  

1. 

Premere il pulsante Edit. 

2. 

Premere il tasto MIDI Panic sulla tastiera. L'Axiom AIR invierà un messaggio MIDI "All Notes Off" e a display 
comparirà la scritta 

All Notes Off

 (tutte le note off). L'Axiom AIR uscirà automaticamente dalla modalità Edit.  
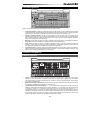
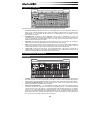
 

Sedi della memoria 


Una volta effettuate alcune assegnazioni MIDI adatte a un dispositivo o a un compito specifico, si può desiderare di 
salvarle in una delle 128 memorie dell'Axiom AIR per utilizzarle in un secondo momento. 


Memoria 


Per memorizzare il set corrente di assegnazioni MIDI ad una memoria: 

1. 

Premere il pulsante Edit. Lampeggerà di rosso. 

2. 

Premere il pulsante Memory (memoria). 

Memory

, e la sede e il numero della memoria attualmente caricata 

compariranno sullo schermo LCD. 

3. 

Servirsi dei tasti numerici (0–9), della manopola 8 o dei tasti direzionali su e giù per selezionare la memoria 
desiderata (0-127).  

4. 

Inserire un nome per la memoria. Servirsi dei tasti direzionali sinistro e destro per selezionare una lettera da 
modificare e utilizzare la manopola 4 per cambiare la lettera selezionata.  

5. 

Premere il tasto Invio sulla tastiera per salvare la memoria. Sullo schermo LCD appare la scritta 

Saving...


(salvataggio in corso). Una volta terminato, l'Axiom AIR uscirà automaticamente dalla modalità Edit. 


Per richiamare una memoria: 

1. 

Premere il pulsante Memory (memoria). Si illumina di verde. 

2. 

Servirsi dei tasti direzionali su e giù o della manopola 8 per selezionare una memoria dall'elenco. 

3. 

Premere il tasto direzionale centrale per caricare la memoria selezionata. Sullo schermo LCD appare la scritta


Loading...

 (caricamento in corso). Una volta terminato, regolare un comando per far tornare lo schermo LCD al 

suo stato normale. 


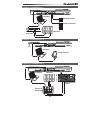
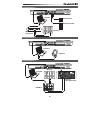
Back up e caricamento 


È possibile effettuare il back up e caricare singole memorie o tutte 
e 128 le memorie sull'Axiom AIR utilizzando MIDI SysEx. Servirsi 
di un'applicazione SysEx librarian o registrarla in una traccia MIDI 
nel DAW e riprodurla quando occorre.  


Per effettuare il backup di una o di tutte le memorie:  

1. 

Assicurarsi che l'Axiom AIR sia collegato al computer, funzioni correttamente e che la memoria desiderata sia 
stata caricata. 

2. 

Assicurarsi che il DAW stia registrando una traccia MIDI (e che sia configurato per ricevere MIDI da Axiom 
AIR), o che l'utility SysEx librarian sia pronta a ricevere dati. 

3. 

Premere il pulsante Edit. Lampeggerà di rosso. 

4. 

Premere ii tasti direzionali su o giù o il tasto MEM Backup sulla tastiera per passare da 

Backup? 

(backup 

memoria attuale) e 

Backup All?

 (backup di tutte le memorie).  

5. 

Premere il tasto direzionale centrale per avviare il backup. Sullo schermo LCD appare la scritta 

Sending...


(invio in corso). L'LCD tornerà alla schermata principale quando il procedimento è completo. 


Per caricare una o tutte le memorie da un backup MIDI:  

1. 

Assicurarsi che l'Axiom AIR sia collegato al computer e 
funzioni correttamente.  

2. 

Assicurarsi che il DAW (con una traccia MIDI contenente dati 
di backup) o l'utility libreria SysEx sia impostata per 
trasmettere MIDI all'Axiom AIR (ossia che la porta di uscita 
MIDi del programma sia impostata per la porta HyperControl 
dell'Axiom AIR).* 

3. 

Premere Play sul DAW o abilitare la trasmissione SysEx nell'applicazione SysEx librarian. Sullo schermo LCD 
appare la scritta 

Rec SysEx...

 (registra SysEx). L'LCD tornerà alla schermata principale quando il 

procedimento è completo. 


IMPORTANTE: 


Quando si caricano


tutte le memorie

, le memorie salvate nel backup sovrascriveranno quelle 

corrispondenti nell'Axiom AIR. L'Axiom AIR manterrà tutte le altre memorie. 


Quando si carica una singola memoria

, sarà caricata unicamente nel "Edit Mode buffer" (buffer 

modalità Edit), non in una memoria specifica. Salvarla in una memoria seguendo le istruzioni contenute 
nel paragrafo 

Storing

 di cui sopra. 

Prima di caricare dati SysEx da una 

traccia MIDI nel DAW, assicurarsi che la 
testina trasporto o la testina di riproduzione 
sia posizionata prima dei dati desiderati 
nella timeline.

IMPORTANTE!:

 quando si inviano dati 

SysEx, 

non

 impostare la velocità di invio 

più alta di 3,05 KB/sec. In caso contrario si 
causerebbero problemi al trasferimento.


1
2
3
4
5
6
7
8
9
10
11
12
13
14
15
16
17
18
19
20
21
22
23
24
25
26
27
28
29
30
31
32
33
34
35
36
37
38
39
40
41
42
43
44
45
46
47
48
49
50
51
52
53
54
55
56
57
58
59
60
Оглавление инструкции
  • Страница 1 из 61
    USER MANUAL ENGLISH ( 2 – 12 ) MANUAL DEL USUARIO ESPAÑOL ( 13 – 23 ) MANUEL D'UTILISATION FRANÇAIS ( 24 – 34 ) GUIDA PER L'USO ITALIANO ( 35 – 45 ) BENUTZERHANDBUCH DEUTSCH ( 46 – 56 )
  • Страница 2 из 61
    USER GUIDE (ENGLISH) Box Contents  Axiom AIR 49  USB cable  Pro Tools Express DVD  User Guide  iLok 2  Safety & Warranty Manual Support For complete system requirements, compatibility information, and product registration, visit the support section of the M-Audio website: m-audio.com/support.
  • Страница 3 из 61
    Setup Scenario 1 Computer Sustain Pedal Expression Pedal USB MIDI IN MIDI OUT R L R L VOL Monitors USB Audio Interface Setup Scenario 2 Computer Headphones Setup Scenario 3 Computer Monitors External Rack Synth USB Mixer 3
  • Страница 4 из 61
    General Overview 3 2 4 5 1 This is a broad overview of Axiom AIR 49's controls, divided into sections: 1. 2. 3. 4. 5. Performance Controls: The keyboard is pressure- and velocity-sensitive, allowing for a comfortable and natural-feeling performance. Access the entire 88-note range by using the
  • Страница 5 из 61
    4. Knobs: You can use these eight knobs to send standard MIDI messages or to take control of mixing or plug-in parameters in HyperControl Mode, depending on the setting of the adjacent Mode buttons. • MIDI Mode (MIDI Bank button): The knobs will send MIDI messages as assigned or according to the
  • Страница 6 из 61
    8. Main Control Panel: A. LCD: This screen displays useful information, such as the current assignment and setting of the most recently moved physical control. D B B. Edit Button: This button puts Axiom AIR in Edit Mode, A allowing you to use its keyboard's special functions to E C create or edit
  • Страница 7 из 61
    Performance Settings This section explains settings that change the functions of Axiom AIR's keyboard and trigger pads. IMPORTANT: When this manual refers to a "key," this means a key on the keyboard with a label printed above it (e.g., "PAD Learn," "PAD Roll," etc.) as opposed to a button
  • Страница 8 из 61
    Assigning MIDI Messages to the Controls Editing Axiom AIR's MIDI configuration all starts with the Edit button. Press it to enter Edit Mode. It will flash to indicate it is in Edit Mode. To exit Edit Mode, press it a second time. To assign a specific MIDI message to a physical control: 1. Press the
  • Страница 9 из 61
    Keyboard Trigger Pads 1 (Low): Low sensitivity 2 (Low Normal): Slightly more sensitive than Low 3 (Normal): Default sensitivity 4 (Normal High): Slightly more sensitive than Normal 5 (High): Highest exponential curve 6 (Linear): True to velocity 7 (Low Range): Velocity limited to lowest third of
  • Страница 10 из 61
    MIDI Panic When you trigger a MIDI Panic message, it sends an "All Notes Off" message on all channels and through all outputs. This is useful when a connected hardware or software synthesizer has a stuck Note On. To send a MIDI Panic message: 1. Press the Edit button. 2. Press the MIDI Panic key on
  • Страница 11 из 61
    HyperControl Rather than assigning parameters one by one, activating Axiom AIR's HyperControl Mode automatically maps its controls to many of the most frequently used DAW features. This section is a general outline of HyperControl Mode's features. Keep in mind that features, control behaviors, and
  • Страница 12 из 61
    Other Controls Directional Buttons The Directional buttons can be used to control certain supported software features. Press the HyperControl button next to the Directional buttons to enable this function. Trigger Pads The trigger pads can be used to trigger drum or instrument sounds mapped by your
  • Страница 13 из 61
    GUÍA DEL USUARIO (ESPAÑOL) Contenido de la caja    Axiom AIR 49 DVD de Pro Tools Express iLok 2    Cable USB Guía del usuario Manual sobre la seguridad y garantía Soporte Para obtener información sobre los requisitos completos de sistema, la compatibilidad y el registro del producto, visite
  • Страница 14 из 61
    Escenario de instalación 1 Pedal de sostenido Pedal de expresión Computadora USB MIDI IN MIDI OUT R L R L VOL Monitores Interfaz de audio USB Escenario de instalación 2 Computadora Auriculares Escenario de instalación 3 Computadora Monitores Rack de sincronismo externo Mezclador USB 14
  • Страница 15 из 61
    Vista general 3 2 4 5 1 Ésta es una vista general de los controles del Axiom AIR 49, divididos en secciones: 1. 2. 3. 4. 5. Controles de interpretación: El teclado es sensible a la presión y la velocidad, permitiendo una interpretación cómoda y con sensación natural. Acceda a la gama completa de 88
  • Страница 16 из 61
    4. Perillas: Puede usar estas ocho perillas para enviar mensajes MIDI estándar o tomar control de los parámetros de mezcla o plug-in en modo HyperControl, en función de la configuración de los botones de modo adyacentes. • Modo MIDI (botón MIDI BANK): Las perillas envían mensajes MIDI según estén
  • Страница 17 из 61
    8. Panel de control principal: A. LCD: Esta pantalla muestra información útil, tal como la asignación y el ajuste actuales del control físico movido más recientemente. D B B. Botón EDIT (Edición): Con este botón se coloca el Axiom AIR en modo de edición, que le permite usar las funciones A
  • Страница 18 из 61
    Ajustes de interpretación En esta sección se explican los ajustes que cambian las funciones del teclado y los pads de disparo del Axiom AIR. IMPORTANTE: Cuando este manual se refiere a una "tecla", significa una tecla del teclado con un rótulo impreso en la misma (por ej., "PAD LEARN", "PAD ROLL,"
  • Страница 19 из 61
    Cómo asignar mensajes MIDI a los controles La edición de la configuración MIDI del Axiom AIR comienza con el botón EDIT. Púlselo para entrar al modo de edición. Destellará para indicar que está en modo de edición. Para salir del modo de edición, pulse el botón una segunda vez. Para asignar un
  • Страница 20 из 61
    Teclado Pads de disparo 1 (Baja): Baja sensibilidad 2 (Normal baja): Ligeramente más sensible que la baja 3 (Normal): Sensibilidad predeterminada 4 (Alta normal): Ligeramente más sensible que la normal 5 (Alta): La curva exponencial más alta 6 (Lineal): Velocidad verdadera 7 (Rango bajo): Velocidad
  • Страница 21 из 61
    MIDI PANIC (Pánico MIDI) Cuando usted dispara un mensaje MIDI Panic (Pánico MIDI), se envía un mensaje "All Notes Off" (Desactivar todas las notas) en todos los canales y por todas las salidas. Esto es útil cuando un sintetizador de hardware o software conectado tiene una nota activada atascada.
  • Страница 22 из 61
    HyperControl En lugar de asignar los parámetros uno por uno, al activarse el modo HyperControl de Axiom AIR, se mapean automáticamente sus controles a muchas de las características de uso más frecuente de la DAW. Esta sección brinda un bosquejo general de las características del modo HyperControl.
  • Страница 23 из 61
    Otros controles Botones direccionales Los botones direccionales se pueden usar para controlar ciertas características de software soportadas. Pulse el botón de HyperControl contiguo a los botones direccionales para habilitar esta función. Pads de disparo Los pads de disparo se pueden usar para
  • Страница 24 из 61
    GUIDE D’UTILISATION (FRANÇAIS) Contenu de la boîte    Axiom AIR 49 DVD Pro Tools Express iLok 2    Câble USB Guide d’utilisation Consignes de sécurité et informations concernant la garantie Assistance Pour tous les renseignements concernant la configuration système minimale requise, la
  • Страница 25 из 61
    Scénario d’installation no 1 Ordinateur Pédale de maintien Pédale d’expression USB MIDI IN MIDI OUT R L R L VOL Moniteurs Interface audio USB Scénario d’installation no 2 Ordinateur Casque d’écoute Scénario d’installation no 3 Ordinateur Moniteurs Synthétiseur fixe externe Console de mixage USB 25
  • Страница 26 из 61
    Vue d’ensemble 3 2 4 5 1 Ceci est une vue d’ensemble générale des différentes sections des commandes du Axiom AIR : 1. 2. 3. 4. 5. Commandes de jeu : Le clavier est sensible à la pression et à la dynamique offrant un jeu confortable et une sensation réaliste. Utilisez les touches Octave afin
  • Страница 27 из 61
    4. Boutons : Ces huit boutons de commande permettent d’envoyer des messages MIDI standards, de faire un mixage ou de modifier les paramètres du plugiciel en mode HyperControl, selon le réglage des touches Mode adjacentes. • Mode MIDI (Touche MIDI Bank) : Les boutons permettent d’envoyer des
  • Страница 28 из 61
    8. Commandes principales : A. Écran ACL : Cet écran affiche des informations pratiques, comme l’affectation et les réglages actuels de la dernière commande modifiée. B. Touche Edit : Cette touche permet d’accéder au mode de modification de l’Axiom AIR afin d’utiliser les fonctions évoluées du
  • Страница 29 из 61
    Configurations des commandes de jeu Cette section explique les paramètres qui modifient les fonctions du clavier et des pads du Axiom AIR. IMPORTANT : Lorsque « touche du clavier » est mentionnée, ceci se réfère aux touches du clavier qui sont identifiées (p. ex., « PAD Learn », « PAD Roll », etc.)
  • Страница 30 из 61
    Affectation des messages MIDI aux commandes Les modifications de la configuration MIDI de l’Axiom AIR se font à l’aide de la touche Edit. Appuyez sur la touche Edit pour accéder au mode Edit. La touche clignote afin d'indiquer que vous êtes en mode Edit. Appuyez de nouveau sur la touche afin de
  • Страница 31 из 61
    Clavier Pads 1 (Low): Faible sensibilité 2 (Low Normal): Sensibilité légèrement plus élevée que faible 3 (Normal): Sensibilité par défaut 4 (Normal High): Sensibilité légèrement plus élevée que normale 5 (High): Courbe exponentielle la plus élevée 6 (Linear): Vitesse réelle 7 (Low Range):Vitesse
  • Страница 32 из 61
    Message de panique MIDI Lorsque vous déclenchez un message de panique MIDI, il envoie un message « All Notes Off » (extinction des notes) sur tous les canaux et vers toutes les sorties. Ceci est très utile lorsqu'un synthétiseur matériel ou logiciel est coincé sur une note. Envoyer un message de
  • Страница 33 из 61
    HyperControl Acitiver le mode HyperControl du Axiom AIR permet de faire le mappage automatique des fonctions les plus fréquemment utilisées des DAW (DAW) plutôt que de faire la configuration des paramètres un à un. Cette section procure un survol général des fonctions du mode HyperControl.
  • Страница 34 из 61
    Autres commandes Touches de déplacement Les touches de déplacement peuvent être utilisées afin de commander certaines fonctions logicielles prises en charge. Appuyez sur la touche HyperControl adjacente aux touches de déplacement afin d’activer cette fonction. Pads Les pads peuvent être utilisés
  • Страница 35 из 61
    GUIDA PER L'USO (ITALIANO) Contenuti della confezione    Axiom AIR 49 DVD Pro Tools Express iLok 2    Cavo USB Guida per l'uso Istruzioni di sicurezza e garanzia Assistenza Per maggiori informazioni in merito ai requisiti di sistema completi, informazioni in merito alla compatibilità e alla
  • Страница 36 из 61
    Configurazione - Scenario 1 Computer Pedale sustain Pedale di espressione USB MIDI IN MIDI OUT R L R L VOL Monitor USB Audio Interfaccia Configurazione - Scenario 2 Computer Cuffie Configurazione - Scenario 3 Computer Monitor Esterno Sint rack Mixer USB 36
  • Страница 37 из 61
    Panoramica generale 3 2 4 5 1 Questa è un'ampia panoramica dei comandi dell'Axiom AIR 49, divisa in sezioni: 1. 2. 3. 4. 5. Comandi prestazioni: la tastiera è sensibile alla pressione e alla velocità e consente esibizioni comode e dalla sensazione naturale. Accedere all'intera gamma delle 88 note
  • Страница 38 из 61
    4. Manopole: si possono utilizzare queste otto manopole per inviare messaggi MIDI standard o per assumere il controllo di parametri di mixaggio o di plug-in in modalità HyperControl, a seconda della configurazione dei tasti modalità adiacenti. • Modalità MIDI (tasto MIDI Bank): le manopole inviano
  • Страница 39 из 61
    8. Pannello comandi principale: A. LCD: questo schermo mostra informazioni utili, quali l'assegnazione corrente e l'impostazione dei comandi fisici spostati più di recente. B. Tasto Edit: questo tasto mette l'Axiom AIR in modalità Edit, consentendo di utilizzare le funzioni speciali della sua
  • Страница 40 из 61
    Impostazioni prestazioni In questo paragrafo vengono descritte le impostazioni che modificano le funzioni della tastiera e dei pad trigger dell'Axiom AIR. IMPORTANTE: quando questo manuale fa riferimento a un "tasto" intende un tasto della tastiera con un'etichetta stampata al di sopra di esso (ad
  • Страница 41 из 61
    Assegnazione di messaggi MIDI ai comandi Modificando la configurazione MIDI dell'Axiom AIR tutto inizia con il tasto Edit. Premerlo per entrare in modalità Edit. Lampeggerà per indicare che ci si trova in modalità Edit. Per uscire dalla modalità Edit, premerlo una seconda volta. Per assegnare un
  • Страница 42 из 61
    Tastiera Pad trigger 1 (Low) (basso): sensibilità bassa 2 (Low Normal) (basso normale): leggermente più sensibile di Low 3 (Normal) (normale): sensibilità predefinita 4 (Normal High) (normale alto): leggermente più sensibile di Normal 5 (High) (alto): curva esponenziale massima 6 (Linear)
  • Страница 43 из 61
    MIDI Panic Quando si attiva un messaggio MIDI Panic, invia un messaggio "All Notes Off" su tutti i canali e attraverso tutte le uscite. Ciò è utile quando un sintetizzatore hardware o software collegato ha una nota On bloccata. Per inviare un messaggio MIDI Panic: 1. Premere il pulsante Edit. 2.
  • Страница 44 из 61
    HyperControl Anziché assegnare i parametri uno a uno, attivando la modalità HyperControl dell'Axiom AIR, questo mapperà automaticamente i suoi comandi su molte delle funzioni dei DAW (workstation audio digitale) utilizzate più di frequente. Questo paragrafo è una descrizione generale delle funzioni
  • Страница 45 из 61
    Altri comandi Tasti direzionali I tasti direzionali possono essere utilizzati per controllare determinate funzioni software supportate. Premere il tasto HyperControl accanto ai tasti direzionali per abilitare questa funzione. Pad trigger I pad trigger possono essere utilizzati per attivare suoni di
  • Страница 46 из 61
    BENUTZERHANDBUCH (DEUTSCH) Lieferumfang    Axiom AIR 49 Pro Tools Express DVD iLok 2    USB-Kabel Benutzerhandbuch Sicherheitshinweise und Garantieinformationen Kundendienst Für die vollständigen Systemanforderungen, Kompatibilitätsinformationen und für die Produktregistrierung besuchen Sie
  • Страница 47 из 61
    Setup-Szenario 1 Computer Sustain-Pedal Expression-Pedal USB MIDI IN MIDI OUT R L R L VOL Monitore USB AudioSchnittstelle Setup-Szenario 2 Computer Kopfhörer Setup-Szenario 3 Monitore Computer Externer Rack-Synthesizer USB-Mixer 47
  • Страница 48 из 61
    Allgemeiner Überblick 3 2 4 5 1 Dies ist ein Überblick über die Bedienelemente des Axiom AIR 49, gegliedert in Abschnitte: 1. 2. 3. 4. 5. Performance-Controls: Das Keyboard ist druck- und anschlagdynamisch, was Ihrem Spiel einen natürlicheren Klang und ein besseres Spielgefühl verleiht. Greifen Sie
  • Страница 49 из 61
    4. Drehregler: Sie können diese acht Regler verwenden, um Standard-MIDI-Nachrichten zu senden oder Mixing und Plug-In-Parameter im HyperControl-Modus zu steuern, je nach Einstellung der benachbarten Modus-Tasten. • MIDI-Modus (MIDI-Bank Taste): Die Regler senden MIDI-Nachrichten je nach Zuweisung
  • Страница 50 из 61
    8. Hauptbedienfeld: A. LCD: Dieses Display zeigt nützliche Informationen, wie z. B. die aktuelle Zuweisung und Einstellung des zuletzt betätigten physischen Bedienelements. B. Bearbeiten-Taste: Diese Taste versetzt Ihr Axiom AIR in den Bearbeitungsmodus, damit Sie die Spezialfunktionen des
  • Страница 51 из 61
    Performance-Einstellungen Dieser Abschnitt beschreibt Einstellungen, die die Keyboard- und Trigger-Pad-Funktionen Ihres Axiom AIR verändern. WICHTIG: Wenn dieses Handbuch nur auf eine "Taste" verweist, handelt es sich um eine Taste auf der Keyboard-Klaviatur mit darüber aufgedruckter Beschriftung
  • Страница 52 из 61
    Zuweisen von MIDI-Meldungen an Bedienelemente Das Bearbeiten der Axiom AIR MIDI-Konfiguration beginnt mit der Bearbeiten-Taste. Drücken Sie diese, um in den Bearbeitungsmodus zu wechseln. Sie blinkt, um anzuzeigen, dass der Bearbeitungsmodus ausgewählt ist. Um den Bearbeitungsmodus zu verlassen,
  • Страница 53 из 61
    Keyboard: Trigger-Pads: 1 (Low): Niedrige Empfindlichkeit 2 (Low Normal): Etwas empfindlicher als die niedrige Empfindlichkeit 3 (Normal): Standard-Empfindlichkeit 4 (Normal High): Etwas empfindlicher als die StandardEmpfindlichkeit 5 (High): Höchste exponentielle Kurve 6 (Linear):
  • Страница 54 из 61
    MIDI-Panik Wenn Sie eine MIDI-Panikmeldung auslösen, wird eine Notendeaktivierungsmeldung an alle Kanäle und über alle Ausgänge gesendet. Dies ist nützlich, wenn eine angeschlossene Hardware oder ein Software-Synthesizer bei einer Note "hängenbleibt". So senden Sie eine MIDI-Panikmeldung: 1.
  • Страница 55 из 61
    HyperControl Anstatt jeden Parameter einzeln zuzuweisen, aktiviert der HyperControl-Modus Ihres Axiom AIR die automatische Zuordnung der Regler für viele häufig verwendete DAW Software-Features. Dieser Abschnitt ist ein allgemeiner Überblick über die HyperControl-Modus-Funktionen. Denken Sie daran,
  • Страница 56 из 61
    Andere Bedienelemente Richtungstasten: Die Richtungstasten können verwendet werden, um bestimmte, unterstützte Software-Funktionen zu steuern. Drücken Sie die HyperControl-Taste neben den Richtungstasten, um diese Funktion zu aktivieren. Trigger-Pads: Die Trigger-Pads können verwendet werden, um
  • Страница 57 из 61
    Appendix MIDI Mode: Messages and Sub-Parameters Modulation Wheel, Faders, Expression Pedal Available MIDI Message Types: RPN and NRPN Sub-Parameters: Parameter MIDI Message Display MIDI CC RPN NRPN Control Disable * 0 – 127 128 129 - MIDI CC -> RPN Define -> NRPN Define -> Control OFF Value Range
  • Страница 58 из 61
    Fader Buttons, Sustain Pedal Available MIDI Message Types: Program Change Sub-Parameters: Parameter MIDI Message Display Sub-Parameter Value Range Display MIDI CC RPN NRPN Program Change 0 – 127 128 129 MIDI CC -> RPN Define -> NRPN Define -> 130 Prg.Change -> LSB MSB Program Number MIDI Channel 0
  • Страница 59 из 61
    Specifications Keys: 49, velocity-sensitive Octaves: 10 total (3 in either direction) Drum Trigger Pads: 12, velocity- and pressure-sensitive Rotary Knob Controls: 8 Velocity Curves: 10 for keyboard, 10 for trigger pads Transport Control Buttons: Loop, Rewind, Fast Forward, Stop, Play, Record
  • Страница 60 из 61
    m-audio.com MANUAL VERSION 1.0
  • Страница 61 из 61