4
Studiophile BX10s Subwoofer
Setting Up the BX10s
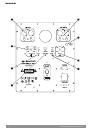
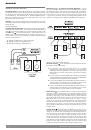
AC Voltage Select
: Since the BX10s contains its own amplifier, it must be
connected to a power outlet using the detachable AC cable provided. Note that
the “AC Select” switch (located below the IEC socket for the mains power cord)
is user-selectable for 100-120V~50/60 Hz or 220-240V~50/60Hz operation.
Before you do anything, make sure the AC voltage select switch is set to the
appropriate position for your location.
Warning:
Use of improper voltage/selector switch combinations may result
in hazardous conditions and/or damage to speaker components not covered by
speaker warranty.
Connecting Audio
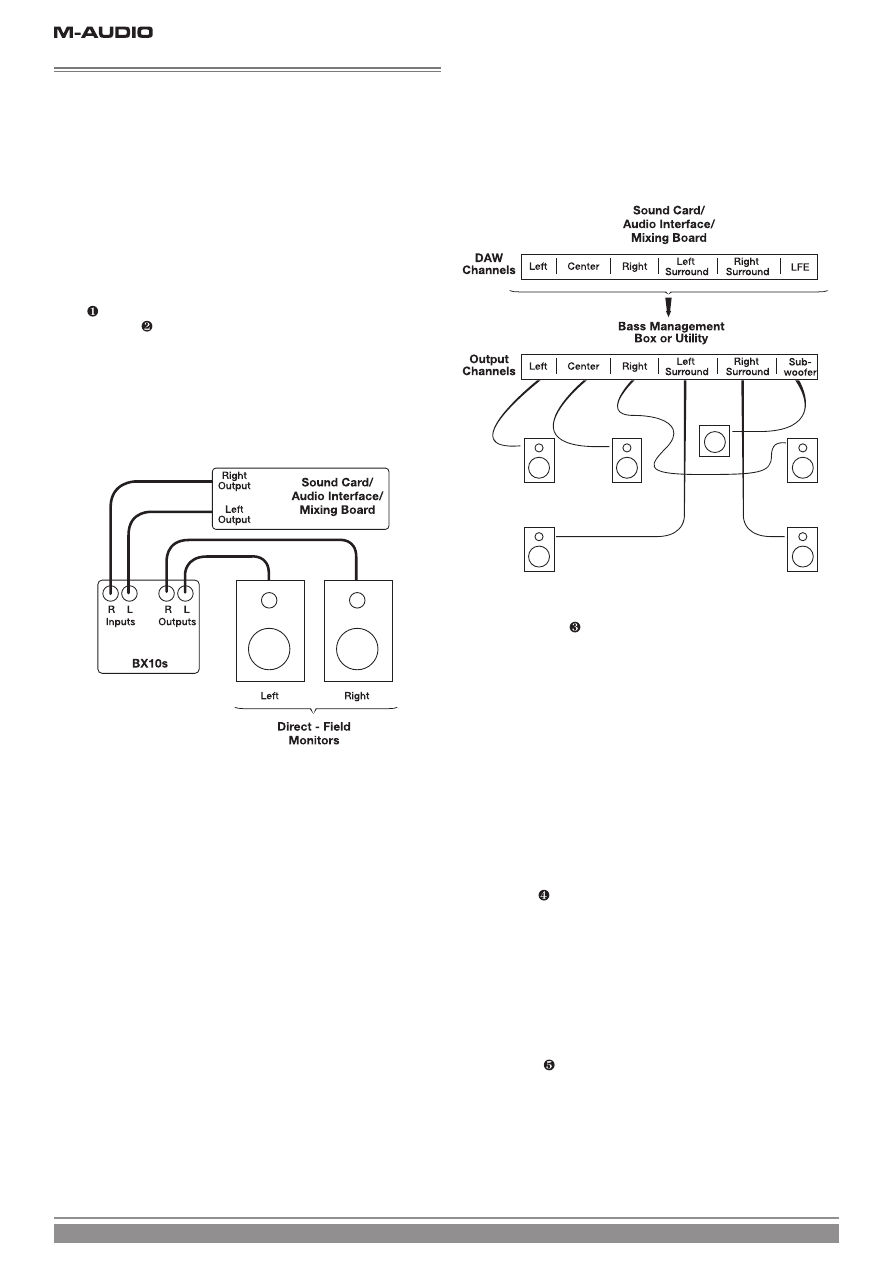
2-Channel Stereo Operation
: Connect the main left and right outputs of
your mixing console, audio interface, or sound card to the XLR or TRS balanced
inputs
on the back of the BX10s; then route the left and right XLR or TRS
balanced outputs
to your direct-field monitors. (While the TRS inputs and
outputs will work with unbalanced cables, we strongly recommend you use
balanced cables—in doing so, you’ll have better immunity to inductively coupled
noise from power cables, etc.)
<
XLR PIN 1 and TRS sleeve = signal ground (shield)
<
XLR PIN 2 and TRS tip = signal positive (+)
<
XLR PIN 3 and TRS ring = signal negative (–)
Multichannel (e.g., 5.1-channel surround) Operation
: If you’re
mixing or monitoring a multichannel source, you undoubtedly have an external
bass management system and/or you may be sending the LFE (low-frequency
effects) channel directly to the subwoofer with no additional signal redirection.
In this scenario, you can route your subwoofer audio signal to either the left
or right input on the BX10s. Further, you should bypass the BX10s’ internal
crossover by setting the crossover control to the 200Hz position (fully open).
Adjusting the Back Panel Controls
Crossover control*
: we’ve touched on this topic already, but to complete
the discussion, consider the following:
<
The crossovers of most A/V home theater systems are set to 80Hz
(assuming they’re being used with a subwoofer). So if you’re mixing
multichannel material using the BX10s, we recommend you start with the
80-Hz setting as a reference to approximate a typical end-user listening
environment.
<
For easy compliance with Dolby Digital, DTS, and THX recommendations,
we’ve provided calibrated markings on the crossover dial for 80Hz, 100Hz,
and 120Hz positions (in addition to 50 Hz and 200 Hz).
<
If you’re using the BX10s with M-Audio’s BX5a direct-field monitors in a
2-channel setup, we recommend you start with 80Hz as your crossover
point and adjust it to suit your particular acoustic environment.
<
If you’re using the BX10s with M-Audio’s BX8a direct-field monitors in a
2-channel setup, we recommend you start with 50Hz as your crossover
point and adjust it to suit your particular acoustic environment.
Phase control
: as we mentioned before, this switch inverts the signal (the
phase angle from 0° to 180°) that goes to the subwoofer amplifier. (If you’re
operating a 2-channel system with the built-in crossover, the phase function does
not affect the signal going to your direct-field monitors.) You can select the
appropriate position of this switch by listening to the way the sound from the
BX10s blends with the rest of your system. There is no “right” or “wrong”
position, per se—but logically you want the subwoofer to be “phase coherent”
with your direct fields at the crossover frequency. One way to determine this
phase coherence is by playing a sine wave signal at the crossover frequency
you’ve selected and put the phase switch in the position that gives you the
strongest output.
Standby Mode
: this function allows the BX10s to go to “sleep” if you’re
not using it. In a sense, it’s like an “audio screen saver.” When the switch is set to
“always on” the subwoofer will be continuously alert and operating; whether or
not you’re using it, it’ll stay on. When the switch is set to “auto sleep” and there
is no audio input signal for at least 15 minutes, the BX10s will go into a low-
standby mode and its amp will mute; an input signal as small as 7mV will “wake
up” the subwoofer and it will reproduce sound normally. (Note that the blue
power LED turns red when the BX10s is asleep and it reverts back to blue upon
awaking.) The “auto sleep” mode can be useful if you want to conserve energy.
In sleep mode, the power draw falls to one-tenth the maximum current.