Studiophile BX10s Subwoofer • User Guide
English
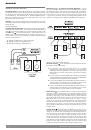
Studiophile BX10s Subwoofer
5
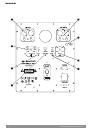
Gain Boost*
: no matter what the setting of the “Volume” knob, you’ll
add 10dB of gain by switching in this function. It’s really most appropriate
for multichannel operation: Dolby Laboratories requires the LFE channel to
be encoded at -10dB relative to the other channels for Dolby Digital. So if
your BX10s is calibrated to have an even level response relative to your main
monitors, and if you’re using the BX10s solely as your LFE reproducer, you
can engage the gain boost and perform your multichannel mix with the levels
set appropriately.
Volume
: you should always send a line-level signal to the BX10s inputs.
When the volume control is all the way up, 85mV of pink noise at the input will
produce 100dBA output SPL at one meter from the front baffle. The volume
control affects the level going to the BX10s amplifier and does not affect the
level of the BX10s’ outputs that feed your direct-field monitors. Generally,
we recommend that you try to get the flattest, most even system response
between your subwoofer and your direct-field monitors—so depending on
the acoustics of your environment and how you’ve set up your signal path
and levels, you should spend a few minutes calibrating the respective levels of
the subwoofer and each of your main monitors. If you have access to pink
noise signals and/or swept sine waves (linear and logarithmic), they can be of
great help for ensuring your system has the smoothest tonal balance from
top to bottom.
Subwoofer Bypass
: this is a 1/4” mono jack for connecting a non-
latching footswitch like the M-Audio SP-1 or any sustain pedal for a keyboard
controller. In 2-channel situations, toggling the footswitch triggers a relay
circuit that mutes the subwoofer output and reroutes the full-bandwidth
audio signal directly to your direct-field monitors. In essence, it takes the
subwoofer (with its crossover) completely out of the signal path so you can
easily audition your mixes both with and without the presence of the BX10s
subwoofer’s low frequency extension—all from your mixing position. This
function can also be useful for multichannel operation. Further, if all you have
is a latching footswitch (which is normally open), you can still use it to operate
this function. Note that when the BX10s is in bypass mode, the blue power
LED on its front face turns red.
*For more information on using a subwoofer for multichannel applications,
please visit www.dolby.com, www.dtsonline.com, or www.thx.com.
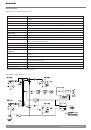
Placing the BX10s
The “location location location” cliché doesn’t only apply to the real estate
market. It’s equally (if not more) applicable to the subject of loudspeakers
and room acoustics. As you can imagine, where you place the BX10s in your
room can have a huge impact on how it will sound. In fact, any well-designed,
powerful subwoofer can sound like a complete dud in your monitoring setup
if you’ve placed it poorly. (This tenet applies for any loudspeaker, but it’s
especially true for low-frequency reproducers like subwoofers.)
There are lots of opinions on the best method to determine the optimal
location for your subwoofer—in fact, if you ask three different studio
engineers, they’ll probably give you six different answers. But we can’t
emphasize enough how important this issue is, so please take a little time to
think about subwoofer placement—keeping in mind that the shape of your
room, its dimensions (including ceiling height), the wall construction, and
any acoustic treatment you have can all conspire to affect the subwoofer’s
apparent performance. Remember, also, that the frequency of any given signal
is inversely proportional to its wavelength—so, for example, at 40Hz, one
wavelength is about 8.5 meters or 28 feet; at 80Hz one wavelength is a little
over 4 meters, or 14 feet; etc.
Where to start
: first of all, you should always place the subwoofer on the
floor when you are using it—never on a table or speaker stand. One theory
suggests that the best position for a subwoofer in a 2-channel system is on the
floor half-way between your left and right direct-field monitors, with its front
facing forward and in the same plane as the direct-field speakers. From there,
you can adjust the subwoofer’s position until it is most “correct.” Another
theory dictates that you should start with the subwoofer in a corner of the
room’s floor, where the adjacent walls can help the subwoofer maximize the
amount of sound it radiates; and then you can adjust the position to suit
your specific monitoring setup. Both of these methods are valid, but there’s
yet another method that a lot of mix engineers have employed with great
success—i.e., by exploiting the law of bilateral symmetry.
With this method, you would place the BX10s in the chair in your listening
position. (Presumably, this is at the apex of an isosceles triangle between
your left and right direct-field monitors.) Play some music with substantial
bass frequencies into the BX10s at a comfortable listening level. (Pink noise
works great for this too.) Crawl around the floor of your room and listen for
a place where the sound is “fullest” but also “tight” sounding. Wherever that
is—bingo!—that’s where your BX10s will go. If you want to be more precise,
you can use a 1/12th-octave real-time (spectrum) analyzer instead of your
ears and perform the same exercise. (If you do this, make sure you play pink
noise as the test signal and observe where the spectral response is smoothest
and has greatest low-frequency extension.)
Please note that because low-frequency signals radiate omnidirectionally, you
may find that the best location sonically for the BX10s is quite inconvenient—
like in an area of your studio with a lot of foot traffic. If this is the case, you
can simply flip the Phase switch on the BX10s’ back panel and repeat the
exercise, hoping for a more convenient outcome.
Finally, once you’ve placed the BX10s where you believe it will sound best,
give yourself a sanity check and play some material along with direct-field
monitors, listening from your standard mix position. (Make sure the BX10s
level, phase, and crossover are set appropriately.) If something is askew, try
out some new subwoofer locations. As always, please feel free to experiment
with different locations (and different directions for facing the driver)... you
may inadvertently find a better way to place the subwoofer even if you think
its current location already sounds good.
Your BX10s Warranty
Warranty Terms
M-Audio warrants products to be free from defects in materials and
workmanship, under normal use and provided that the product is owned by
the original, registered user. Visit www.m-audio.com/warranty for terms and
limitations applying to your specific product.
Warranty Registration
Thank you for registering your new M-Audio product. Doing so immediately
both entitles you to full warranty coverage and helps M-Audio develop
and manufacture the finest quality products available. Register online at
www.m-audio.com/register for the chance to win M-Audio giveaways.
The web sites mentioned above are examples only and are in no way associated or affiliated with M-Audio or Avid Technology, Inc. M-Audio does not
guarantee the performance or availability of these services. Studiophile BX10s is not endorsed, sponsored, or approved by these companies.