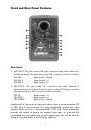
The TRS input is summed through a balanced input amplifier with the XLR input,
allowing both inputs to be used simultaneously. Input specifications apply to
both.
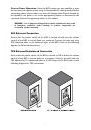
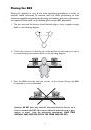
3. PRODUCT LABEL: This label contains the model and serial number information.
4. VENT PORT: This port aids in reproduction of very low frequencies by
discharging frequencies below 60 Hz.
5. VOLUME CONTROL: Use the volume control to set the output sound pressure
from the BX5 to proper levels as required.
6. LOW CUTOFF: This 3-position switch sets the bass rolloff frequency.The lowest
setting, 56Hz, is essentially a low cutoff bypass as it does not attenuate the BX5’s
frequency response. Other settings are 80Hz and 100Hz.
7. MID-BOOST: Two selections are available, “In” and “Out.” The Out setting
produces a flat frequency response curve, while the In setting gives a boost in
the mid-range frequencies.
8. HIGH FREQ: Three settings are possible, -2dB, 0dB, and +2dB. 0dB is a “flat”
setting with no attenuation, while the -2dB and +2dB settings will attenuate or
boost the high frequencies (3kHz shelf) by -2dB and +2dB respectively.
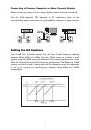
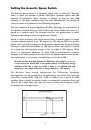
9. ACOUSTIC SPACE: This 3-position switch is designed to compensate for
different speaker placements. Please see the section “Setting the Acoustic Space
Switch” for more information.
10. POWER SWITCH:This switch turns the monitor on and off.The on position is
indicated with the marking “.” (a white dot).
11. POWER RECEPTACLE: Accepts a detachable 3-circuit line cord in order to
power the monitor.
12. FUSE HOLDER: Holds the external main fuse.
13. VOLTAGE-SELECT SWITCH: Provides 2 selections, 115VAC and 230VAC, and
should be set to match the “house supply” (receptacle) voltage of the country
or location in which the speaker is used.The 115V setting is correct for the USA,
while the 230V setting is correct for most of the UK and Europe.
5