7
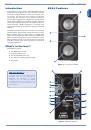
EX66 • User Guide
English
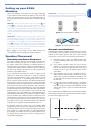
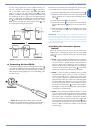
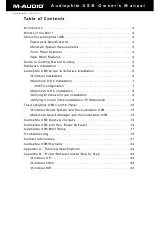
If you’re using a digital source with a S/PDIF interface, you
can feed it directly into the S/PDIF input
�
on the back of
one of your EX66 monitors using a high-quality 75
Ω
S/PDIF
cable. You must set the Input Select switch
��
to either
S/PDIF L or S/PDIF R depending on whether that speaker will
be reproducing the left or right half of the digital bitstream.
Next, run a high-quality 75
Ω
S/PDIF cable from the S/PDIF Out
jack
�
of that speaker to the S/PDIF In jack of your second
EX66 monitor, and make sure the Input Select switch
��
is set
to the appropriate setting for that speaker.
Figure 9
: Digital Connections using the S/PDIF Interface
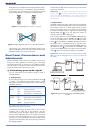
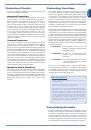
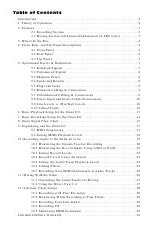
2) Powering On the EX66
As stated earlier, please make sure the Voltage Selector switch
��
on the back of the EX66 is set to the proper AC mains supply. You
can rotate the switch with a flat-head screwdriver if necessary.
Note that the operating voltage is the one corresponding to the
6 o’clock position.
Figure 10
: Voltage Selector Switch (Note: Improper
combinations can lead to hazardous conditions and/or damage to
speaker components not covered by speaker warranty!)
Now that you’ve connected your audio signal input, you can power
on your EX66 monitors using the following procedure:
1) Connect the supplied AC power cord to the IEC connector
��
.
2) Plug the other end of the AC power cord into a grounded outlet
that is configured to correspond with the Voltage Selector
switch
��
.
3) Turn the Volume knob
��
all the way down.
4) Flip the Power switch
��
to the On position. You should see
the blue LED indicators
�
light up on the front face of the
EX66.
5) With the Volume knob
��
still turned down, start playing
your audio signal at a normal level. Gradually turn up the
Volume knob.
Important
- When shutting down your equipment, it’s always best
to power off the EX66 monitors first in order to prevent a “pop”
noise from coming out of the speakers when you power down your
mixing board, computer, or sound card. Likewise, you should always
power up the EX66 monitors last to prevent a “pop” noise generated
from equipment upstream.
3) Setting the Acoustic Space
Switch
Earlier, we went over some tips for how best to position your
EX66 monitors. Depending on where and how you’ve placed
them, you’ll want to adjust the three-position Acoustic Space
switch
�
.
<
FULL
: If you’ve mounted your EX66 monitors on tall (0.5m
to 1.2m) speaker stands away from walls and corners, we
call this “full space.” (Mathematically, it approximates the
effect of a simple source operating in free air emitting an
omnidirectional acoustic radiation pattern.) In this condition,
it’s best to set the Acoustic Space switch
�
to Full, which
will give you the flattest near-field frequency response.
<
HALF
: If you’ve mounted your EX66 monitors on stands
and placed them against a wall, or if you’ve mounted them
on the meter bridge of your console in the center of the
room, we call this “half space.” (Mathematically, this situation
approximates the effect of a simple source operating against
an infinite baffle, which radiates an acoustic pressure twice
that of the full space scenario.) In this condition, it’s best to
set the Acoustic Space switch
�
to Half, which activates a
shelving filter to reduce the low-frequency output by 2dB to
compensate for the bass buildup.
<
QTR
: If you’ve mounted your EX66 on stands in a corner,
or on your console meter bridge against a wall, or on shelves
against a wall, we call this “quarter space.” (Mathematically,
the acoustic power is equivalent to the full space condition
times a factor of four, or twice that of half space.) In this case,
we recommend you set the Acoustic Space switch
�
to Qtr,
which activates a shelving filter to reduce the low-frequency
output by 4dB to attenuate the buildup of low-frequency
acoustic energy.