11
Instalación recomendada
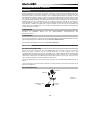
Ableton Live Lite:
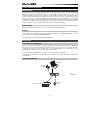
Hemos incluido Ableton Live Lite con su Keystation de modo que puede comenzar a
hacer música con software profesional en cuanto lo saca de la caja. Seleccione el software Ableton Live Lite,
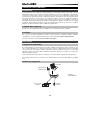
abra la aplicación "setup" (instalación) o
.exe
(Windows) o el archivo
.mpkg
(Mac OS X), y luego siga las
instrucciones de la pantalla para instalar el software. Visite también
ableton.com
para comprobar si hay
actualizaciones de software disponibles.
Guía de inicio rápido
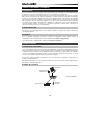
Una vez concluida la instalación deberá configurar su software MIDI para poder utilizar el Keystation.
Recuerde que de momento el teclado no producirá ninguna clase de sonido cuando pulse una tecla. Esto se
debe a que, al pulsar una tecla, el teclado se limita a enviar datos MIDI. Los datos MIDI son información
acerca de cómo debe reproducirse un sonido, pero para poder oírlo necesita configurar su software musical
para que lea los datos MIDI que Keystation le envía y los reproduzca de manera adecuada. Muy
probablemente, esta configuración implicará la selección del dispositivo adecuado en algún menú
“Opciones” o “Configuración de dispositivos” de su software musical. El teclado Keystation aparecerá en sus
programas como “Dispositivo de audio USB” (en Windows Vista, Windows 7) o como “Keystation 61” (en
otros sistemas operativos). Por favor, consulte el manual suministrado con su software para realizar una
configuración correcta.
Características
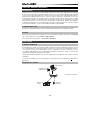
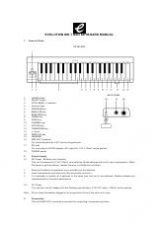
Panel superior
Teclado
La mayoría de las teclas blancas y negras del Keystation tienen rótulos con nombres. Dentro del menú
Advanced (Funciones avanzadas), presionar las teclas rotuladas permitirá realizar operaciones especiales
tales como ajustar el canal MIDI, transponer enviar mensajes de cambio de programa.
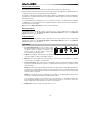
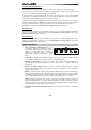
Octave Buttons
Si oprime el botón OCT (octava) “+” una vez, el LED que está arriba del botón de octava “-” se apagará,
indicando que la octava del teclado está desplazada hacia arriba. Si pulsa de nuevo el botón de octava “+”,
el rango del teclado aumentará en dos octavas, y así sucesivamente. Puede modificar el rango del teclado
hasta 3 octavas hacia arriba o hacia abajo partiendo de la posición predeterminada.
Para desplazar la octava hacia abajo, oprima el botón OCT “-” y note que el LED que está arriba del botón
de octava “+” se apaga.Si sólo permanece iluminada la tecla de octava “-”, el rango de octavas está
desplazado hacia abajo; Si sólo permanence iluminada la tecla de octava “+”, el rango de octavas está
desplazado hacia arriba.
Los LED de octava “+” y octava “-” cambiarán de color cuando se desplace hacia
arriba o hacia abajo más de una octava.
Para regresar al rango normal 0, pulse ambas teclas de octava (“+” y “-”) al mismo tiempo. Ambos LEDs se
iluminarán para indicar que el rango de octava se encuentra de nuevo en “0”.
Deslizador volumen
El deslizador de volumen envía un mensaje MIDI que controla el volumen de las notas que está tocando.
También puede asignarlo a diferentes efectos, como por ejemplo el panorama (balance), ataque,
reverberación o chorus, entre otros. Para más información, consulte la sección
Funciones avanzadas
.
Rueda de pitch bend
La rueda de pitch bend se usa generalmente para alterar el tono de las notas tocadas en el teclado hacia
arriba o hacia abajo, lo cual le permite tocar frases que no se asocian normalmente con un instrumento de
teclado, por ejemplo un fraseo de guitarra.
Su fuente de sonido determina el rango en que la rueda de pitch bend altera el tono. El ajuste más común es
dos semitonos, aunque puede ser de hasta dos octavas hacia arriba o hacia abajo.