Доступность: Бесплатно как и все руководства на сайте. Без регистрации и SMS.
Дополнительно: Чтение инструкции онлайн
Real Flat Television
User manual
29PT8811 29PT8841 29PT8842
Страница: (1 из 20)
навигация
1
2
3
4
5
6
7
8
9
10
11
12
13
14
15
16
17
18
19
20
Оглавление инструкции
Страница 1 из 21 Real Flat Television User manual 29PT8811 29PT8841 29PT8842
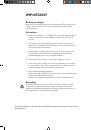
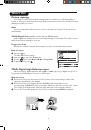
Страница 2 из 21 IMPORTANT Before you begin: Make sure your package includes the following items:TV and mains cord, remote control, user manual, antenna cable (optional) and Coaxial cable (optional). Attention: 1. Read your manual first – your Philips TV comes with a well-designed remote control and onscreen
Страница 4 из 21 Safety information • – – – – – Disconnect mains plug when : the indicator light below the TV screen is flashing continuously. a bright white line is displayed across the screen. there is a lightning storm. the set is left unattended for a prolonged period of time. cleaning the TV screen. Never use
Страница 5 из 21 What’s Hot Picture scanning Your Philips TV has been built with scanning features to enhance your TV viewing. All you need is to select your desired mode to enjoy sharper and clearer pictures. The description below will help you make your choice. Auto If you are undecided of which mode to choose,
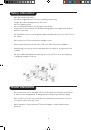
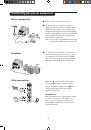
Страница 6 из 21 Installing your television set Positioning the television set Remote control 10 cm 10 cm 10 cm Place your TV on a solid, stable surface, leaving a space of at least 10 cm around the appliance. Connections Insert the two R6-type batteries (supplied) making sure that they are the right way round. The
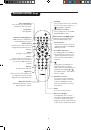
Страница 7 из 21 Remote control keys Standby Lets you place the TV set on standby. To turn on the TV, press CH + or –, , AV, A/CH or digit keys. Personal Zapping You can surf up to 10 personal channels for each key (p. 12) Sleeptimer Not applicable. AV channel selection Press several times to select AV1, CVI, AV2,
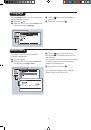
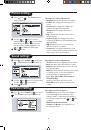
Страница 8 из 21 Language The Language feature is used to change the display language for menus. & Press the key. é With the cursor, select the Install menu and follow by the Language. MENU “ Use the key to select a language of your choice. ‘ To quit the menus, press Ë . Auto Store This menu is used to store all
Страница 9 из 21 Manual Store This menu is used to store channels one at a time. MENU & Press the key. é With the cursor, select the Install menu and follow by the Manual. “ Colour Sys(tem): use the or key to select the desired colour system; Auto, PAL or SECAM. ‘ Sound Sys(tem): use the or key to select the
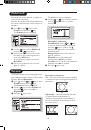
Страница 10 из 21 Channel edit This feature allows you to skip or edit channels which have bad or weak TV signal or channels you do not watch often. Once a channel is skipped, you cannot have access to it by the Channel + or – key.You can only access the channels by the digit (0-9) keys. MENU & Press the key. The
Страница 11 из 21 Picture settings MENU & Press then . The Picture menu will be called up. or keys to select a é Use the or keys to adjust. setting and the Note: during the picture adjustment, only the selected line remains displayed. Press or to display the menu again. “ Press Ë to exit. Description of the
Страница 12 из 21 Child Lock You can block certain channels or inhibit use of the TV set completely. Note:You can only access the locked channels via the remote control. Keep the remote control in a safe place. key to select & Press , use the Features and press the key. The Features menu is displayed. The Child Lock
Страница 13 из 21 Active Control The Active Control monitors and adjusts incoming video signals to help provide the best picture quality.When you choose to turn the Active Control to On or Display On, the Brightness, Contrast, Sharpness, Contrast+ and NR (noise reduction) features are controlled automatically.
Страница 14 из 21 Automatic Picture Booster key to turn Autopicture If the transmission signal is weak, the Automatic " Use the Booster On or Off. Picture Booster built into the TV set will increase the signal level to provide a good picture at all times.You have a choice to turn on or off the feature, depending on
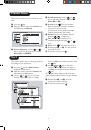
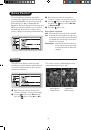
Страница 15 из 21 Connecting peripheral equipment DVD player & Connect the cable from the TV's "Y", "Pb" and "Pr" (AV1) sockets to the corresponding COMPONENT VIDEO OUT sockets of the player. Note: Do not connect the AV1 VIDEO IN socket. AV1 IN Video recorder é Connect the red and white (R and L) cable from the TV's
Страница 16 из 21 Connecting peripheral equipment Other equipment & Carry out the connections as shown. AV1 IN Amplifier Side connections é To optimise picture quality, connect the equipment which produces the video signals (digital decoder, games, etc) to AV1 IN and equipment which produces the S-VHS signals (S-VHS
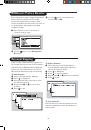
Страница 17 из 21 Tips Poor reception The proximity of mountains or high buildings may be responsible for ghost pictures, echoing or shadows. In this case, try manually adjusting your picture: see Fine Tuning (refer to section on Manual Store) or modify the orientation of the outside aerial. Does your antenna enable
Страница 18 из 21 Glossary 4:3 Refers to the ration between the length and the height of the screen. Wide screen televisions have a ration of 16:9 while conventional televisions have a ratio of 4:3. 4:3 Expand The images recorded in “letterbox” format are expanded to fill the entire screen and the black horizontal
Страница 19 из 21 Specification Product type 29PT8811, 29PT8841, 29PT8842 Side Connections • S-Video • Video and Audio inputs • Headphone out PICTURE • Picture screen diagonal: 29” (720 mm) • Visible screen size: 27” (680 mm) • Picture Tube: Real Flat 4:3 • 100 Hz (PAL and SECAM) • Progressive Scan (Auto Switching
Страница 20 из 21 Specifications are subject to change without notice. Trademarks are the property of Koninklijke Philips Electronics N.V. or their respective owners. www.philips.com 313912536223