Инструкция для PHILIPS BRE650/00 Satinelle с роликовым массажером, BRE610/00 Satinelle Advanced, BRE630/00 Satinelle Advanced, Satinelle BRE630, Satinelle BRE640, BRE610/00, BRE620/00, BRE630/00, BRE630/01, BRE630/10, BRE634/10, BRE640/00, BRE640/10, BRE644/00, BRE644/10, BRE650/00, BRE650/10, BRE651/00

Facial cap
You can attach the facial cap onto the epilating head for precise epilation of
facial hair (e.g. above your upper lip).
Do not use the appliance to epilate eyelashes, eyebrows or scalp
hair.
Shaving head
You can use the shaving head to shave your legs and body.
Note: The appliance can be moved in two directions, for easier shaving of
underarms.
Note: Always check the foil before use. If it is damaged in any way, replace
the cutting unit right away (see 'Replacement').
Comb for shaving head
You can attach the comb onto the shaving head to trim hairs to a length of
3mm.
Trimming head
You can use the trimming head to trim hard-to-reach areas in the bikini
zone.
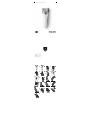
Place the trimming head flat onto the skin to trim (Fig. 16). Place the
trimming head perpendicularly onto the skin for styling and shaping (Fig. 17).
Comb for trimming head
You can attach the comb onto the trimming head to trim hairs in the bikini
area to a length of 3mm (Fig. 18).
Body massage head
The body massage head rotates firmly to relax your muscles.
Note: You have to put the body massage head on the coupling unit before
you can attach it onto the handle (Fig. 19).
Body exfoliation brush
You can use the body exfoliation brush to remove dead skin cells.
Do not use the body exfoliation brush on your face.
Note: You have to put the body exfoliation brush on the coupling unit
before you can attach it onto the handle (Fig. 20).
Cleaning and storage
Keep the adapter dry.
1
To clean the epilating head, hold the appliance upside down, switch it
on and rinse it with cold water for 15 seconds after every use (Fig. 21).
2 To clean the shaving head (if supplied): Use the cleaning brush to brush
away any hairs that have collected under the trimmers. Grab the two
trimmers of the cutting unit and pull the cutting unit out of the shaving
head (Fig. 22). Clean all parts of the shaving head with the cleaning
brush, except the foil.
Note: Lubricate trimmer teeth and foils with a drop of sewing machine oil
every six weeks for optimal performance.
3 Rinse the cutting unit, heads and accessories under the tap. Shake them
firmly to remove water drops.
4 Let all parts dry completely.
5 Place the cutting unit back into the shaving head ('click').
6 Put protection caps or combs on the heads to prevent damage to the
heads when you store them.
7 Store the appliance, its heads and accessories in the pouch.
Note: Lubricate trimmer teeth and foils with a drop of sewing machine oil
every six weeks for optimal performance.
Replacement
To buy accessories or spare parts, visit
www.shop.philips.com/service
or go
to your Philips dealer. You can also contact the Philips Consumer Care
Centre in your country (see the worldwide guarantee leaflet for contact
details).
Shaving head (if supplied): For optimal performance, we advise you to
replace the cutting unit of the shaving head every two years. If you use the
shaving head twice or more times a week, replace the cutting unit more
often. Always replace the cutting unit with one of the original type (BRL384).
Body exfoliation brush (if supplied): If you use the body exfoliation brush
2-3 times a week, it lasts approximately 3 months. Replace the body
exfoliation brush every 3 months with one of the original type (BRE351).
Troubleshooting
This chapter summarises the most common problems you could encounter
with the appliance. If you are unable to solve the problem with the
information below, visit www.philips.com/support for a list of frequently
asked questions or contact the Consumer Care Centre in your country.
Problem
Solution
The appliance
does not work as
well as it should.
Make sure you hold the appliance at the correct
angle (Fig. 12) and move it across the skin slowly,
against the direction of hair growth.
Clean the heads and accessories after every use.
After charging, the
battery indicator
flashes when I
press the on/off
button, but the
appliance does not
switch on.
The appliance is still connected to the mains. In this
case, the battery indicator flashes to indicate that
you should disconnect the appliance from the mains
before you can switch it on.
During use, the
appliance
becomes hot and
suddenly stops
operating. Then the
speed lights and
the battery
indicator flash red
for 30 seconds.
The overheat protection has been activated. The
overheat protection switches off the appliance
automatically if it becomes too hot. To reset the
overheat protection, let the appliance cool down and
then switch it on again. To avoid overheating of the
appliance, do not press it too hard onto you skin.
My skin is irritated
after I have used
the appliance.
Slight skin irritation like red skin or red dots may
occur. This is normal. To avoid irritated skin, make
sure that you gently move the appliance against the
direction of hair growth. Do not apply too much
pressure. If the irritation lasts longer than 3 days, we
advise you to consult a doctor.
Always stretch the skin with your free hand. When
you use the appliance on your underarms, raise your
arm and put your hand on the back of your head to
stretch the skin (Fig. 14).
Қазақша
Кіріспе
Осы
затты
сатып
алуыңызбен
құттықтаймыз
және
Philips
компаниясына
қош
келдіңіз
! Philips
ұсынатын
қолдауды
толық
пайдалану
үшін
өнімді
www.philips.com/welcome
торабында
тіркеңіз
.
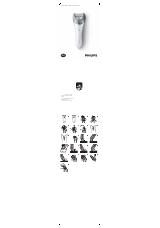
Жалпы
сипаттама
(1-
сурет
)
1
Сап
2
Жылдамдық
шамдары
(I
және
II)
3
Қосу
/
өшіру
түймесі
4
Батарея
индикаторы
5
Босату
түймесі
6
Кіші
ашаға
арналған
розетка
7
Эпилятор
басы
8
Ішіне
орнатылған
шам
9
Массаж
ұшы
10
Беттік
ұшы
11
Нәзік
аймақ
ұшы
12
Тері
созғыш
қақпағы
13
Қыратын
басы
14
Фольга
15
Триммерлер
16
Қыратын
басының
тарағы
17
Шаш
кесу
18
Қыратын
басының
тарағы
19
Жалғастырғыш
20
Дене
массажының
басы
21
Түлеген
дене
қылшағы
22
Түлеген
дене
қылшағының
қорғаныс
ұшы
23
Щетка
24
Адаптер
(HQ8505;
кіріс
: 100-240
В
айнымалы
ток
; 50/60
Гц
; 9
Вт
,
шығыс
: 15
В
тұрақты
ток
; 5,4
Вт
)
25
Жарығы
бар
қысқыштар
Көрсетілмеген
:
Қалта
Ескерту
:
Қамтамасыз
етілген
ұштар
мен
аксессуарлар
әр
түрлі
нөмірлер
үшін
өзгеше
болуы
мүмкін
.
Белгілі
бір
құрылғымен
қамтамасыз
етілген
ұштар
мен
аксессуарлар
үшін
шолу
суретін
қараңыз
.
Зарядтау
Ескерту
:
Құралды
алғашқы
рет
қолданар
алдында
,
оны
толығымен
зарядтап
алыңыз
.
Ескерту
:
Бұл
құрылғыны
тек
сымсыз
пайдалануға
болады
.
Құрылғыны
зарядтау
үшін
кішкене
штепсельді
құралдың
түбіндегі
ұяға
жалғап
,
адаптерді
қабырғадағы
розеткаға
жалғаңыз
.
-
Заряд
индикаторы
ақ
түспен
(
сурет
2)
жыпылықтайды
:
құрал
зарядталуда
.
Зарядтау
ең
көбі
1,5
сағат
алады
.
-
Заряд
индикаторы
ақ
түсте
үздіксіз
жанады
(
сурет
3):
құрылғы
зарядталып
, 40
минутқа
дейін
сымсыз
жұмыс
істейді
.
-
Құрылғы
қосулы
кезде
заряд
индикаторы
жанбайды
:
құрылғыда
пайдалануға
жеткілікті
энергия
бар
.
-
Батарея
индикаторы
қызғылт
сары
түспен
(
сурет
2)
жыпылықтайды
:
батарея
заряды
бос
және
зарядталуы
керек
.
Пайдаланып
болған
кезде
құрылғыны
зарядтаңыз
.
Ескерту
:
Егер
құрал
толығымен
зарядталса
,
бірақ
электр
тогына
әлі
де
қосулы
болса
,
қосу
/
өшіру
түймесін
басқан
кезде
батарея
индикаторы
бірнеше
рет
жыпылықтайды
.
Бұл
қосу
алдында
құрылғыны
электр
тогынан
ажырату
керектігін
көрсетеді
.