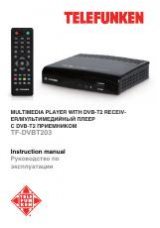
Operation
8
Operation
8
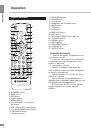
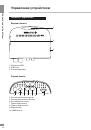
TTX
Press this button to enable or disable the
Teletext (Teletext is not supported by some TV
channels).
PVR
When a USB drive is connected to this unit,
while watching TV channels press PVR to
start recording video from the channel to USB.
Press STOP button to stop recording.
SUBTITLE
Click this button to select subtitle language,
if this choice is supported by the current
channel.
TV/RADIO
Press this button to switch between TV and
radio.
RECALL
Click this button to select the last-viewed
channel.
GOTO
During playback of video file, press this
button to open the window in which with the
help of number buttons you can input the file
playback time to start playback from. After
entering the time, press OK button to confirm.
PREV/NEXT
When playing a media file, press these
buttons to select previous/next file.
STOP
When playing a media file, press this button
to stop playback.
REPEAT
When playing a media file, press this button
to select the repeat mode: Repeat a single file,
folder repeat, repeat all the content, cancel
repeat (repeat modes available may vary
depending on different types of files).
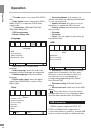
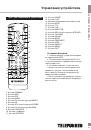
OSD operation
1. Press MENU button to enter the setting
menu displayed on the screen.
2. Press LEFT/RIGHT cursor buttons on the
RC to select setting page.
3. Press OK button on the RC to go to the
parameter list.
4. Press UP/DOWN cursor buttons on the
RC to select a parameter to adjust.
5. Press LEFT/RIGHT cursor buttons on the
RC to adjust the selected parameter.
6. Press MENU button to return to the
previous menu page. Press EXIT button on the
RC to quit the menu.
Some menu items may be in grey color,
in this case they are not adjustable. Pictures
of OSD menu are for reference only; they may
differ from the real screens.
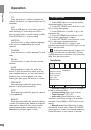
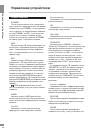
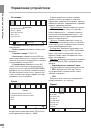
Installation
EXIT
ОК
Return
Confirm
Installation
Antenna setting
Country setting
Tuner System
Auto Scan
Manual Scan
•
Antenna setting:
this option is intended to
power an active antenna.
•
Country setting:
select your country.
•
Tuner System:
T/T2/T+T2
•
Auto scan:
press OK button to start
automatic search and saving of all available
channels. Press MENU or EXIT button to quit
search.
•
Manual scan:
Press OK button to enter
the manual search menu. Press LEFT/RIGHT
cursor buttons to select the channel frequency.
Press OK button to start search of the new