www.timberk.com • Electric air conditioner
5
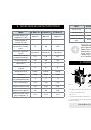
1. Household air conditioner 1 pc.
2. Air outlet 1 pc.
3. Giftbox - 1pc.
4. Manual - 1 pc.
5. Options (accessories) - depends of delivery
5. DELIVERY SET
6. APPLIANCE CONTROL
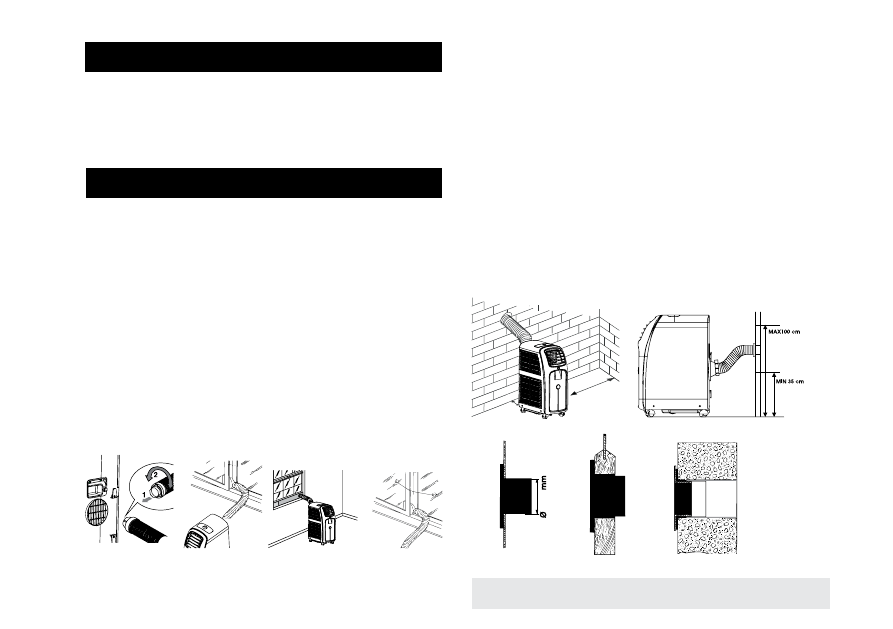
AIR-CONDITIONING WITHOUT INSTALLATION
Just a few simple steps and your comfort is ensured with your appliance:
Fit the air exhaust hose in the housing at the back of the appliance (fig. 1).
Fit the window outlet to the end of the hose.
Place the air conditioner near a window or French window.
Adjust the length of the hose to reach the window.
Make sure the air exhaust hose is unobstructed.
Open the window or French window slightly and position the outlet (fig. 2).
If you have a sash (window), place the bracket on the window sill, extend
the bracket fully within the window frame fix the bracket by using the pin,
then lower the window into the bracket. Insert the window outlet of the
exhaust hose into the slot, then connect the hose to the air conditioner
(fig. 3).
If you have a double window, use the sucker provided to hold the two
parts of the window together (fig. 4).
Keep the air hose as short and free of curves as possible to avoid
bottlenecks.
Fig. 4.
Fig.3.
Fig.2.
Fig. 1.
AIR-CONDITIONING WITH INSTALLATION
If required, your appliance can also be installed semi-permanently
(Fig. 5).
Proceed as follows:
Drill in an outside wall or in the window pane a 134 mm dia. hole
respecting the heights shown in fig.6.
Fit the flange accessory provided in the hole following the indications in
figs. 7, 8 and 9.
Fit the hose in the housing at the back of the appliance (fig. 1).
Fit the end of the hose to the flange as shown in fig. 6. When the hose
is not fitted, the hole can be closed with the flange
cap.
Keep the air hose as short and free of curves as possible to avoid
bottlenecks.
When installing the air conditioner semi-permanently, you should leave a
door slightly open (as little as 1 cm) to guarantee
correct ventilation.
Fig. 5.
Fig. 6.
30 cm
30 cm
134
Fig. 7.
Fig. 8.
Fig. 9.