Note:
•
Do not fill it with water above the MAX.
mark.
•
If you need to refill the water tank during
ironing, turn off the iron and unplug the
power cord from the outlet.
•
After you finish ironing, switch off the iron,
wait until it cools down completely, open
the filling opening lid (9) hold the unit in its
upright position and drain the remaining
water.
BEFORE FIRST USAGE
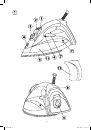
• Unpack the iron; remove the protection (if any)
from the iron soleplate (5).
• Make sure that the electrical supply voltage
corresponds to the iron’s operating voltage.
• Fill the water tank with water (10).
• Insert the plug into the socket.
• Set the temperature control (7) to the “МАХ”
position, the indicator in the temperature con-
trol (7) will light up.
• When the soleplate temperature (5) reaches
the desired temperature value, the indicator
will go out.
• Set the steam supply control (3) to the “ ”
position (steam supply is on), steam will start
going out of the openings on the iron soleplate
(5).
• Before operating test the heated iron on the
old cloth to be sure that the iron soleplate (5)
and the water tank (10) are clean.
• The unit is ready to operate.
Note:
When using the unit for the first time, the
heating element of the unit burns that is why
some smoke or foreign odor can appear. It
is normal.
“AUTOMATIC OFF” FUNCTION
If the iron is motionless during 30 seconds in
horizontal position or about 8 minutes in verti-
cal position, it will switch off automatically. The
indicator in the temperature control (7) will be
flashing.
To switch on the unit, just start ironing, the iron
will switch on and the indicator will stop flashing.
Note:
After the iron is switched on, the previously
set soleplate temperature will be set in some
time, depending on the position of the tem-
perature control (7).
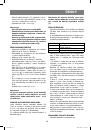
IRONING TEMPERATURE
• Always check the recommended iron temper-
ature indicated on the tag before ironing.
• If the tag does not list the recommended iron-
ing temperature, but you know the type of fab-
ric, then use the following table to determine
the proper temperature.
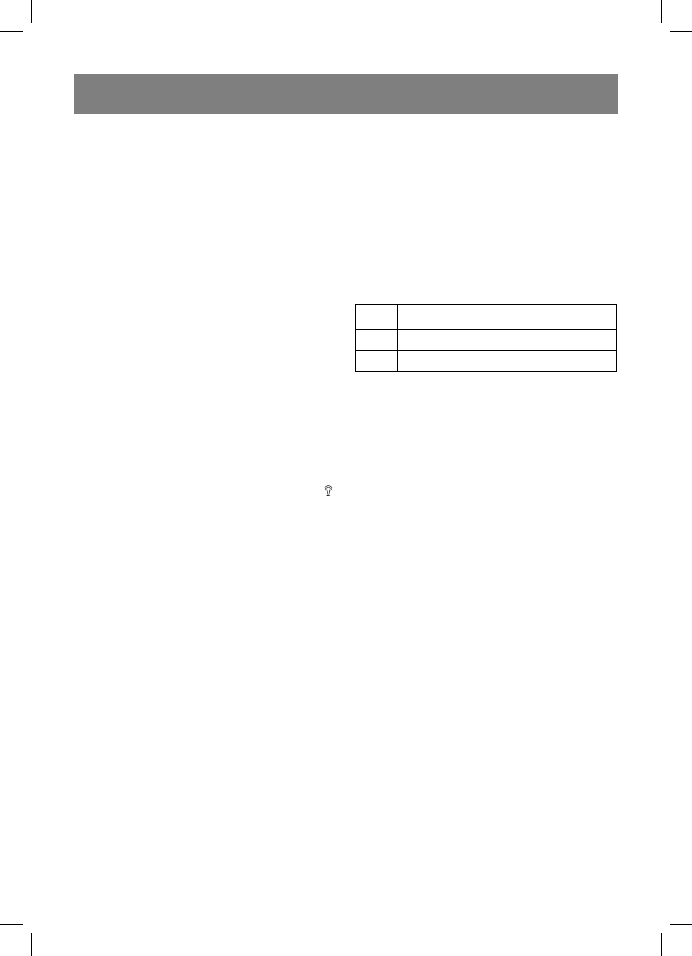
Signs Fabric type (temperature)
•
Synthetics, nylon, acryl, polyester
(low temperature)
••
Silk/wool (medium temperature)
•••
Cotton/flax (high temperature)
• This table is only for smooth materials. Fabrics
of other types (crimped, raised etc.) are best
ironed at low temperature.
• Firstly sort items by ironing temperature: wool
with wool, cotton with cotton etc.
• The iron heats up faster than is cools down.
For this reason it is recommended to begin
ironing at low temperature (for instance syn-
thetic fabrics).
• After that, move to higher temperature iron-
ing (silk/wool). Cotton and linens should be
ironed last.
• If an item is made from a mix of fabrics, then
the iron should be set for the fabric with the
lowest ironing (for instance if an item is made
from 60% polyester and 40% cotton, it should
be ironed at the temperature used for ironing
polyester “•”).
• If you cannot define the fabric the item is
made from, find a place on it that is hidden
while wearing and, on practice select the iron-
ing temperature (always start at the lowest
and gradually raise it until you get the desired
result.)
• Corduroy and other fabrics that start glossy
quickly should be ironed strictly in one direc-
tion (along the lines) with slight pressure.
• To avoid appearance of glossy spots on the
synthetic and silk fabrics, iron them back-
side.
SETTING THE IRONING TEMPERATURE
• Place the iron on the base (8).
• Insert the power plug into the socket.
5
ENGLISH
1214.indd 5
1214.indd 5
06.07.2011 17:33:13
06.07.2011 17:33:13