Инструкция для VITEK VT-2542 GY

(скачивание инструкции бесплатно)
Формат файла: PDF
Доступность: Бесплатно как и все руководства на сайте. Без регистрации и SMS.
Дополнительно: Чтение инструкции онлайн
background image

5

ENGLISH          

USING THE HAIR CLIPPER

After  unit  transportation  or  storage  at  low 
temperature it is necessary to keep it for at 
least two hours at room temperature before 
switching on.

–  Unpack the unit completely and remove any 

stickers that can prevent unit operation.

–  Check the unit for damages, do not use the 

unit in case of damages.

–  Before switching the unit on make sure that 

voltage  of  the  mains  corresponds  to  unit 
operating voltage.

Accumulator battery (ACC) charging 

Full  charging  of  the  accumulator  battery  is 
enough for about 45 minutes of continuous unit 
operation.
–  Insert the power cord (9) connector into the 

socket  (1)  on  the  hair  clipper  body  or  the 
base (10) jack (11).

–  If  you  use  the  base  (10),  place  it  on  a  flat 

stable surface, place the hair clipper on the 
base.

–  Plug  the  power  adapter  (9)  into  the  mains 

socket,  the  charging  indicator  (2)  will  light 
up red.

–  Before  the  first  use,  charge  the  ACC  dur-

ing 10 hours. Duration of the following ACC 
charging should not exceed 8 hours.

–  After  charging  the  ACC,  unplug  the  power 

adapter (9) and remove the jack-plug of the 
cord from the jack (1)/(11).

Note

:

–  Recharge  the  ACC  only  after  its  complete 

discharge.

–  Charge the ACC at the temperature from +5° 

C to +35° C.

–  Never leave the unit connected to the mains 

unattended.

–  After  a  long  period  of  non-use  (more  than 

2-3  weeks),  charge  the  ACC  completely 
before the hair clipper use.
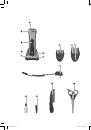
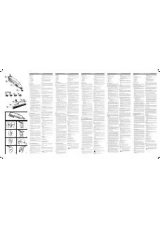
Attachments (6, 7)

–  Holding the clamp (8), move the attachment 

to the required position.

–  Before  installing  and  changing  the  attach-

ment switch the unit off by pressing the but-
ton  (3),  if  the  unit  is  powered  through  the 
power adapter, unplug it.

–  By  pressing  and  holding  the  clamp  (8), 

remove the attachment from the unit body.

–  To  install  an  attachment  insert  it  into  the 

groove on the rear side of the unit body, then 
holding the clamp (8) move it downwards till 
bumping and release the clamp (8). 

Lubricating oil

–  Lubricate  the  blades  after  every  use  of  the 

hair clipper. 

–  Use only the oil (12) supplied with the unit.
–  Do not use vegetable oil or oil that contains 

solvents.  Solvents  will  evaporate,  leaving  a 
thick grease that may slow down the blades 
motion.

Operating the hair clipper

–  Before  the  cordless  operation  of  the  unit, 

charge it completely.

–  Install the required attachment (6 or 7) on the 

hair clipper body.

Note

:  For  the  corded  unit  operation,  insert 

the  power  adapter  (9)  jack-plug  into  the  jack 
(1)  and  connect  the  power  adapter  (9)  to  the 
mains. 

–  Switch the unit on by pressing the button (3), 

the indicator (2) will light up blue. 

–  After finishing the unit operation switch it off 

by pressing the button (3) again.

Note

Always  switch  the  hair  clipper  off  during  the 
intervals in operation.
Before changing an attachment, switch the hair 
clipper off, and in case of corded unit operation 
unplug the power adapter.
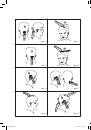
Haircutting

–  Hair should be clean and dry.
–  Before  cutting  hair  switch  the  hair  clipper 

on  by  pressing  the  button  (3),  and  make 
sure that the unit operates normally and the 
blades move smoothly. If there is excess oil 
on blades, remove it with a dry cloth.

–  Switch the unit off by pressing the button (3) 

and fix the attachment comb (6).

–  Seat  the  person  so  that  his/her  head  is 

approximately  at  your  eye  level,  cover  the 

VT-2542.indd   5

12.09.2013   17:09:32

1
2
3
4
5
6
7
8
9
10
11
12
13
14
15
16
17
18
19
20
21
22
23
24
25
26
27
28
29
30
31
32
33
34
35
36
37
38
39
40
Оглавление инструкции
  • Страница 1 из 41
    1 VT-2542.indd 1 12.09.2013 17:09:30
  • Страница 2 из 41
    VT-2542.indd 2 12.09.2013 17:09:32
  • Страница 3 из 41
    VT-2542.indd 3 рис. 1 рис. 5 рис. 2 рис. 6 рис. 3 рис. 7 рис. 4 рис. 8 12.09.2013 17:09:32
  • Страница 4 из 41
    ENGLISH HAIR CLIPPER This set is designed for hair cutting and thinning out. •• Charge the accumulator battery at the tem- DESCRIPTION 1. Power adapter jack 2. Power On/Charging indicator 3. On/Off button 4. Thinning comb clamp 5. Blade block 6. 3/6/9/12/15 mm attachment comb 7. 18/21/24/27/30 mm
  • Страница 5 из 41
    ENGLISH – By pressing and holding the clamp (8), remove the attachment from the unit body. – To install an attachment insert it into the groove on the rear side of the unit body, then holding the clamp (8) move it downwards till bumping and release the clamp (8). USING THE HAIR CLIPPER After unit
  • Страница 6 из 41
    ENGLISH •• You can use the comb (14): lift the hair locks person’s shoulders with a towel and comb his/her hair with the comb (14). – Switch the unit on by pressing the button (3). Reminder •• Cut off a little amount of hair at a time; if necessary, you can always return to the cut area again for
  • Страница 7 из 41
    ENGLISH 5. 6. 7. 8. 9. – Remove the blade block (5) by pressing the top part of the block from the blade side. Clean the blade block (5) and the inner side under the blade block (5) with the cleaning brush (13). Fix the blade block (5) to its place by inserting the clamp of the block to the groove
  • Страница 8 из 41
    DEUTSCH HAARSCHNEIDESET Dieses Set ist fürs Effilieren bestimmt. Haarschneiden •• Benutzen Sie das Gerät in den Räumen mit erhöhter Temperatur und relativer Feuchtigkeit über 80% nicht. •• Es ist nicht gestattet, das Gerät draußen zu benutzen. •• Laden Sie den Akkumulator bei der Temperatur von
  • Страница 9 из 41
    DEUTSCH Beschädigungen des Netzadapters und des Untersatzes, unterbrochenem Gerätebetrieb und im Sturzfall wenden Sie sich an den nächsten autorisierten Kundendienst. •• Transportieren Sie das Gerät nur in der Fabrikverpackung. •• Bewahren Sie das Gerät an einem trockenen, kühlen und für Kinder und
  • Страница 10 из 41
    DEUTSCH Schritt 2 Schalten Sie die Haarschneidemaschine mit der Taste (3) aus, stellen Sie den Aufsatz in die Position «9» oder «12», schalten Sie die Haarschneidemaschine ein und setzen Sie das Haarschneiden näher zum Scheitel fort (Abb.4). Schritt 3 - Schneiden der Koteletten Schalten Sie die
  • Страница 11 из 41
    DEUTSCH Konusförmiger Schnitt Setzen Sie den notwendigen Kammaufsatz auf und beginnen Sie das Haarschneiden vom Hinterkopf in die Richtung des Haarwirbels. Schneiden Sie das Haar gegen den Haarwuchs vom vorderen Teil des Kopfes in die Richtung des Haarwirbels und an den Kopfseiten (Abb. 8). Um den
  • Страница 12 из 41
    русский НАБОР ДЛЯ СТРИЖКИ Данный набор предназначен для стрижки и филировки волос. •• Используйте машинку только для стрижки ОПИСАНИЕ 1. Гнездо для подключения сетевого адаптера 2. Индикатор включения/зарядки 3. Кнопка включения/выключения 4. Фиксатор филировочного гребня 5. Блок лезвий 6.
  • Страница 13 из 41
    русский используемые в качестве упаковки, без надзора. Внимание! Не разрешайте детям играть с полиэтиленовыми пакетами или пленкой. Опасность удушения! •• Не разбирайте прибор самостоятельно. В случае обнаружения неисправности, повреждения сетевого адаптера, подставки, если устройство работает с
  • Страница 14 из 41
    русский – Установите необходимую насадку (6 или 7) на корпус машинки. Примечание: Для работы от электрической сети подсоедините разъём провода адаптера (9) к гнезду (1) и вставьте сетевой адаптер (9) в розетку. – Включите устройство, нажав кнопку (3), при этом загорится индикатор (2) синего цвета.
  • Страница 15 из 41
    русский и на шее (рис. 7). Не давите на машинку с усилием, при контакте открытых лезвий с кожей можно нанести себе травму или порезы. Конусообразная стрижка Установите необходимую насадку-расчёску и начните стрижку с задней части головы по направлению к макушке. Подстригите волосы против
  • Страница 16 из 41
    Қазақша ШАШ ҚЫРҚУҒА АРНАЛҒАН ЖИНАҚ Бұл жинақ шашты қырқуға филировкалауға арналған. •• Тек жеткізу жинағына кіретін саптаманы, және •• СУРЕТТЕМЕ 1. Желілік адаптерді қосуға арналған ұя 2. Қосу/зарядтау көрсеткіші 3. Қосу/өшіру түймесі 4. Филировка тарағының бекіткіші 5. Жүздер блогы 6.
  • Страница 17 из 41
    Қазақша – АКБ-ның зарядталу ұзақтығы алғаш рет пайдаланар алдында 10 сағатты құрайды. АКБ-ның одан кейінгі зарядталу уақыты 8 сағаттан аспау керек. – АКБ зарядталған соң желілік адаптерді (9) розеткадан суырыңыз және сымның ағытпасын ұядан (1)/(11) суырып алыңыз. Ескертпе: – АКБ-ны заряды толық
  • Страница 18 из 41
    Қазақша жылжытыңыз. Бастың артқы жағының төменгі бөлігіндегі және құлақ маңайындағы барлық шашты қырқыңыз (сур. 1, 2, 3). 2-қадам Машинаны түймемен (3) ажыратыңыз, саптаманы «9» немесе «12» күйіне орнатыңыз, машинаны қосыңыз және шашты төбеге қарай қырқуды жалғастырыңыз (4-сур). 3-қадам. Самай
  • Страница 19 из 41
    Қазақша Конус тәрізді қырқу Қажетті саптама-тарақты орнатыңыз және қырқуды бастың желке тұсынан төбеге қарай бағытта бастаңыз. Бастың алдыңғы бөлігіндегі шашты төбеге қарай бағытта және самай шаштарды олардың өсуіне қарсы бағытта қырқыңых (сур. 8). Төбені жайпақ етіп қырқу үшін тарақты (14)
  • Страница 20 из 41
    romÂnĂ/ Moldovenească TRUSĂ DE TUNS Acest aparat este destinat pentru tunderea şi filarea părului. •• Nu utilizaţi aparatul în locuri cu temperaturi ridi- cate şi umiditate relativă ce depăşeşte 80%. •• Nu utilizaţi aparatul în afara încăperilor. •• Efectuaţi încărcarea bateriei de acumulator la
  • Страница 21 из 41
    romÂnĂ/ Moldovenească Accesoriile (6, 7) Menţinând fixatorul (8), mutaţi accesoriul în poziţia necesară. – Înainte de instalarea sau schimbarea accesoriului opriţi aparatul, apăsând pe butonul (3), dacă lucraţi de la adaptorul de reţea scoateţi-l din priza electrică. – Apăsând şi menţinând apăsat
  • Страница 22 из 41
    romÂnĂ/ Moldovenească Opriţi aparatul apăsând pe butonul (3), apoi instalaţi accesoriul-pieptene (6). – Aşezaţi persoana în aşa fel, încât capul acesteia să se situeze aproximativ la nivelul ochilor Dvs., acoperiţi-i umerii cu un prosop, pieptănaţi părul cu ajutorul pieptenelui (14). – Porniţi
  • Страница 23 из 41
    romÂnĂ/ Moldovenească Scoateţi blocul de cuţite (5), apăsând pe partea superioară a blocului din partea lamelor. Curăţaţi cu periuţa (13) blocul de cuţite (5) şi cavitatea interioară sub blocul de cuţite (5). Instalaţi blocul de cuţite (5) în poziţia iniţială, introducând fixatorul blocului în
  • Страница 24 из 41
    Český Souprava na stříhání vlasů Tato souprava je určena k stříhání a efilaci vlasů. •• Nepoužívejte přístroj v místech se zvýšenou teplotou a relativní vlhkostí více 80%. •• Nikdy nepoužívejte přístroj vně budovy. •• Dobíjejte akumulátorovou baterii při teplo- POPIS 1. Přípojka pro zapojení
  • Страница 25 из 41
    Český – Pokud jste nepoužívali přístroj delší dobu (déle než 2-3 týdny), před dalším použitím zcela nabijte AKB. •• Skladujte přístroj v suchém chladném místě mimo dosah dětí a osob s omezenými schopnostmi. Nástavce (6,7) – Přidržte západku (8) a posuňte nástavec do požadované polohy. – Před
  • Страница 26 из 41
    Český Stříhání vlasů – Vlasy musí byt čisté a suché – Před střiháním zapněte strojek tlačítkem (3) a přesvědčte se, že přístroj funguje bez přerušení a chod čepelí je plynulý. Pokud je na čepelích přebytek mazacího oleje, odstraňte ho pomocí suché látky. – Vypněte přístroj stisknutím tlačítka (3),
  • Страница 27 из 41
    Český Obsah balení: 1. Stříhací strojek se stříhací jednotkou - 1 kus 2. Nástavec-hřeben - 2 kusy 3. Síťový adaptér - 1 kus 4. Podstavec - 1 kus 5. Olej - 1 kus 6. Kartáček - 1 kus 7. Hřeben - 1 kus 8. Nůžky - 1 kus 9. Uživatelská příručka - 1 kus – Nikdy neponořujte strojek, stříhací jednotku,
  • Страница 28 из 41
    УКРАЇНЬСКа •• Використовуйте лише насадки, підставку НАБІР ДЛЯ СТРИЖКИ Даний набір призначений для стрижки і філіровки волосся. і мережевий адаптер з комплекту постачання. •• Не використовуйте пристрій в місцях з підвищеною температурою і відносною вологістю більше 80%. •• Забороняється
  • Страница 29 из 41
    УКРАЇНЬСКа •• Не розбирайте прилад самостійно. В разі Після зарядки АКБ витягніть мережевий адаптер (9) з розетки і вийміть роз’їм дроту з гнізда (1)/(11). Примітка: – Робить повторну зарядку АКБ лише після її повної розрядки. – Робить зарядку АКБ при температурі від +5° C до +35° C. – Не залишайте
  • Страница 30 из 41
    УКРАЇНЬСКа машинку і продовжуйте стригти волосся ближче до верхівки (мал. 4). Крок 3 - стрижа в області скронь Відключите машинку, встановите насадку в положення «3» або «6» і підстрижіть волосся на скронях. Потім встановите її в положення «9» або «12» і продовжуйте стрижку у напрямку до верхівки.
  • Страница 31 из 41
    УКРАЇНЬСКа ЗБЕРІГАННЯ Перед тим, як прибрати пристрій на зберігання, зробіть його чищення і змастіть леза маслом (12). – Зберігайте пристрій в сухому прохолодному місці, недоступному для дітей. плоскою верхівкою використовуйте гребінець (14): підводьте і зістригайте пасма волосся по гребінцю.
  • Страница 32 из 41
    Беларуская •• Выкарыстоўвайце толькі насадкі, падстаўку НАБОР ДЛЯ СТРЫЖКІ Дадзены набор прызначаны для стрыжкі і філіравання валасоў. і сеткавы адаптар з камплекта пастаўкі. •• Не выкарыстоўвайце прыладу ў месцах з павышанай тэмпературай і адноснай вільготнасцю больш 80%. •• Забараняецца
  • Страница 33 из 41
    Беларуская Небяспека ўдушэння! •• Не разбірайце прыбор самастойна. У выпадку выяўлення няспраўнасці, пашкоджання сеткавага адаптара, падстаўкі, калі прылада працуе з перабоямі, а таксама пасля яе падзення звярніцеся ў найбліжэйшы аўтарызаваны сэрвісны цэнтр. •• Перавозьце прыладу толькі ў завадской
  • Страница 34 из 41
    Беларуская Крок 2 Адключыце машынку кнопкай (3), устанавіце насадку ў становішча «9» ці «12», уключыце машынку і працягвайце стрыгчы валасы бліжэй да макушкі (мал.4). Крок 3 - стрыжка ў вобласці скроняў Адключыце машынку, устанавіце насадку ў становішча «3» ці «6» і падстрыжыце валасы на скронях.
  • Страница 35 из 41
    Беларуская ЗАХОЎВАННЕ Перад тым, як прыбраць прыладу на захоўванне, вырабіце яе чыстку і змажце лёзы маслам (12). – Захоўвайце прыладу ў сухім прахалодным месцы, недаступным для дзяцей. супраць кірунку іх росту з пярэдняй часткі галавы ў кірунку да макушкі і з бакоў (мал. 8). Для атрымання стрыжкі
  • Страница 36 из 41
    O’zbekcha SОCH ОLISH TO’PLАMI Sоch оlish to’plаmi sоchni kаltаlаsh vа siyrаklаshtirishgа mo’ljаllаngаn •• Jihоzni hаrоrаt bаlаnd, nisbiy nаmlik 80% dаn ko’p jоydа ishlаtmаng. хоnаdаn tаshqаridа ishlаtish tа’qiqlаnаdi. •• Аkkumulyatоr bаtаrеsini hаvо hаrоrаti +5°C dаrаjаdаn +35°C .dаrаjаgаchа
  • Страница 37 из 41
    O’zbekcha shikаstlаnsа yoki ishlаb-ishlаmаyotgаn bo’lsа yaqinrоqdаgi vаkоlаtli хizmаt mаrkаzigа оlib bоring. •• Jihоzni fаqаt zаvоddаn kеlgаn qutisidа bоshqа jоygа оlib bоring. •• Jihоzni quruq, sаlqin, bоlаlаr bilаn imkоniyati chеklаngаn insоnlаrning qo’li yеtmаydigаn jоygа оlib qo’ying. Eslаtmа:
  • Страница 38 из 41
    O’zbekcha оling. So’ng birikmаni yanа «9» yoki «12» tоmоngа o’tkаzib bоsh tеpаsigа qаrаtib sоchni оling. 4-qаdаm – bоsh оrqаsidаgi sоchni оlish Birikmа tаrоqni «9» yoki «12» tоmоngа o’tkаzib bоsh tеpаsidаn bo’yin tоmоngа, sоch o’sgаn tоmоngа tеskаri yurgаzib sоchni kаltаlаng. •• Sоchni sоch o’sgаn
  • Страница 39 из 41
    O’zbekcha – Jihоzni quruq, sаlqin, bоlаlаrning qo’li yеtmаydigаn jоygа оlib qo’ying. оlib tаshlаsh bo’lаdi. Uzun sоch tutаmlаridаn kаltа sоch tutаmlаrigа bir tеkis o’tish imkоnini bеrаdi. Sоch kаltаlаsh охiridа siyrаklаshtirilаdi. – Siyrаklаshtirаdigаn tаrоqni chiqаrish uchun mаhkаmlаgichni (4)
  • Страница 40 из 41
    gb A production date of the item is indicated in the serial number on the technical data plate. A serial number is an eleven-unit number, with the first four figures indicating the production date. For example, serial number 0606ххххххх means that the item was manufactured in June (the sixth month)
  • Страница 41 из 41