
P-2000W_V2 User’s Guide
76
Chapter 12 User Web Configurator Screens
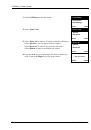
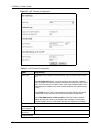
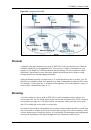
12.7 Network Configuration: DHCP
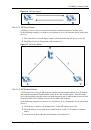
If you were not assigned a specific IP address for your Prestige, use the following directions to
set your Prestige to get it automatically via DHCP (Dynamic Host Control Protocol).
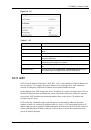
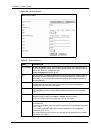
Table 7
STATIC
LABEL
DESCRIPTION
Get IP Address
Network Mode
Click
STATIC
to manually enter a fixed IP address.
Click
DHCP
to have the Prestige automatically obtain network settings at startup
from a Dynamic Host Configuration Protocol server. These settings are not
configurable.
Click
PPPoE
if your ISP uses Point-to-Point Protocol over Ethernet.
Network IP
This is the IP address your Prestige uses to connect to the wireless LAN. Type the
address given to you by your network administrator.
Network Subnet
Mask
The subnet mask specifies the network number portion of an IP address. Type the
subnet mask given to you by your network administrator. See the appendix for
information on subnetting.
Default Gateway
Type the gateway IP address of the device to which your Prestige is to connect.
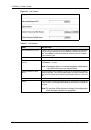
MAC Address
Every Ethernet device has a unique MAC (Media Access Control) address. The
MAC address is assigned at the factory and consists of six pairs of hexadecimal
characters, for example, 00:A0:C5:00:00:02.
This field is read only and cannot be configured.
DNS Server IP
Type the DNS’ IP address for translating readable domain names into valid
computer IP addresses.
Second DNS
Server IP
Type a backup DNS IP address for the Prestige to use in the event that the
Prestige cannot connect to the preferred DNS.
APPLY
Click
APPLY
to save your changes without restarting the Prestige. Your wireless
LAN, Internet and SIP settings changes do not take affect until you use
RESTART
(in the navigation panel).
CANCEL
Click
CANCEL
to begin configuring this screen afresh.
 1
1
 2
2
 3
3
 4
4
 5
5
 6
6
 7
7
 8
8
 9
9
 10
10
 11
11
 12
12
 13
13
 14
14
 15
15
 16
16
 17
17
 18
18
 19
19
 20
20
 21
21
 22
22
 23
23
 24
24
 25
25
 26
26
 27
27
 28
28
 29
29
 30
30
 31
31
 32
32
 33
33
 34
34
 35
35
 36
36
 37
37
 38
38
 39
39
 40
40
 41
41
 42
42
 43
43
 44
44
 45
45
 46
46
 47
47
 48
48
 49
49
 50
50
 51
51
 52
52
 53
53
 54
54
 55
55
 56
56
 57
57
 58
58
 59
59
 60
60
 61
61
 62
62
 63
63
 64
64
 65
65
 66
66
 67
67
 68
68
 69
69
 70
70
 71
71
 72
72
 73
73
 74
74
 75
75
 76
76
 77
77
 78
78
 79
79
 80
80
 81
81
 82
82
 83
83
 84
84
 85
85
 86
86
 87
87
 88
88
 89
89
 90
90
 91
91
 92
92
 93
93
 94
94
 95
95
 96
96
 97
97
 98
98
 99
99
 100
100
 101
101
 102
102
 103
103
 104
104
 105
105
 106
106
 107
107
 108
108
 109
109
 110
110
 111
111
 112
112
 113
113
 114
114
 115
115
 116
116
 117
117
 118
118
 119
119
 120
120
 121
121
 122
122
 123
123
 124
124
 125
125
 126
126
 127
127
 128
128
 129
129
 130
130
 131
131