5
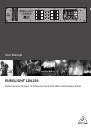
EUROLIGHT LD6230 User Manual
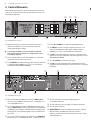
2. Control Elements
Various LD6230 control elements are described in this chapter. All controls and
connectors are described in detail, and you also get useful advice on how to use
them in different applications.
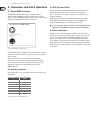
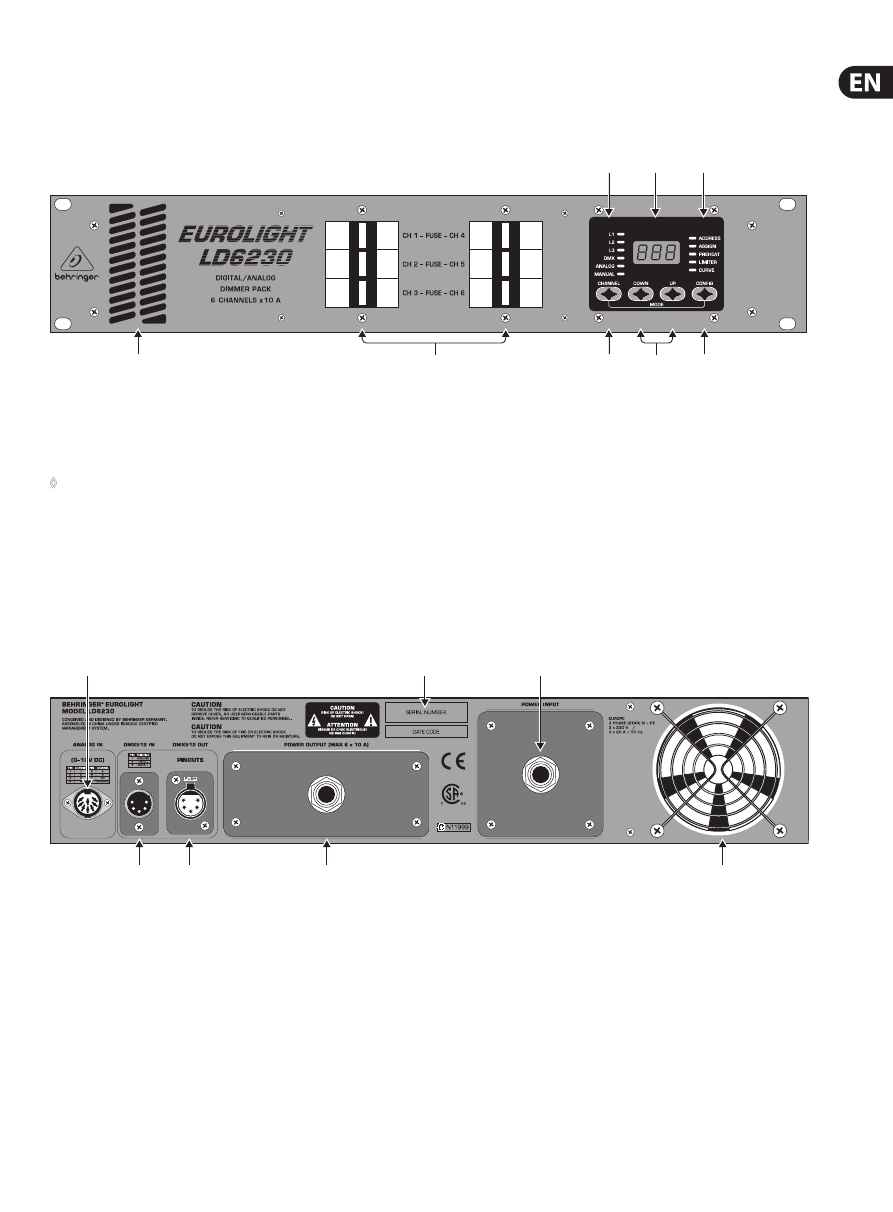
(1)
(2)
(3)
(4)
(5)
(6)
(7)
(8)
Fig. 2.1: EUROLIGHT LD6230’s front panel
(1)
Ventilation openings are located on the front panel. Their position at
the front assures that hot air does not enter the inside of your rack,
causing equipment failure or damage.
◊
To ensure that your dimmer pack runs smoothly even under full
load, you have to make sure that there is enough distance to other
heat-emitting equipment.
(2)
There is an automated fuse for each of the six dimmer circles. These fuses
engage in the event of overload or short circuit.
(3)
Use the
CHANNEL
key to shift between the six dimmer channels. When used
in combination with the CONFIG key (see
(5)
), you can select different
operating modes (DMX, ANALOG and MANUAL).
(4)
Use the
UP
and
DOWN
keys to navigate through individual menus.
(5)
The
CONFIG
key is used to activate the configuration mode (see ch. 2.1)
and to select individual menus. When used in combination with the
CHANNEL key (see
(3)
), you can select different operating modes.
(6)
The
LED
s to the left of the display have two purposes: supply phase status
indication (L1, L2 und L3) and indication of the operating mode you selected
(DMX, ANALOG and MANUAL).
(7)
The 3-digit
DISPLAY
shows the values to be edited.
(8)
The
LED
s to the right of the display relate to the individual menus in the
configuration mode. Depending on the selected function, the corresponding
LED lights up.
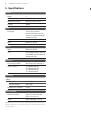
(9)
(10)
(12)
(14)
(13)
(11)
(15)
Fig. 2.2: EUROLIGHT LD6230’s rear panel
(9)
When your LD6230 works in DMX mode, use the 5-pole
DMX512 IN
-XLR
connector to connect DMX512 control signals (see ch. 2.2 “DMX mode” and
ch. 4.1 “Digital DMX connector”).
(10)
You can relay the DMX control signal to additional dimmer packs by using
the 5-pole
DMX512 OUT
XLR connector. If the dimmer is at the terminal end
of a DMX chain, place a terminator at the DMX output of the dimmer pack to
avoid signal bounce (use a terminator with the resistance of 120 Ω between
pins 2 and 3).
(11)
You can connect an analog 0 - 10 V control signal to the 8-pole
ANALOG IN
DIN connector (see ch. 2.3 “ANALOG mode” and ch. 4.2 “Analog connector”).
(12)
This is the cable slot for connecting your lighting equipment
(see Installation Instructions).
(13)
This is the cable slot for the power supply (see Installation Instructions).
(14)
The cooling fan is located here.
(15)
SERIAL NUMBER
. Please take a few minutes and send us the completely
filled out warranty card within 14 days of the date of purchase.
Otherwise, warranty claims may be rendered invalid. You may also register
online at behringer.com.