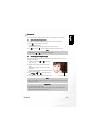
Welcome
DC C62 Digital Camera
DC C62 Digital Camera
DC C62 Digital Camera
DC C62 Digital Camera
User’s Manual
User’s Manual
User’s Manual
User’s Manual


Оглавление инструкции
Document Outline
- 1 Touring Your DC C62 1
- 2 Preparing Your DC C62 for Use 5
- 3 Basic Image Recording 9
- 4 Other Recording Functions 13
- 4.1 Selecting the Focus Mode 13
- 4.2 Exposure Compensation (EV Shift) 15
- 4.3 Adjusting White Balance 15
- 4.4 Using the NICESHOT Mode 16
- 4.5 Using the Movie Mode 17
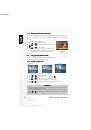
- 4.6 About the Histogram 17
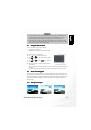
- 4.6.1 Histogram Examples 17
- 4.6.2 Specifying ISO Sensitivity 18
- 4.6.3 Selecting the Metering Mode 18
- 4.6.4 Using the Filter Function 19
- 4.6.5 Specifying Color Saturation 19
- 4.6.6 Specifying Contrast 19
- 4.6.7 Specifying Outline Sharpness 19
- 4.6.8 Turning the On-screen Grid On and Off 20
- 4.6.9 Turning Image Review On and Off 20
- 4.6.10 Specifying Power On Default Settings 20
- 4.6.11 Resetting the Camera 20
- 5 Playback 21
- 6 DPOF 26
- 7 Camera Settings 28
- 8 Using A Memory Card 30
- 9 Connecting to a Computer 32
- 10 Troubleshooting 35
- 11 Specifications 36
- 12 Service Information 36
- Touring Your DC C62
- 1.1 Checking the Package Contents
- 1.2 DC C62 Components
- Note
- 1.2.3 Bottom View
- 1.3 Monitor Screen Contents
- Note
- Important!
- Important!
- Preparing Your DC C62 for Use
- 2.1 Power Requirements
- Important!
- Note
- Important!
- 2.2.2 To turn off the camera
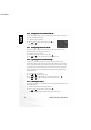
- 2.3 Operating the Multi-controller
- 1. Press the power button or the [] (REC) button.
- 2. Press [MENU].
- 3. Press [] or [] to select the tab you want, and then press [SET] to move the selection cursor f...
- 4. Use [] and [] to select the feature whose setting you want to configure, and then press []. (I...
- 5. Use [] and [] to change the currently selected setting.
- 6. Perform one of the following operations to apply the setting you configured.
- 2.4 Setting the Language
- 2.5 Setting the Date and Time
- 1. Press the power button or the [] (REC) button.
- 2. Press [MENU].
- 3. Press [] to select the [Setup] tab, and then press [SET].
- 4. Use [] to select the Date Style, and then press [SET].
- 5. Use [] and [] to change the date format setting, and then press [].
- 6. Use [] to select the Adjust, and then press [SET].
- 7. Use [][][] and [] to set the current date and time.
- 8. Press [SET].
- Basic Image Recording
- 3.1 Recording an Image
- 1. Press the power button or the [] (REC) button to turn on the camera.
- 2. Compose the image on the monitor screen so the main subject is within the focus frame.
- 3. Press the shutter release button half way to focus the image.
- 4. After making sure that the image is focused properly, press the shutter release button the res...
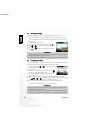
- 3.2 Using Zoom
- Note
- Important!
- Important!
- 3.1 Recording an Image
- Other Recording Functions
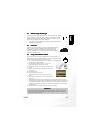
- 4.1 Selecting the Focus Mode
- Important!
- 4.1.3 Using the Infinity Mode
- 4.1.4 Using Manual Focus
- 4.2 Exposure Compensation (EV Shift)
- 4.3 Adjusting White Balance
- 4.4 Using the NICESHOT Mode
- Important!
- Important!
- Important!
- Important!
- Important!
- Playback
- 5.1 Basic Playback Operation
- Note
- Note
- Important!
- Important!
- 5.4 Cropping an Image
- 1. In the PLAY mode, use [] and [] to scroll through images and display the one you want to crop.
- 2. Press [MENU].
- 3. Select the "PLAY" tab, select "Trimming", and then press [] .
- 4. Use the zoom controller to make the cropping boundary larger or smaller.
- 5. Use [], [], [] and [] to move the cropping boundary up, down, left, or right until the area of...
- 6. Press [SET] to extract the part of the image enclosed in the cropping boundary.
- 5.4 Cropping an Image
- Important!
- Important!
- 5.6 Viewing Pictures in Thumbnail Mode
- 5.7 Rotating the Display Image
- 1. In the PLAY mode, press [MENU].
- 2. Select the "PLAY" tab, select "Rotation", and then press [].
- 3. Use [] and [] to scroll through images until the one you want to rotate is on the monitor screen.
- 4. Use []and [] to select "Rotate", and then press [SET].
- 5. After you are finished configuring settings, press the [MENU] button to exit the setting screen.
- Important!
- Important!
- DPOF
- 6.1 DPOF Setting
- 6.2 To configure print settings for a single image
- 1. In the PLAY mode, press [MENU].
- 2. Select the "PLAY" tab, select "DPOF", and then press [].
- 3. Use []and [] to select “Select Images”, and then press [].
- 4. Use [] and []to display the image you want.
- 5. Use []and [] to specify the number of copies.
- 6. To turn on date stamping for the prints, press [DISP] so is displayed.
- 7. After all the settings are the way you want, press [SET] to apply them.
- 6.3 To configure print settings for all images
- 1. In the PLAY mode, press [MENU].
- 2. Select the "PLAY" tab, select "DPOF", and then press [].
- 3. Use []and [] to select “All Images”, and then press [].
- 4. Use [] and [] to specify the number of copies.
- 5. To turn on date stamping for the prints, press [DISP] so is displayed.
- 6. After all the settings are the way you want, press [SET] to apply them.
- 6.4 PRINT Image Matching II
- 6.5 Exif Print
- 6.6 Using USB DIRECT-PRINT
- 1. Use the DPOF procedure on page 31 to specify the images in file memory that you want to print.
- 2. Load Alkaline batteries or connect the AC adaptor to the camera.
- 3. Use the USB cable that comes with the camera to connect it to a printer.
- 4. Turn on the printer.
- 5. Press the camera's power button.
- 6. On the camera's monitor screen, select "Print", and then press [SET].
- 7. The camera will turn off automatically when printing is complete.
- Important!
- Camera Settings
- Using A Memory Card
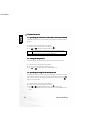
- 8.1 Installing an SD Card
- 8.2 To remove the SD card
- Important!
- Memory Card Precautions!
- Important!
- 8.4.1 To copy all the files in built-in memory to a memory card
- 8.4.2 To copy a file from a memory card to built-in memory
- 1. Perform steps 1 through 3 of the procedure under "To copy all the files in built-in memory to ...
- 2. Use []and [] to select "Card Built-in", and then press [SET].
- 3. Use [] and [] to select the file you want to copy.
- 4. Use []and [] to select "Copy", and then press [SET].
- 5. Press [MENU] to exit the copy operation.
- Connecting to a Computer
- 9.1 Installing the Digital Camera Software
- 9.2 Bundled Software
- 9.3 Transferring Files To/From a Computer
- 9.3.1 Transferring Photos, Movie Clips, and Music Files
- 1. Turn on the computer.
- 2. Turn on the camera.
- 3. Before connecting the camera C62 to your PC, please install the C62 driver first.
- 4. Connect the camera to the PC with the included USB cable. Ensure that the connection is secure.
- 5. A new disk appears in Windows Explorer labelled “Removable Disk.” (See note below).
- 6. Stored photos and movie clips can be found in the directory “Removable Disk\DCIM\100DCPIC”.
- 9.3.1 Transferring Photos, Movie Clips, and Music Files
- Note
- Troubleshooting
- Specifications
- Image Sensor
- Lens
- View Finder
- LCD Monitor
- Focus Range
- Exposure Control
- Exposure Compensation
- Exposure Meter
- Shutter Speed
- Aperture
- Exposure
- ISO Equivalent
- White Balance
- Flash Mode
- Flash Range
- Self-Timer
- Image File Format
- Movie Mode
- Image size
- Picture Storage
- Power Source
- Dimensions (WxHxD)
- Weight
- Operating Temperature Range
- CD-ROM Contents
- Service Information