16
Getting the most from your BenQ monitor
4. Getting the most from your BenQ monitor
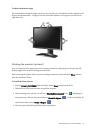
Monitors and USB hubs
Your BenQ FP241WZ LCD Monitor is a modern state-of-the-art device. It not only utilizes the
latest LCD display technology currently available – it contains a built-in 3 port USB 2.0 hub. Using
only one USB 2.0 port on your computer (freeing the others up for other uses), the built-in hub
provides close, handy, easy-to-use access for your USB devices. You could use the USB hub to
plug-in your USB keyboard, USB mouse, and USB web camera all at the same time if you wish. Or
if you connect your keyboard and mouse directly to your computer, you could use the USB ports
on the monitor for connection to your digital camera, digital video camera, USB reader, USB
printer, USB memory stick, or any other USB device.
What do I have to do?
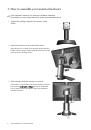
All you have to do, is connect the monitor cables as instructed in How to install your monitor
hardware of this User Manual, turn the computer and monitor on, then you’re ready to
Plug-and-Play with USB, Windows, and your BenQ LCD Monitor’s USB hub. Windows 2000 and
later comes with integrated USB support. It will automatically detect and identify your USB
devices, and install the necessary drivers for them to work. If your USB device was accompanied
by the manufacturer’s driver or custom software for the device, you need only point Windows in
the direction of that driver, and Windows will install it for you.
How do I gain the most benefit from my new monitor?
To gain the most benefit from your new BenQ color LCD flat screen monitor, you should set the
graphics card to the native resolution of 1920 x 1200 at first, and then you may start to install the
custom BenQ LCD Monitor driver software as provided on the BenQ LCD Monitor CD-ROM.
The circumstances under which you connect and install your BenQ LCD Monitor will determine
which process you need to follow to successfully install the BenQ LCD Monitor driver software.
These circumstances relate to which version of Microsoft Windows you are using, and whether
you are connecting the monitor and installing the software onto a new computer (without existing
monitor driver software), or whether you are upgrading an existing installation (which already has
existing monitor driver software) with a newer monitor.
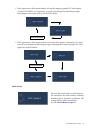
In either case however, the very next time you turn on your computer (after connecting the
monitor to your computer), Windows will automatically recognise the new (or different)
hardware, and will launch its Found New Hardware wizard.
Follow the wizard instructions until it asks you to select a monitor model. At that point, click the
Have Disk button, insert the BenQ LCD Monitor CD-ROM and select the appropriate monitor
model. Further details and step-by-step instructions for both an automatic (new) or upgrade
(existing) installation follow. See:
•
How to install the monitor on a new computer on page 18
•
How to upgrade the monitor on an existing computer on page 19