Connection
26
Connecting a DVI source device
The projector provides a DVI-I input socket that allows you to connect it to a DVI source
device like DVD player, or a VGA output device like notebook or desktop computer.
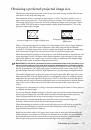
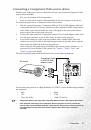
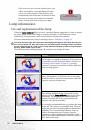
There are three types of DVI connector: DVI-A, DVI-D, and DVI-I. The DVI-I socket is an
integrated connector which supports both formats: DVI-A, and DVI-D.
DVI-A format is used to carry a DVI signal to an analog (VGA) display, or vice-versa.
Although some signal quality is lost from the signal conversion, it still transmits higher
picture quality than standard VGA connection.
DVI-D format is used to directly carry a digital signal to a digital display without signal
conversion. The pure digital connection provides faster and higher image quality than
analog connection, due to the nature of the digital format.
DVI-A and DVI-D formats are non-interchangeable. You cannot connect a DVI-A format
connector to a DVI-D equipment. Make sure what kind of format you need before you
purchase the cable. Or you can purchase a DVI-I cable which will be more useful in any type
of DVI connection situations.
Examine your source device to determine if it has an unused DVI or VGA (D-Sub) output
socket available:
If so, you can continue with this procedure.
If not, you will need to reassess which method you can use to connect to the device.
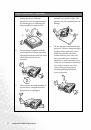
To connect the projector to a DVI source device through a DVI cable:
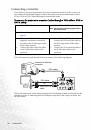
For information on connecting a DVI source device to a computer through a VGA to DVI-A
cable, see
"Connecting a computer" on page 22
.
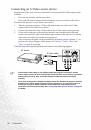
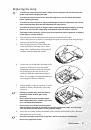
1.
Take the DVI (DVI-D or DVI-I) cable and connect one end to the DVI output socket
of the DVI source device.
2.
Connect the other end of the cable to the DVI-I signal input socket on the projector.
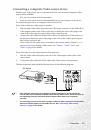
3.
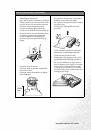
If you wish to make use the projector speakers, take a suitable audio cable and connect
one end of the cable to the audio output sockets of the video device, and the other end
to the PC Audio socket or Audio L/R sockets on the projector.
Once connected, the audio can be controlled by the remote control (Volume +/-) or
projector On-Screen Display (OSD) menus. See
, and
for details.
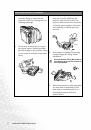
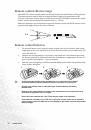
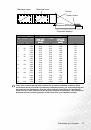
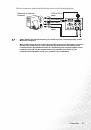
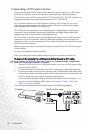
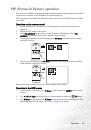
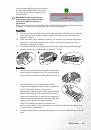
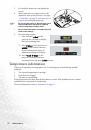
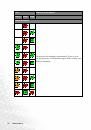
The final connection path should be like that shown in the following diagram:
DVI-D or DVI-I cable
Audio cable
AV device