38
Th
e
us
e
of inf
e
rior-quality dust bags (
e
.g. pap
e
r
bags) can hav
e
a n
e
gativ
e
e
ff
e
ct on th
e
s
e
rvic
e
lif
e
and p
e
rfor
m
anc
e
of your applianc
e
. Using unsuitabl
e
or inf
e
rior-quality dust bags can also da
m
ag
e
your
vacuu
m
cl
e
an
e
r. Such da
m
ag
e
is not cov
e
r
e
d by our
guarant
ee
.
You can find
m
or
e
infor
m
ation about this at
www.bosch-ho
me
.co
m
/dust-bag. You can ord
e
r our
original vacuu
m
cl
e
an
e
r bags h
e
r
e
.
B
EPA filter BBZ156HF
Additional filt
e
r for cl
e
an
e
r
e
xhaust air.
Re
co
mme
nd
e
d for all
e
rgy suff
e
r
e
rs.
Re
plac
e
onc
e
a
y
e
ar.
C H
a
rd
-
floor tool BBZ1
2
3HD
For vacuu
m
ing hard floors
(parqu
e
t
,
til
e
s
,
t
e
rracotta
,
e
tc.)
Before u
s
ing for the fir
s
t ti
m
e
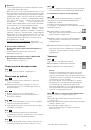
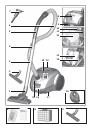
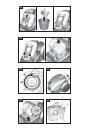
Figure
1
Push th
e
handl
e
onto th
e
fl
e
xibl
e
hos
e
and lock it
in plac
e
.
Initi
a
l u
s
e
Figure
2
a
)
Push th
e
fl
e
xibl
e
hos
e
conn
e
cting pi
e
c
e
into th
e
air
intak
e
op
e
ning in th
e
lid until it locks in plac
e
.
b)
To r
em
ov
e
th
e
fl
e
xibl
e
hos
e,
pr
e
ss th
e
two locking
catch
e
s tog
e
th
e
r and pull out th
e
hos
e
.
Figure
3
Push th
e
handl
e
into th
e
suction/t
e
l
e
scopic tub
e
.
To r
em
ov
e
it
,
turn th
e
handl
e
slightly and pull it out
of th
e
tub
e
.
Figure
4
Push th
e
suction/t
e
l
e
scopic tub
e
into th
e
conn
e
c-
ting pi
e
c
e
of th
e
floor tool.
To r
e
l
e
as
e
th
e
conn
e
ction
,
turn th
e
tub
e
slightly
and pull it out of th
e
floor tool.
Figure
5
Unlock th
e
t
e
l
e
scopic tub
e
by
m
oving th
e
sliding
switch in th
e
dir
e
ction of th
e
arrow and adjust it to
th
e
d
e
sir
e
d l
e
ngth.
Figure
6
Holding th
e
pow
e
r cord by th
e
plug
,
pull it out to
th
e
r
e
quir
e
d l
e
ngth and ins
e
rt th
e
plug into th
e
m
ains sock
e
t.
Figure
7
To switch th
e
vacuu
m
cl
e
an
e
r on or off
,
pr
e
ss th
e
On/Off button in th
e
dir
e
ction of th
e
arrow.
Controlling the
s
uction level
Figure
8
S
e
t th
e
suction l
e
v
e
l by turning th
e
On/Off button in
th
e
dir
e
ction of th
e
arrow.
Th
e
suction l
e
v
e
l can b
e
infinit
e
ly adjust
e
d to th
e
l
e
v
e
l
r
e
quir
e
d by turning th
e
control knob in th
e
dir
e
ction
of th
e
arrow.
Low pow
e
r rang
e
=>
For vacuu
m
ing d
e
licat
e
m
at
e
rials
,
e
.g. d
e
licat
e
upholst
e
ry
,
curtains
,
e
tc.
M
e
diu
m
pow
e
r rang
e
=>
For daily vacuu
m
ing of lightly soil
e
d floors.
High pow
e
r rang
e
=>
For vacuu
m
ing durabl
e
floor cov
e
rings
,
hard floors
and h
e
avily soil
e
d floors.
V
a
cuu
m
ing
Figure
9
Adjusting th
e
floor tool:
R
ugs and carp
e
ts
=>
Hard floors
=>
Ple
as
e note:
Floor tools ar
e
subj
e
ct to a c
e
rtain a
m
ount of w
e
ar
,
d
e
p
e
nding on th
e
typ
e
of hard floors you hav
e
(
e
.g.
rough
,
rustic til
e
s). You
m
ust th
e
r
e
for
e
ch
e
ck th
e
und
e
rsid
e
of th
e
floor tool at r
e
gular int
e
rvals.
Worn und
e
rsid
e
s of floor tools
m
ay hav
e
sharp
e
dg
e
s that can da
m
ag
e
d
e
licat
e
hard floors
,
such
as parqu
e
t or linol
e
u
m
. Th
e
m
anufactur
e
r do
e
s not
acc
e
pt any r
e
sponsibility for da
m
ag
e
caus
e
d by
worn floor tools.
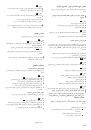
Figure
10*
V
a
cuu
m
ing with
a
cce
ss
orie
s
Attach th
e
nozzl
e
s to th
e
suction pip
e
or handl
e
as
r
e
quir
e
d:
a
)
C
r
e
vic
e
nozzl
e
for vacuu
m
ing cr
e
vic
e
s and corn
e
rs
,
e
tc.
b)
Upholst
e
ry nozzl
e
for vacuu
m
ing upholst
e
r
e
d furni-
tur
e,
curtains
,
e
tc.
c)
Hard-floor tool
For vacuu
m
ing hard floor cov
e
rings (til
e
s
,
parqu
e
t
,
e
tc.)
Drill du
s
t nozzle
Fig.
11*
Fast
e
n th
e
drill dust nozzl
e
onto th
e
handl
e
and po-
sition it on th
e
wall so that th
e
drill hol
e
op
e
ning on
th
e
nozzl
e
is plac
e
d dir
e
ctly ov
e
r wh
e
r
e
th
e
hol
e
is
to b
e
drill
e
d.
S
e
t th
e
applianc
e
to th
e
low
e
st pow
e
r l
e
v
e
l and th
e
n
switch it on.
Th
e
drill dust nozzl
e
is h
e
ld in th
e
r
e
quir
e
d position
by suction. D
e
p
e
nding on th
e
condition of th
e
wall to
b
e
drill
e
d
,
you
m
ay n
ee
d to adjust to a high
e
r pow
e
r
s
e
tting to
e
nsur
e
that th
e
drill dust nozzl
e
r
em
ains
in plac
e
.
During drilling
,
th
e
fin
e
dust is auto
m
atically vacu-
u
me
d up.
* D
e
p
e
nding on
m
od
e
l
 1
1
 2
2
 3
3
 4
4
 5
5
 6
6
 7
7
 8
8
 9
9
 10
10
 11
11
 12
12
 13
13
 14
14
 15
15
 16
16
 17
17
 18
18
 19
19
 20
20
 21
21
 22
22
 23
23
 24
24
 25
25
 26
26
 27
27
 28
28
 29
29
 30
30
 31
31
 32
32
 33
33
 34
34
 35
35
 36
36
 37
37
 38
38
 39
39
 40
40
 41
41
 42
42
 43
43
 44
44
 45
45
 46
46
 47
47
 48
48
 49
49
 50
50
 51
51
 52
52
 53
53
 54
54
 55
55
 56
56
 57
57
 58
58
 59
59
 60
60
 61
61
 62
62
 63
63
 64
64
 65
65
 66
66
 67
67
 68
68
 69
69
 70
70
 71
71
 72
72
 73
73
 74
74
 75
75
 76
76
 77
77
 78
78
 79
79
 80
80
 81
81
 82
82
 83
83
 84
84
 85
85
 86
86
 87
87
 88
88
 89
89
 90
90
 91
91
 92
92
 93
93
 94
94
 95
95
 96
96
 97
97
 98
98
 99
99
 100
100
 101
101
 102
102
 103
103
 104
104
 105
105
 106
106
 107
107
 108
108
 109
109
 110
110
 111
111
 112
112
 113
113
 114
114
 115
115
 116
116
 117
117
 118
118
 119
119
 120
120
 121
121
 122
122
 123
123
 124
124
 125
125
 126
126
 127
127
 128
128
Инструкции и руководства похожие на BOSCH BGN 21700 Bag&Bagless


