Black plate (8,1)
Cadillac CTS/CTS-V Navigation System - 2011
8
Infotainment System
Entering an Address and Point
of Interest, and Storing Preset
Destinations
The vehicle must be in P (Park) to
perform these operations.
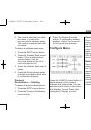
Entering an Address
If having trouble finding a city or a
street name:
.
Enter the street name first
instead of the city name, or vice
versa.
.
Enter more characters or reduce
the amount of characters to
reduce or expand the available
options.
To set a destination by entering a
street name:
1. Press
O
to turn the system on.
2. A caution may appear. Press OK
to proceed.
3. Press the DEST control button.
4. Select the Street screen button.
5. The Street name category is
automatically selected for entry.
Start entering the street name.
It is recommended that
directional information or street
type is not entered, and use the
Space screen button between
street or city names. Use the
backspace (
q
) screen button
if an incorrect character has
been entered.
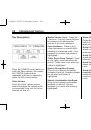
If four or less names are
available for the entered
characters, a list displays.
If more than four are available,
there is a match counter with a
number in it, it represents the
number of available streets.
Press the List screen button to
view the list and select a street.
While the Street name category
is empty, there is a Last 5
Streets screen button that
displays the last five selected
streets. Press this button to
select a street from the list.
6. Enter the house number. The
system displays the house
number range that is available
for the street.
7. If there is more than one city, the
list of cities that have that street
name and house number
displays. Select a city from
the list.
8. A confirmation screen displays
with the address. If the address
is correct, press Go. The system
calculates the route.
9. Select the route preference
(Fastest, Shortest, or Easy). The
system highlights the route.
10. Press the Start Guidance
screen button. The route is
now ready to be started.
See
“
Address Entry
”
under
for more
information.


Инструкции и руководства похожие на CADILLAC CTS COUPE (2011) навигационная система, CTS COUPE (2011)


Другие инструкции и руководства из категории навигационная система