English
Instruction for use CHEST FREEZERS
fiCONS91214
5
GB
•
Use by date (
consumption date)
(
see “storage table”)
Then continue as follows
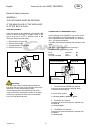
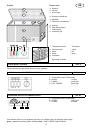
a) We recommend you place fresh foods in the fast
freezing compartment at the side
(f)
(not all models are
equipped) or on the bottom of the freezer. This is the
coldest part.
Avoid to put fresh foods directly in contact with deep frozen
food. Deep frozen food could defrost and may not outlast
the foreseen storage time.
b) Fill in within 24 hours, only the quantities of fresh food
that are suitable for the freezing capacity of your
appliance.
See information on the rating plate
(XX kg/24h)
.
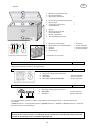
c) If available, switch on the FAST FREEZE SWITCH
(FIG.4)
(not absolutely necessary when filling in
already frozen (e.g. deep-frozen food) items.
d) After 24 hours, shift deep-frozen goods from the
freezer bottom or the pre-freeze shelf to a hung basket
so that the pre-freeze shelf or freezer bottom are
available for freezing additional fresh foods.
e) Turn off the FAST FREEZE SWITCH (yellow light goes
off).
f) Set the temperature control to one of the appliance’s
relevant filling capacities (
see “Maximum stacking
height”).
g) Keep the temperature in the storage shelf
(d)
under
control, preferably by placing a thermometer with a
scale range of up to –26°C.
The storage temperature must always be at least -18°C.
Refilling of fresh food (not frozen)
Make sure that you refill fresh food, in quantities adequate
to the freezing capacity (XXkg/24h) earliest 24 hours after
the previous filling.
(do not exceed maximum stacking height)
9
Maximum stacking height
To ensure correct storage of frozen food, never fill the
storage compartment
(d)
up to the edge. Always allow
space between the lid and the frozen foods.
Note the stacking marks affixed by the manufacturer.
(as far as available)
Set the temperature control
(l)
strictly according to the
filling capacity.
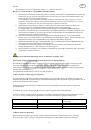
To save energy when operating in normal ambient
temperature (+18 to + 22°C), we recommend the following
settings for the temperature control:
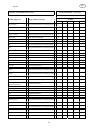
Capacity Stacking
mark
Setting
pos.
Full
upper
12,00
h
Half
full
medium
10.00
h
1/4 or less
lower
08.00 h
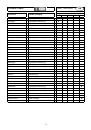
10 Storage
time
The storage time for purchased deep-frozen products
varies and depends on the type of product and its
packaging. Therefore, strictly observe the producer’s
instructions on the packaging.
For fresh food that you like to deep freeze, consult the
storage
table
at the back of this user manual.
After being defrosted, food must be consumed immediately
but latest within the next 24 hours.
11 Precautions and advice
•
Whenever cleaning or defrosting, remove the power
plug.
•
After closing the freezer lid, do not open it immediately
and do not force it open under any circumstances. Any
vacuum remaining on the
•
seal
(b)
is released after about 1 or 2 minutes, so that
the lid can be opened normally once again.
•
To prevent condensation and ice forming, allow cooked
food to cool down to ambient temperature before closing
the lid of the dish and before storage.
•
Leave the freezer lid open as briefly as possible to avoid
waste of energy and to prevent an excessive amount of
ice forming in the appliance.
•
ice forming in the appliance.
•
If the red indicator-light goes on unexpectedly or stays on
for a long period, do not open the lid on any account and
take the appropriate measures immediately (
see guide
“what is when ....” at the back of the this user manual)
.
•
Do not use a screwdriver or other metal objects to
remove the layer of ice. The interior walls are very
delicate and will not tolerate any sharp edges. Use only
plastic or wooden scrapers.
12 Cleaning
and
maintenance
For the upkeep of the external appearance of your
appliance, now and again clean with furniture polish or
other enamel protecting product (never, on any account,
use it in the inside. Clean the seal
(b)
with warm water now
and again without using any cleaning product.
If your appliance has a condenser
(p)
in the rear inside,
from time to time remove dirt and dust. Dust and dirt
impede release of heat from the inner compartment and
considerably increases consumption of energy. For best
results, use a light brush or duster to remove dust from the
condenser on the rear wall.
If you leave your appliance out of use for an extended
period (e.g. when on holidays), leave it open to prevent
odours building up inside. For appliances with locks: when
the chest lid is open, always set the lock in “closed”
position and keep the key well away from small children to
prevent accidents.
When
ice and frost layers
form on the inner walls up to a
certain thickness, they act as an insulation element and
prevent the coldness being released from the inner walls.
They must be removed from time to time.
To remove ice from the inner walls, use a plastic or wood
scraper without sharp edges.
Cover the frozen food with a cloth which aids to collect the
scraped ice and enables a simple removal.
13 Defrosting
Under normal conditions (3 to 4 openings per day) the
freezer must be defrosted once or twice a year (more often
in other cases).