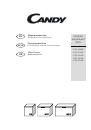
Инструкция для CANDY CCFE 260

(скачивание инструкции бесплатно)
Формат файла: PDF
Доступность: Бесплатно как и все руководства на сайте. Без регистрации и SMS.
Дополнительно: Чтение инструкции онлайн
background image

English 

                     Instruction for use CHEST FREEZERS 


fiCONS91214 

6

GB

Danger warning 


Never

 use electrical appliances to defrost the chest 

freezer, e.g. hair dryer, fan heater, or devices with a naked 
flame (e.g. candles). 
Plastic in the inner compartment can melt and escaping 
gas can be ignited by sparks or naked flames.  

Proceed as follows: 

 
1.  Provide a suitable non-metallic container (plastic 

container or wash-basket). 

2. 

Make absolutely sure that you remove the plug 
from the power socket.


3. Dry 

your 

hands


thoroughly to prevent skin damage by 

contact with ice (it is advisable to use gloves). 

4.  Remove all frozen food from the freezer, 

roll it


firmly 

in newspaper

, put it into the container, place the 

container in a cool, dry room. 

5.  Cover up the container all around with a thick blanket.   
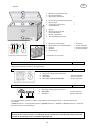
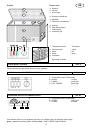
6.  Lift the separator 

(e)

 (not all models are equipped) 

upwards out of the guide-rail of the freezer. 

7. 

Use the divider (so far as provided)  as a defrosting 
dish and push it on the side under the freezer – where 
the defrosting water drain-plug is located. 


8.  Pull the plug (as far as provided) out of the freezer 

bottom. 

9.  As previously described, scrape the thickest ice 

carefully from the freezer inside and put it into the 
kitchen sink. for defrosting. 

10.  If necessary, speed up defrosting by placing a large 

pot of warm (not too hot) water on the freezer bottom. 

11.  In freezers not provided with a drain-plug, continuously 

wipe up the water with a sponge. 

12.  Thoroughly clean the inside. Rinse it  with a mixture of 

warm water and vinegar, thereafter


rinse with clear 

water. 

13.  Wipe the freezer with an absorbent cloth thoroughly 

dry and allow to air for about 3 to 4 minutes. 

14.  Replace the drain-plug (if provided) 
15.  Empty the dry defrosting water dish (if provided) and 

slide it as separator into the guide rails of the freezer. 

16.  Close the chest and plug it back into the socket. 
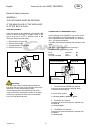
17. Set the temperature control 

(l)

 to maximum setting 

(

green and red lamps go on

) and switch on the FAST 

FREEZE SWITCH 

(FIG.4) 

(if provided) (the 

yellow 

lamp lights additionally

). 

18.  Now refill  the frozen food – the oldest items at the top. 

 To prevent frosted food from defrosting, carry out 

steps from 1 to 17 within max. two hours. 
 

19. When the red lamp goes off, reset the temperature 

control to a as per the filling capacity suitable storage 
temperature.  

20.  Switch off the FAST FREEZER SWITCH (if provided) 

after about 8 to 12 hours or, latest after 24 hours (

the 

yellow light goes off

). 


14 Interior 

light 


(not provided in all models) 

 
A switch is built into appliances equipped with lighting. 
When the appliance is opened the light goes on 
automatically and switches off automatically when 
closed. 
The lamp is protected with a transparent cover. 
Strictly use 

15 W max

. replacement bulbs. 


15  Resolving faults on your own 

 
High quality manufacturing processes and use of latest 
cooling and freezing technology will principally ensure 
trouble-free function of your appliance. 
If you suspect any fault, before contacting the after-sales 
service directly or via your dealer, make sure you have 
observed all instructions and advice in this user manual.  
 
Repairs by the after-sales service, of faults that have 
occurred because of non-adherence to the information and 
advice given in this manual have to be charged to the 
customer and are not covered by your dealer’s guarantee.  

 Attention 

The compressor (also known as motor) must not operate 
continuously.  
 
It is controlled by the thermostat which you set with the 
temperature control 

(FIG.4)

. It switches on automatically 

when the set temperature in the storage compartment 
exceeds and switches off automatically when the correct 
temperature is reached again. 
 
Noise can be heard in every compressor – cooling system 
when the compressor is switched on. This noise is 
produced when the motor in the compressor operates and 
also by refrigerant flowing in the cooling system circuit. 
These noises are normal and do not indicate any functional 
trouble. 
 

In unheated rooms

 and in cold weather condition 

condensation can build up on the outer walls of the 
appliance. This does not mean trouble and disappears 
when the weather becomes warmer. 

NOTE


Water condensation on the bottom side of the appliance 
could happen if there is poor ventilation in a wet 
environment. It's not a fault of the product and it could be 
fixed by turning the adjustable feet of the product to the 
higher maximum position in order to increase the space 
between the bottom surface and the floor. 
 

16  After-sales service  
 

Call the after-sales service only, if after analysis of possible 
trouble/fault factors you cannot find any cause for the 
defect or do not have the means to eliminate the trouble. 
Therefore first check under 

“What is when ....”


Consult the enclosed guarantee card or the separately 
enclosed after-sales centres list, to see which company is 
responsible for servicing your appliance. If several after-
sales centres are mentioned on the list, select the nearest 
one to you.  
If no after-sales service centres list is enclosed with your 
appliance, contact your dealer. 
 
In order to receive immediate help, make sure you have 
ready the following essential data to identify your 
appliance: 

• 

Brand of appliance  

• 

Model / Type 

• 

Kind of trouble 

• 

Date of purchase 

• 

Purchased from whom? 


1
2
3
4
5
6
7
8
9
10
11
12
13
14
15
16
17
18
19
20
21
22
23
24
25
26
27
Оглавление инструкции
  • Страница 1 из 28
    RU Морозильник-ларь KAZ Мұздатқыш-қобди GB Инструкции по эксплуатации МОДЕЛИ МОДЕЛЬДЕР MOD. Іске пайдалану жөніндегі нұсқаулықтар CCFA 100 RU CCFA 210 RU Chest Freezer Instruction for use CCFE 210 RU CCFE 260 RU CCFE 300 RU 1
  • Страница 2 из 28
  • Страница 3 из 28
    RU Russian Содержание Стр. Инструкция по электробезопасности 1 Установка ..................................................................................................................................................2 2 Паспортная
  • Страница 4 из 28
    RU Russian Инструкции по эксплуатации Ниже вы найдете всю необходимую информацию по использованию вашего электроприбора. Приведенные ниже инструкции по эксплуатации относятся к нескольким моделям морозильников-ларей, поэтому детали информации для различных моделей морозильников-ларей могут
  • Страница 5 из 28
    RU Russian Вмешательство в холодильную систему должно выполняться только авторизированным специалистом. ВАЖНО! Вытекший из холодильной системы хладагент может повредить глаза. При попадании в глаза хладагента необходимо немедленно промыть глаза большим количеством проточной воды из-под крана, а
  • Страница 6 из 28
    RU Russian Для включения устройства регулирования температуры: Поверните регулятор температуры вправо, и установите нужную температуру в диапазоне между установками: "1" (самое слабое замораживание) "7" (самая низкая температура) Для выключения устройства регулирования температуры: Поверните
  • Страница 7 из 28
    RU Russian 6 Звуковой предупреждающий сигнал Если ваш электроприбор снабжен звуковым предупреждающим сигналом, то этот звуковой сигнал будет подаваться при загорании красной индикаторной лампочки. Звуковой сигнал будет автоматически выключаться, когда будет включаться функция быстрого замораживания
  • Страница 8 из 28
    RU Russian Использовать до (дата употребления в пищу) (см. "Таблица хранения") После этого воспользуйтесь следующими рекомендациями: Рекомендуется помещать свежие продукты в отделение для быстрого замораживания на стороне (f) (имеется не во всех моделях морозильных камер) или класть их на дно
  • Страница 9 из 28
    RU Russian Время хранения свежих продуктов, которые вы хотите подвергнуть глубокой заморозке, указано в "Таблице хранения", представленной в конце данного руководства. После размораживания продукты питания должны быть употреблены в пищу немедленно, по крайней мере, не позднее чем через 24 часа
  • Страница 10 из 28
    RU Russian Никогда не используйте для размораживания морозильника-ларя электроприборы, например, фены для сушки волос, или устройства с открытым пламенем (например, свечи). Пластмассовые детали внутреннего отделения морозильника могут расплавляться и могут выделять газ, который может воспламениться
  • Страница 11 из 28
    RU Russian 15 Нахождение и устранение неисправностей, выполняемое пользователем Высокое качество изготовления и использование новейших технологий охлаждения и замораживания обеспечивают безотказную работу вашего электроприбора. Если у вас имеется подозрение относительно того, что произошло
  • Страница 12 из 28
    RU Russian 17 Гарантия Прочтите условия гарантии и узнайте, когда она заканчивается. Эта информация представлена в гарантийном талоне, поставляемом вместе с электроприбором. Если в документации электроприбора отсутствует гарантийный талон, свяжитесь с торговой организацией, в которой вы приобрели
  • Страница 13 из 28
    RU Russian В морозильную камеру загружено больше продуктов, чем это позволяет его охлаждающая способность (см. паспортную табличку: ХХ кг/24 часа), или вы загрузили в морозильник слишком теплую пищу. (см. "Загрузка свежих продуктов"). Производитель постоянно усовершенствует выпускаемую им
  • Страница 14 из 28
    RU Russian МОРОЗИЛЬНИКИ - ЛАРИ (RU) ТАБЛИЦА ХРАНЕНИЯ ПРОДУКТОВ -18°C < Свежие продукты приблизительное время хранения, месяцы 2-3 4 6 8 10-12 Подходящая упаковка Мясной фарш > Полиэтиленовый пакет для морозильника > • Сосиски > Полиэтиленовый пакет для морозильника > • Мелкая рыба > Полиэтиленовый
  • Страница 15 из 28
    RU Russian a b c Крышка морозильника-ларя Прокладка крышки Внутреннее освещение d e f Отделение для хранения продуктов Перегородка Отделение для быстрого замораживания g h i k Корпус Пробка (слив воды при размораживании) Панель управления Вентиляционная решетка l m n o p Регулятор температуры
  • Страница 16 из 28
  • Страница 17 из 28
    English Instruction for use CHEST FREEZERS Contents GB Page Electrical Safety Instruction..........................................................................................…...........…….……. 2 1
  • Страница 18 из 28
    English GB Instruction for use CHEST FREEZERS Electrical Safety Instruction WARNING ! THIS APPLIANCE MUST BE EARTHED. IF THE MAINS LEAD OF THE APPLIANCE IS FITTED WITH A PLUG: FUSE REPLACEMENT CONNECTION TO A REWIREABLE PLUG If the mains lead of this appliance is fitted with a BS 1363A 13 amp fused
  • Страница 19 из 28
    • • •
  • Страница 20 из 28
    English Instruction for use CHEST FREEZERS To switch on: Turn the control (l) to the right adjust temperature to the level you require, between: "1" (slight cooling) and "7" (lowest temperature) To switch off: Turn the control to the left 7 Start-up 1. 2. Fully unpack the appliance. Remove the
  • Страница 21 из 28
    English Instruction for use CHEST FREEZERS • Use by date (consumption date) (see “storage table”) Then continue as follows GB After being defrosted, food must be consumed immediately but latest within the next 24 hours. a) We recommend you place fresh foods in the fast freezing compartment at the
  • Страница 22 из 28
    English Instruction for use CHEST FREEZERS 15 Danger warning 2. 3. 4. 5. 6. 7. 8. 9. 10. 11. 12. 13. 14. 15. 16. 17. 18. Repairs by the after-sales service, of faults that have occurred because of non-adherence to the information and advice given in this manual have to be charged to the customer
  • Страница 23 из 28
    English Instruction for use CHEST FREEZERS (see: ” Refilling of fresh food” ). 17 Guarantee Please note the general guarantee terms and the guarantee period are stated in the attached guarantee card. If the appliance documentation does not include a guarantee card, please contact your dealer. 18
  • Страница 24 из 28
    STORAGE TABLE Fresh food GB CHEST FREEZERS -18°C < approx. storage time in months 2-3 4 6 8 10-12 Suitable packaging Mincemeat > Polyethylene freezer bag > z Sausages > Polyethylene freezer bag > z Small fish > Polyethylene freezer bag > z Heart / liver > Polyethylene freezer bag > z Ice cream >
  • Страница 25 из 28
    English GB Components a Chest lid b Lid seal c Interior light a b c e d * d Storage compartment e Separator * f Fast freeze compartment * f g k g h i k Housing Plug (defrost water) Control panel Ventilation grid l m n o p Temperature control Fast freeze key Alarm Power Condenser * h m n o I i p p *
  • Страница 26 из 28
  • Страница 27 из 28
  • Страница 28 из 28