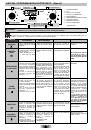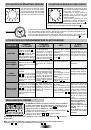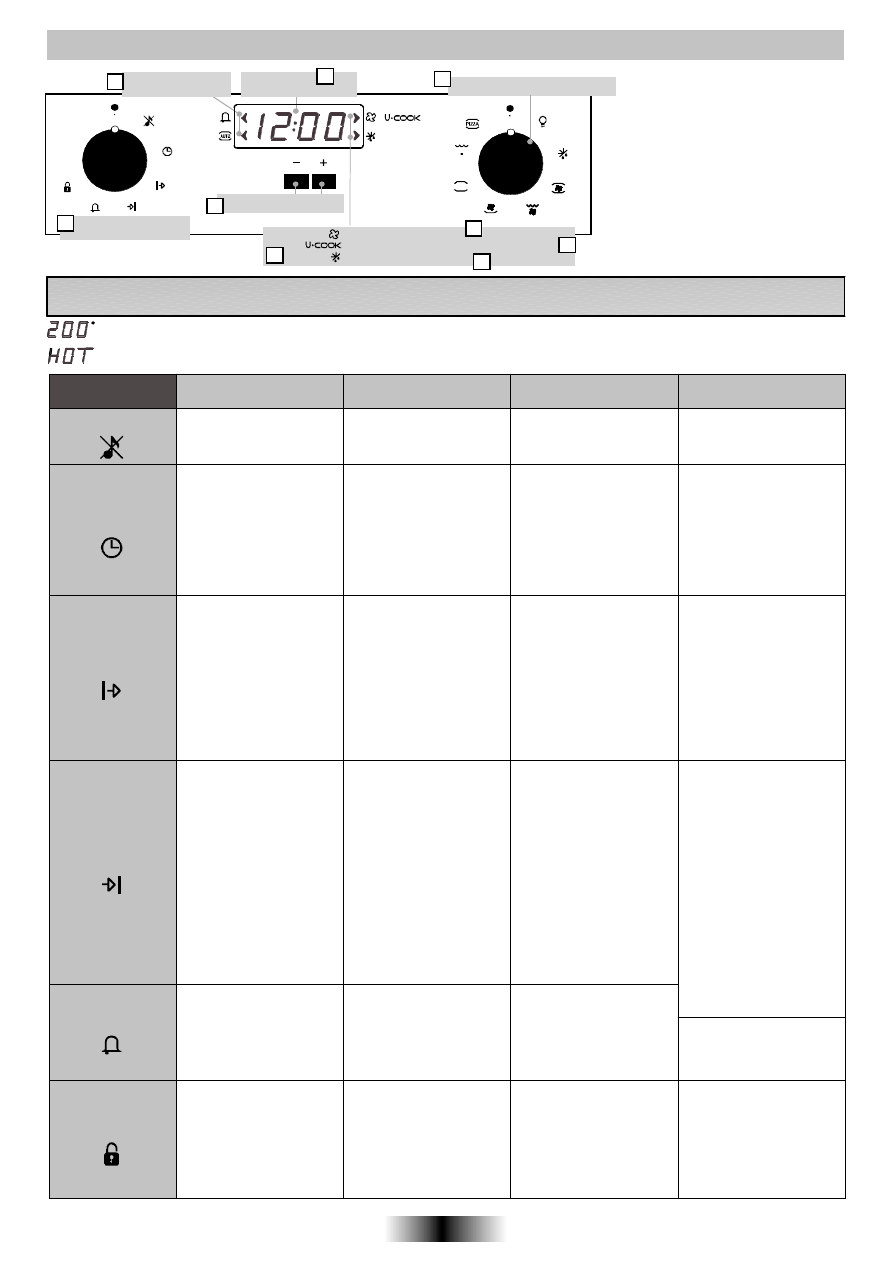
UTILIZZO DEL PROGRAMMATORE ELETTRONICO
(Type A)
6 IT
•
Q u e s t a
f u n z i o n e
v i
permette di regolare l’ora
utilizzando i tasti + e –
Nota: impostare l’ora al
momento dell'installazio-
ne del vostro forno o
subito dopo un’interru-
zione di corrente (12:00
lampeggia sullo schermo).
•
Impostare la manopola
sulla posizione
“impostazione
dell’orologio”
•
Usare i tasti + e -
per impostare l'ora.
•
Ruotare la manopola del
pr og r amm at or e sul l a
“M odali tà Silenziosa”
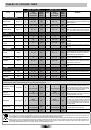
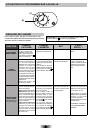
FUNZIONI
COME SI UTILIZZANO?
COME SI DISATTIVANO?
COSA FA
A COSA SERVE?
•
Questa funzione è
utilizzata per spegnere il
suono del timer
•
Ruotare la manopola sulla
posizione off
•
Permette di regolare l’ora
che appare sul display
Modalità silenziosa
Impostazione
dell’orologio
•
Questa funzione attiva un
allarme sonoro di qualche
secondo alla fine del
tempo impostato.
•
Utile per ricordare,
l’allarme sonoro funziona
indipendentemente dal
fatto che il forno sia acceso.
•
Regolare la manopola del
pr ogr am mat or e sul l a
posizione TIMER.
•
Regolare il tempo di
cottura utilizzando i tasti
+ e -.
•
Regolare il tempo su
00:00, posizionando la
manopola del program-
matore sulla posizione
TIMER, ed utilizzando i
tasti + e -.
Sicurezza
bambini
•
Riposizionare la manopola
sulla funzione Sicurezza
bambini e premere il tasto
– per 3 secondi.
•
L’indicazione sul display
sparisce.
•
Il forno non può essere
utilizzato.
•
Questa funzione è utile
quando ci sono dei
bambini in casa.
•
Regolare la manopola del
pr og r amm at or e sul l a
p os i z i o ne S i c ur ez z a
Bambini.
•
Premere sul tasto + per 3
secondi.
•
La sicurezza bambini è in
funzione quando sul
display appare STOP.
•
Quando il tempo di cot-
tura è finito, la cottura si
arresta automaticamente
e l'allarme suona per
qualche secondo.
•
Una volta che il tempo è
trascorso, il forno viene
automaticamente disat-
tivato. Per fermare la
cottura prima, si deve
impostare la manopola
delle funzioni su OFF, o
regolare il tempo di cottura
su 00:00, posizionando la
manopola sulla Durata
della cottura e utilizzando
il tasto + e -.
•
Permette di regolare il
tempo di cottura.
•
Quando il tempo di cottura
è regolato, posizionare la
manopola su OFF per
ritornare alla visualiz-
zazione dell’ora attuale.
•
Per visualizzare l’ora
selezionata, posizionare il
selettore delle funzioni di
sinistra su Durata di cottura.
•
Selezionare una funzione
di cucina
• Impostare la manopola del
programmatore sulla
durata di cottura
• Regolare il tempo di
cottura utilizzando
i tasti + e -.
• Auto display si illumina.
Durata di cottura
•
Permette di spegnere il
suono del timer
•
Questa funzione è anche
utilizzata per le cotture
che possono essere
programmate
in anticipo. Ad esempio,
se il tuo piatto deve essere
cucinato per 45 minuti e
deve essere pronto alle
12.30: impostare sempli-
cemente la durata
di 45 minuti e l'ora di Fine
cottura alle 12:30.
La cottura inizierà automa-
ticamente alle 11:45 (12:30
meno 45 min) e proseguirà fino
a che l'ora di fine cottura è
stata raggiunta.
A questo punto il forno si
spegnerà automaticamente.
•
Selezionare una funzione
di cottura.
•
Regolare la manopola sul-
la posizione Fine di cot-
tura.
•
Regolare l’ora di fine
cottura utilizzando i
tasti + e -.
• Auto display si illumina
•
Quando l a cott ura è
term inat a, il f or no si
spegne automaticamente.
Per bloccare la cottura
anticipatamente, ruotare
la manopola delle funzioni
su OFF.
•
Permette di regolare l’ora
di fine cottura.
•
Quando l’ora di fine cottura
è regolata, ruotare il
selettore di funzione su
OFF per ritornare all’ora
attuale.
•
Per vedere il tempo di
cottura selezionato, ruotare
il selezionatore di funzione
di sinistra sulla posizione
Fine di cottura.
Fine di cottura
•
Ruotare la manopola sulla
posizione off
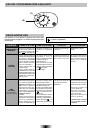
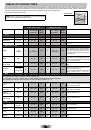
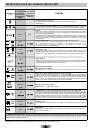
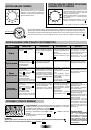
Il Led " ° " della temperatura lampeggia fino a che la temperatura visualizzata non è stata raggiunta.
Display per
temperatura o orologio
Luce: Timer /
Modalità automatica
Manopola di selezione
programmatore
Luce:
Funzione con ventola
Funzione con ventola a sistema variabile
Modalità scongelamento
Bottoni di regolazione
*
/
* secondo modello
Manopola di selezione funzione
1
2
3
4
5
6
7
9
8
1. Luce: Timer / Modalità automatica
2. Luce
3. Funzione con ventola
4. Funzione con ventola a sistema
variabile
5. Modalità scongelamento
6. Display per temperatura o
orologio
7. Bottoni di regolazione
8. Manopola di selezione funzione
9. Manopola di selezione
programmatore
La prima operazione da fare dopo l’installazione o dopo l'interruzione di corrente (situazioni di questo tipo
possono essere riconosciute in quanto il display è acceso e lampeggia 12:00) è l'impostazione del tempo.
Attenzione!
Quando un programma è finito, se il forno è ancora caldo, il display mostra "HOT", in alternanza con il tempo e anche se le
maniglie sono posizionate su "OFF"
TIMER