Доступность: Бесплатно как и все руководства на сайте. Без регистрации и SMS.
Дополнительно: Чтение инструкции онлайн
10
CAUTION: SAFETY INSTRUCTIONS
w
w
w
.d
el
l.
c
om
|
s
upp
ort
.del
l.
com
Страница: (10 из 94)
навигация
1
2
3
4
5
6
7
8
9
10
11
12
13
14
15
16
17
18
19
20
21
22
23
24
25
26
27
28
29
30
31
32
33
34
35
36
37
38
39
40
41
42
43
44
45
46
47
48
49
50
51
52
53
54
55
56
57
58
59
60
61
62
63
64
65
66
67
68
69
70
71
72
73
74
75
76
77
78
79
80
81
82
83
84
85
86
87
88
89
90
91
92
93
94
Оглавление инструкции
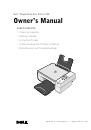
Страница 1 из 95 Dell™ Photo All-In-One Printer 924 Owner’s Manual Look Inside For: • Ordering Supplies • Getting Started • Using the Printer • Understanding the Printer Software • Maintenance and Troubleshooting w w w. d e l l . c o m / s u p p l i e s | s u p p o r t . d e l l . c o m
Страница 2 из 95 Ordering Supplies Your Dell Photo AIO Printer 924 includes software installed to detect the ink levels in the printer. During a print job, a screen appears on your computer to warn you of low ink levels. You can order ink online at www.dell.com/supplies or by phone. US 877-INK-2-YOU Luxembourg
Страница 3 из 95 Notes, Notices, and Cautions NOTE: A NOTE indicates important information that helps you make better use of your printer. NOTICE: A NOTICE indicates either potential damage to hardware or loss of data and tells you how to avoid the problem. CAUTION: A CAUTION indicates a potential for property
Страница 9 из 95 CAUTION: SAFETY INSTRUCTIONS Use the following safety guidelines to help ensure your own personal safety and to help protect your product and working environment from potential damage. • If your product includes a modem, the cable used with the modem should be manufactured with a minimum wire size
Страница 10 из 95 10 CAUTION: SAFETY INSTRUCTIONS w w w. d el l. c om | s upp ort . del l . com
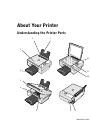
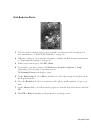
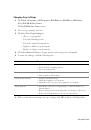
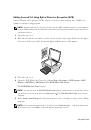
Страница 11 из 95 1 About Your Printer Understanding the Printer Parts 1 2 3 12 4 11 10 5 6 7 8 9 About Your Printer 11
Страница 12 из 95 w w w. d el l. c om | s upp ort . del l . com Part: 1 Paper support Part that supports loaded paper. 2 Paper guide Guide that helps the paper feed into the printer properly. 3 Top cover Top of printer that holds your document or photo flat while you scan it. 4 Paper exit tray Tray that holds the
Страница 13 из 95 Setting Up Your Printer NOTE: The Dell AIO Printer 924 supports Microsoft® Windows® 2000, Windows XP, and Windows XP Professional x64 Edition. Follow the instructions on your Setting Up Your Printer poster to install the hardware and software. If you encounter problems during setup, see "Setup
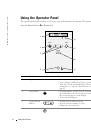
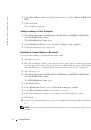
Страница 14 из 95 w w w. d el l. c om | s upp ort . del l . com Using the Operator Panel The operator panel buttons allow you to scan, copy, and customize documents. The printer is on when the Power button is illuminated. 1 8 Start Menu 2 7 Cancel 3 6 5 4 14 Use the To 1 Display • View the number of copies selected.
Страница 15 из 95 Use the To 5 Error light Alert you to errors such as paper out, paper jam, or low ink. 6 Cancel button • Cancel a scan, print, or copy job in progress. • Cancel a copy job (using only the printer), and eject a page. • Exit a menu, and return to the default settings. 7 Start button Start the copying
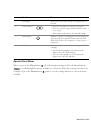
Страница 16 из 95 w w w. d el l. c om | s upp ort . del l . com Copy Mode Menu: Submenu item: Settings: Copy Copy • Color* • Black Copies (use arrow buttons to specify quantity) Quality • Draft • Normal* • Photo Dark (use arrow buttons to specify darkness setting) Size • • • • • • • • • • • • • Letter* Legal B5 A4
Страница 17 из 95 Scan Mode The Scan submenu is only available if the printer is connected to a network adapter. If you choose Scan as the mode, you are prompted to choose the destination computer for the scanned document. You can scroll through the available computers by pressing the arrow buttons. Pressing the
Страница 18 из 95 w w w. d el l. c om | s upp ort . del l . com To choose paper size: 1 With your document open, click File→ Print. 2 In the Print dialog box, click Preferences or Properties (depending on your program or operating system). The Printing Preferences dialog box opens. 3 On the Print Setup tab, select
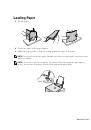
Страница 19 из 95 Loading Paper 1 Fan the paper. 2 Center the paper on the paper support. 3 Adjust the paper guides so both are resting against the edges of the paper. NOTE: Do not pull on both paper guides simultaneously. When one paper guide is moved, the other adjusts accordingly. NOTE: Do not force paper into
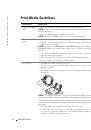
Страница 20 из 95 w w w. d el l. c om | s upp ort . del l . com Print Media Guidelines Load up to: Make sure: 100 sheets of plain paper • The paper is centered between the left and right paper guides. NOTE: Load letterhead paper with the top of the letterhead entering the printer first and facing up. • You select
Страница 21 из 95 Load up to: Make sure: 25 greeting cards, index cards, postcards, or photo cards • The print side of the cards faces up. • The cards are centered on the paper support, in between the left and right paper guides. • The paper guide rests against the left edge of the cards. • You select Normal or
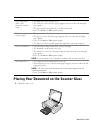
Страница 22 из 95 w w w. d el l. c om | s upp ort . del l . com 2 Place the document on the scanner glass. NOTE: Make sure the upper left corner of the front of the item aligns with the arrow on the printer. 3 22 Close the top cover. About Your Printer
Страница 23 из 95 2 Using the Printer Printing Printing a Document 1 Turn on your computer and printer, and make sure they are connected. 2 Load paper with the print side facing up. For more information, see "Loading Paper" on page 19. 3 With your document open, click File→ Print. 4 To customize your print settings:
Страница 24 из 95 w w w. d el l. c om | s upp ort . del l . com Printing Photos 1 Load the photo paper with the print (glossy) side facing up. For more information, see "Print Media Guidelines" on page 20. 2 Make sure you have a color cartridge and a photo cartridge installed. For more information, see "Replacing
Страница 25 из 95 Print Borderless Photos 1 For best results, load photo/glossy paper, and make sure the print side is facing up. For more information, see "Print Media Guidelines" on page 20. 2 Make sure you have a color cartridge and a photo cartridge installed. For more information, see "Replacing Ink Cartridges"
Страница 26 из 95 w w w. d el l. c om | s upp ort . del l . com Printing Photos From a PictBridge-Compatible Camera Your printer supports PictBridge-compatible cameras. 1 Insert one end of the USB cable into the camera. 2 Insert the other end of the USB cable into the PictBridge port on the front of the printer.
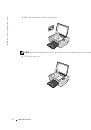
Страница 27 из 95 4 Place the document you want to copy face down on the scanner glass and make sure the upper left corner of the front of the document aligns with the arrow on the printer. For more information, see "Placing Your Document on the Scanner Glass" on page 21. 5 Close the top cover. 6 Access the menu to
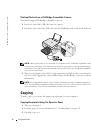
Страница 28 из 95 w w w. d el l. c om | s upp ort . del l . com Copying Photos Using Your Computer 1 Turn on your computer and printer, and make sure they are connected. 2 Load photo paper with the print side facing up. For more information, see "Print Media Guidelines" on page 20. 3 Open the top cover. 4 Place the
Страница 29 из 95 Changing Copy Settings 1 Click Start→ Programs or All Programs→ Dell Printers→ Dell Photo AIO Printer 924→ Dell All-In-One Center. The Dell All-In-One Center opens. 2 Select a copy quantity and color. 3 Click See More Copy Settings to: – Choose a copy quality. – Select the blank paper size. –
Страница 30 из 95 w w w. d el l. c om | s upp ort . del l . com Scanning You can scan with your printer using the printer operator panel or your computer. 1 Turn on your computer and printer, and make sure they are connected. 2 Open the top cover. 3 Place the document you want to scan face down on the scanner glass,
Страница 31 из 95 5 Open the Dell All-In-One Center by clicking Start→ Programs or All Programs→ Dell Printers→ Dell Photo AIO Printer 924→ Dell All-In-One Center. The Dell All-In-One Center opens. NOTE: You can also open the Dell All-In-One Center from the operator panel on your printer. When your printer is in
Страница 32 из 95 w w w. d el l. c om | s upp ort . del l . com 7 In the Scan section, click See More Scan Settings. 8 Click the Advanced button. 9 Click Display Advanced Scan Settings to change advanced options. 10 On the Scan tab, click the Scan multiple items before output box. 11 Click OK. 12 When you finish
Страница 33 из 95 Editing Scanned Text Using Optical Character Recognition (OCR) Optical Character Recognition (OCR) software converts a scanned image into editable text within a word-processing program. NOTE: Japanese and Chinese customers: Ensure you have OCR software installed on your computer. A copy of OCR
Страница 34 из 95 w w w. d el l. c om | s upp ort . del l . com 6 In the How will the scan be used? drop-down menu, select To edit text (OCR and 300 DPI). 7 Click Scan Now. The scanned text appears. Saving an Image on Your Computer 1 Click Start→ Programs or All Programs→ Dell Printers→ Dell Photo AIO Printer 924→
Страница 35 из 95 Enlarging or Reducing Images or Documents If you are using your printer with a computer, you can enlarge or reduce your document between 25–400 percent using the Dell All-In-One Center. If you are using your printer without a computer, you can enlarge or reduce your document by 25, 50, 100, 150, or
Страница 36 из 95 w w w. d el l. c om | s upp ort . del l . com Installing Microsoft Fax Console in Windows XP 1 Click Start→ Settings→ Control Panel. Under Pick a Category, click Add or Remove Programs. The Add or Remove Programs dialog box opens. 2 Click Add/Remove Windows Components. 3 In the Components list,
Страница 37 из 95 10 Click Next. NOTE: Steps 10–13 only occur if you enabled your machine to receive faxes in step 6. 11 On the Called Subscriber Identification (CSID) screen, type the CSID (appears to confirm that the fax is being sent to the correct recipient) that you want in the CSID box. 12 Click Next. 13 On
Страница 38 из 95 w w w. d el l. c om | s upp ort . del l . com 4 In the Dell All-In-One Center you can either: • In the Scan or Fax section, send a single or multiple page fax. First, customize your fax job by answering the questions that appear on your screen. To send a single-page fax, click Fax Now. To send a
Страница 39 из 95 Viewing the Status of a Fax Using Fax Console or Fax Service Management 1 Click Start→ Programs or All Programs→ Accessories→ Communications→ Fax. 2 Click Fax Console or Fax Service Management. 3 The following folders appear: • Incoming — faxes currently being received • Inbox — faxes that have
Страница 40 из 95 40 Using the Printer w w w. d el l. c om | s upp ort . del l . com
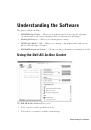
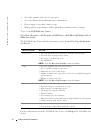
Страница 41 из 95 3 Understanding the Software The printer software includes: • Dell All-In-One Center — Allows you to perform various scan, copy, fax, and print operations with newly scanned and previously saved documents and images. • Printing Preferences — Allows you to adjust printer settings. • Dell Picture
Страница 42 из 95 w w w. d el l. c om | s upp ort . del l . com • Select the quantity and color of your copies. • Access troubleshooting and maintenance information. • Preview images you want to print or copy. • Manage photos (copy them to folders, print them, perform creative copying). To access the Dell All-In-One
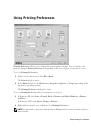
Страница 43 из 95 Using Printing Preferences Printing Preferences allows you to change the various printer settings. You can change your printer settings in Printing Preferences depending on the type of project you want to create. To access Printing Preferences: 1 With your document open, click File→ Print. The
Страница 44 из 95 w w w. d el l. c om | s upp ort . del l . com Printing Preferences Tabs Printing Preferences includes three main tabs. Tab Options Print Setup Quality/Speed — Select Automatic, Draft, Normal, or Photo depending on your desired output quality. Draft is the fastest option but should not be selected
Страница 45 из 95 Using Dell Picture Studio v2.0 In Dell Picture Studio v2.0, you can explore digital photography and learn how to organize, create, or print photos. There are three components to the Dell Picture Studio: • Paint Shop Photo Album Click Start→ Programs or All Programs→ Dell Picture Studio v2.0→ Paint
Страница 46 из 95 w w w. d el l. c om | s upp ort . del l . com If your black ink cartridge is out of ink, you can choose to print black from the color ink cartridge (Process Black) by selecting Complete-A-Print before clicking the Continue Printing button. If you select Complete-A-Print, and click Continue
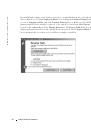
Страница 47 из 95 Removing and Reinstalling the Software If your printer does not function properly, or communication error messages appear when using your printer, you can remove and reinstall the printer software. 1 Click Start→Programs or All Programs→Dell Printers→Dell Photo AIO Printer 924→Uninstall Dell Photo
Страница 48 из 95 48 Understanding the Software w w w. d el l. c om | s upp ort . del l . com
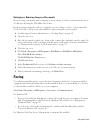
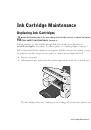
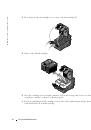
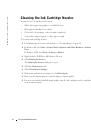
Страница 49 из 95 4 Ink Cartridge Maintenance Replacing Ink Cartridges Before performing any of the procedures listed in this section, read and follow the "CAUTION: SAFETY INSTRUCTIONS" on page 9. Dell ink cartridges are only available through Dell. You can order more ink online at www.dell.com/supplies or by phone.
Страница 50 из 95 w w w. d el l. c om | s upp ort . del l . com 50 3 Press down on the ink cartridge lever to raise each ink cartridge lid. 4 Remove the old ink cartridges. 5 Store the cartridges in an air-tight container, such as the storage unit you received with your photo cartridge, or dispose of them properly.
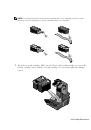
Страница 51 из 95 NOTE: The illustration below shows a black cartridge and a color cartridge (used for normal printing). For photo printing, use a photo cartridge and a color cartridge. 7 Insert the new ink cartridges. Make sure the black or photo ink cartridge is secure in the left ink cartridge carrier, and the
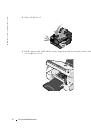
Страница 52 из 95 w w w. d el l. c om | s upp ort . del l . com 52 8 Snap each lid closed. 9 Lift the printer unit, and hold the scanner support up while lowering the printer unit until it is completely closed. Ink Cartridge Maintenance
Страница 53 из 95 Aligning Ink Cartridges Your printer automatically prompts you to align the ink cartridges when they are installed or replaced. To verify your ink cartridges are aligned, you can print an alignment page. After you close the printer unit, press the Menu button . The alignment page begins printing.
Страница 54 из 95 w w w. d el l. c om | s upp ort . del l . com Cleaning the Ink Cartridge Nozzles You may need to clean the nozzles when: • White lines appear in graphics or solid black areas. • Print appears smudged or too dark. • Colors fade, do not print, or do not print completely. • Vertical lines appear
Страница 55 из 95 5 Troubleshooting Follow these tips when you troubleshoot your printer: • If the printer does not work, ensure that the printer is properly connected. • If an error message appears on the operator panel display, write down the exact message. Setup Problems Computer Problems V E R I F Y T H A T Y O
Страница 56 из 95 w w w. d el l. c om | s upp ort . del l . com S E T Y O U R P R I N T E R A S T H E D E F A U L T P R I N T E R. 1 In Windows XP, click Start→ Control Panel→ Printers and Other Hardware→ Printers and Faxes. In Windows 2000, click Start→ Settings→ Printers. 2 Right-click Dell Photo AIO Printer 924,
Страница 57 из 95 E N S U R E A P I C T B R I D G E - E N A B L E D C A M E R A I S N O T C O N N E C T E D T O T H E P R I N T E R. For more information, see "Printing Photos From a PictBridge-Compatible Camera" on page 26. ENSURE THE PRINTER DISPLAYS THE CORRECT LANGUAGE. For more information, see "Resetting the
Страница 58 из 95 w w w. d el l. c om | s upp ort . del l . com MAKE SURE THE PAPER IS NOT WRINKLED, TORN, OR DAMAGED. MAKE SURE THE PAPER IS CENTERED IN THE PAPER SUPPORT, AND THE PAPER G U I D E S R E S T A G A I N S T T H E L E F T A N D R I G H T S I D E S O F T H E P A P E R. CHECK FOR A PAPER JAM. Using your
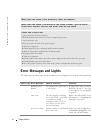
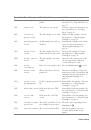
Страница 59 из 95 Error Code: Error Message: What it indicates: Solution: 1100 Paper jam A paper jam exists in the printer. Clear the paper jam. For more information, see "Paper Problems" on page 57. 1101 Paper out The printer is out of paper. Load more paper into the printer. For more information, see "Loading
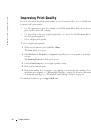
Страница 60 из 95 w w w. d el l. c om | s upp ort . del l . com Improving Print Quality If you are not satisfied with the print quality of your documents, there are several different ways to improve the print quality. • Use the appropriate paper. For example, use Dell Premium Photo Paper if you are printing photos
Страница 61 из 95 6 Contacting Dell Technical Assistance If you need help with a technical problem, Dell is ready to assist you. 1 Call technical support from a telephone near or at the printer so that technical support can assist you with any necessary procedures. When calling Dell, use your Express Service Code to
Страница 62 из 95 w w w. d el l. c om | s upp ort . del l . com Contacting Dell To contact Dell electronically, you can access the following websites: • www.dell.com • support.dell.com (technical support) • premiersupport.dell.com (technical support for educational, government, healthcare, and medium/large business
Страница 63 из 95 Country (City) International Access Code Country Code City Code Department Name or Service Area, Website and E-Mail Address Area Codes, Local Numbers, and Toll-Free Numbers Anguilla General Support toll-free: 800-335-0031 Antigua and Barbuda General Support 1-800-805-5924 Argentina (Buenos Aires)
Страница 64 из 95 w w w. d el l. c om | s upp ort . del l . com Country (City) International Access Code Country Code City Code Department Name or Service Area, Website and E-Mail Address Area Codes, Local Numbers, and Toll-Free Numbers Austria (Vienna) Website: support.euro.dell.com International Access Code: 900
Страница 65 из 95 Country (City) International Access Code Country Code City Code Department Name or Service Area, Website and E-Mail Address Area Codes, Local Numbers, and Toll-Free Numbers Canada (North York, Ontario) Online Order Status: www.dell.ca/ostatus International Access Code: 011 AutoTech (automated
Страница 66 из 95 w w w. d el l. c om | s upp ort . del l . com Country (City) International Access Code Country Code City Code Department Name or Service Area, Website and E-Mail Address China (Xiamen) Technical Support website: support.dell.com.cn Country Code: 86 Technical Support E-mail: cn_support@dell.com City
Страница 67 из 95 Country (City) International Access Code Country Code City Code Department Name or Service Area, Website and E-Mail Address Czech Republic (Prague) Website: support.euro.dell.com International Access Code: 00 E-mail: czech_dell@dell.com Country Code: 420 Technical Support Area Codes, Local Numbers,
Страница 68 из 95 w w w. d el l. c om | s upp ort . del l . com Country (City) International Access Code Country Code City Code Department Name or Service Area, Website and E-Mail Address Area Codes, Local Numbers, and Toll-Free Numbers France (Paris) (Montpellier) Website: support.euro.dell.com International Access
Страница 69 из 95 Country (City) International Access Code Country Code City Code Department Name or Service Area, Website and E-Mail Address Area Codes, Local Numbers, and Toll-Free Numbers Greece Website: support.euro.dell.com International Access Code: 00 E-mail: support.euro.dell.com/gr/en/emaildell/ Country
Страница 70 из 95 w w w. d el l. c om | s upp ort . del l . com Country (City) International Access Code Country Code City Code Department Name or Service Area, Website and E-Mail Address Ireland (Cherrywood) Website: support.euro.dell.com International Access Code: 16 E-mail: dell_direct_support@dell.com Country
Страница 71 из 95 Country (City) International Access Code Country Code City Code Department Name or Service Area, Website and E-Mail Address Japan (Kawasaki) Website: support.jp.dell.com International Access Code: 001 Technical Support (servers) Country Code: 81 Technical Support outside of Japan (servers) City
Страница 72 из 95 w w w. d el l. c om | s upp ort . del l . com Country (City) International Access Code Country Code City Code Latin America Department Name or Service Area, Website and E-Mail Address Area Codes, Local Numbers, and Toll-Free Numbers Customer Technical Support (Austin, Texas, U.S.A.) 512 728-4093
Страница 73 из 95 Country (City) International Access Code Country Code City Code Mexico Department Name or Service Area, Website and E-Mail Address Customer Technical Support International Access Code: 00 Country Code: 52 Area Codes, Local Numbers, and Toll-Free Numbers 001-877-384-8979 or 001-877-269-3383 Sales
Страница 74 из 95 w w w. d el l. c om | s upp ort . del l . com Country (City) International Access Code Country Code City Code Department Name or Service Area, Website and E-Mail Address Norway (Lysaker) Website: support.euro.dell.com International Access Code: 00 E-mail: support.euro.dell.com/no/no/emaildell/
Страница 75 из 95 Country (City) International Access Code Country Code City Code Department Name or Service Area, Website and E-Mail Address Area Codes, Local Numbers, and Toll-Free Numbers Singapore (Singapore) Website: support.ap.dell.com International Access Code: 005 Technical Support (Dimension, Inspiron, and
Страница 76 из 95 w w w. d el l. c om | s upp ort . del l . com Country (City) International Access Code Country Code City Code Department Name or Service Area, Website and E-Mail Address Area Codes, Local Numbers, and Toll-Free Numbers Spain (Madrid) Website: support.euro.dell.com International Access Code: 00
Страница 77 из 95 Country (City) International Access Code Country Code City Code Department Name or Service Area, Website and E-Mail Address Area Codes, Local Numbers, and Toll-Free Numbers Taiwan Website: support.ap.dell.com International Access Code: 002 E-mail: ap_support@dell.com Country Code: 886 Technical
Страница 78 из 95 w w w. d el l. c om | s upp ort . del l . com Country (City) International Access Code Country Code City Code Department Name or Service Area, Website and E-Mail Address Area Codes, Local Numbers, and Toll-Free Numbers U.K. (Bracknell) Website: support.euro.dell.com International Access Code: 00
Страница 79 из 95 Country (City) International Access Code Country Code City Code Department Name or Service Area, Website and E-Mail Address Area Codes, Local Numbers, and Toll-Free Numbers U.S.A. (Austin, Texas) Automated Order-Status Service toll-free: 1-800-433-9014 International Access Code: 011 AutoTech
Страница 80 из 95 80 Contacting Dell w w w. d el l. c om | s upp ort . del l . com
Страница 81 из 95 7 Appendix U.S. Terms and Conditions of Sale These terms and conditions ("Agreement") apply to your purchase of computer systems and/or related products and/or services and support sold in the United States ("Product") by the Dell entity named on the invoice or acknowledgement ("Dell") provided to
Страница 82 из 95 w w w. d el l. c om | s upp ort . del l . com BRANDED PRODUCT, IF ANY, IS PROVIDED BY THE ORIGINAL MANUFACTURER, NOT BY DELL. DELL MAKES NO EXPRESS WARRANTIES EXCEPT THOSE STATED IN DELL'S APPLICABLE WARRANTY STATEMENT IN EFFECT ON THE DATE OF THE INVOICE, PACKING SLIP OR ACKNOWLEDGEMENT.
Страница 83 из 95 POSSIBILITY OF SUCH DAMAGES, OR FOR ANY CLAIM BY ANY THIRD PARTY. YOU AGREE THAT FOR ANY LIABILITY RELATED TO THE PURCHASE OF PRODUCT, DELL IS NOT LIABLE OR RESPONSIBLE FOR ANY AMOUNT OF DAMAGES ABOVE THE AMOUNT INVOICED FOR THE APPLICABLE PRODUCT. NOTWITHSTANDING ANYTHING IN THIS AGREEMENT TO THE
Страница 84 из 95 w w w. d el l. c om | s upp ort . del l . com Limited Warranties and Return Policy Limited Warranty for Dell-Branded Hardware Products (U.S. Only) Dell-branded hardware products purchased in the U.S. come with either a 90-day, 1-year, 2-year, 3-year, or 4-year limited warranty depending on the
Страница 85 из 95 How long does this limited warranty last? This limited warranty lasts for the time period indicated on your packing slip or invoice, except for the following Dell-branded hardware: • Portable computer batteries carry a 1-year limited warranty. • Projector lamps carry a 90-day limited warranty. •
Страница 86 из 95 w w w. d el l. c om | s upp ort . del l . com What will Dell do? During the 90 days of the 90-day limited warranty and the first year of all other limited warranties: During the 90 days of the 90-day limited warranty and the first year of all other limited warranties, we will repair any
Страница 87 из 95 • If you are a Home Office, Small, Medium, Large, or Global Commercial Customer, go to www.dell.com/us/en/biz/topics/sbtopic_ccare_nav_015_ccare.htm • If you are a Government, Education, or Healthcare Customer, or an Individual Home Consumer who purchased through an Employee Purchase Program, go to
Страница 88 из 95 w w w. d el l. c om | s upp ort . del l . com You must ship the products to Dell within five (5) days of the date that Dell issues the Credit Return Authorization Number. You must also return the products to Dell in their original packaging, in as-new condition along with any media, documentation,
Страница 89 из 95 Export Regulations Customer acknowledges that these Products, which may include technology and software, are subject to the customs and export control laws and regulations of the United States (“U.S.”) and may also be subject to the customs and export laws and regulations of the country in which
Страница 90 из 95 w w w. d el l. c om | s upp ort . del l . com suppliers, and your exclusive remedy, shall be (a) return of the price paid for the Software or (b) replacement of any disk not meeting this warranty that is sent with a return authorization number to Dell, at your cost and risk. This limited warranty
Страница 91 из 95 Electromagnetic Compatibility is the ability of items of electronic equipment to function properly together in the electronic environment. While this product has been designed and determined to be compliant with regulatory agency limits for EMI, there is no guarantee that interference will not
Страница 92 из 95 92 Appendix w w w. d el l. c om | s upp ort . del l . com
Страница 93 из 95 Index A D Advanced tab, 44 Dell contacting, 61 aligning ink cartridges, 53 B borderless printing, 25 buttons, operator panel Cancel, 15 down arrow, 14 Power, 14 C Cancel button, 15 Dell All-In-One Center accessing, 42 Copy section, 42 Preview section, 42 Productivity Tools, 42 Scan section, 42
Страница 94 из 95 94 L O loading cards, 21 envelopes, 20 greeting cards, 21 index cards, 21 iron-on transfers, 21 photo cards, 21 photo paper, 21 postcards, 21 transparencies, 21 operator panel copying with, 26 using, 14 P paper exit tray, 12 Paper jam message, 59 Paper tray empty message, 59 paper type sensor, 17