23
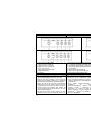
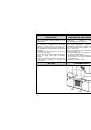
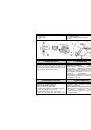
air is increase, by tightening it is reduced. The air/gas
mixture is correct when the flame has blue color.
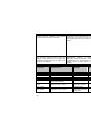
Adjust screw 5 for value X in accordance with the table,
and tighten the nut.
Check that the burner is working properly: the flame
must be blue and sharp, without a yellow tip.
воздуха можно с помощью регулировочного винта.
Но прежде нужно открыть дверцу духовки (при
необходимости, дверцу снять с петель) и вытащить
дно.
При отвинчивании регулировочного винта
количество первичного подсасываемого воздуха
увеличивается, при завинчивании - уменьшается.
Положение винта (величину „Х“) нужно установить в
соответствии с нижеприведённой таблицей.
(2). Відкручуючи регулюючий гвинт збільшується
кількість початкового повітря, при затягуванні гвинта
– зменшується. Суміш повітря/газу відрегульовано,
якщо полум’я має голубий колір.
Відрегулюйте гвинт 5 для значення X згідно таблиці,
що зазначена, і затягніть гайку.
Перевірте, чи конфорка працює правильно: полум’я
повинне бути гострокінцеве і голубого кольору без
жовтих кінчиків.
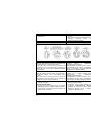
ADJUSTMENT OF OVEN BURNER
MINIMUM POWER
On completion of this operation, proceed as follows:
Remove the oven bottom.
Oven control knob
Lift off the oven control knob.
For propane/butane fully tighten screw G and for
natural gas unscrew screw G by a ½ or ¾ turn for
natural gas
Oven temperature selector
Disconnect the cooker from the mains power supply.
Lifř the oven temperature selector knob. For
propane/butane fully tighten screw G.
•
For natural gas unscrew screw G by a ½ or ¾ turn for
natural gas
•
Light the oven burner and close the oven door.
Oven control knob
Set the oven control knob to position “MAXIMUM
POWER” and heat the oven for 15 minutes. Then set
the control knob to the to adjust the flame.
Oven temperature selector
Set the temperature selector control knob to position 8 and
heat the oven for 15 minutes.
Then set the temperature selector knob to position 1 and
use screw G to adjust the flame.
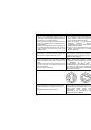
Right turn reduces the height of the flame, and left turn
increases the height. The adjustment is correct when the
body of the flame is about 3 to 4 mm high.
Replace the knob and set it to the switch off position, then
replace the oven base.
If the flame sensor does not operate properly, check its
position according to fig.
РЕГУЛИРОВКА МОЩНОСТИ В
ПОЛОЖЕНИИ „МАЛОЕ ПЛАМЯ“
Данная
операция
выполняется
следующим
способом:
Нужно открыть дверцу духовки и вытащить дно.
Ручка духовки
Снимите ручку крана горелки духовки.
Выполните предварительную регулировку, завинтив
винт G до упора, если плита работает на пропан-
бутане, и отвинтив на 1/2” и даже на 3/4” оборота
при работе плиты на природном газе.
Установите ручку крана на “МАКСИМАЛЬНУЮ
МОЩНОСТЬ”.
З ажгите газ горелки, закройте дверцу и прогрейте
духовку в течение, приблизительно, 15 минут.
Затем установите ручку крана в положение “МАЛОЕ
ПЛАМЯ” и винтом G выполните окончательную
регулировку.
При повороте винта вправо пламя уменьшается, а
при повороте влево - увеличивается. Мощность
горелки считается правильно
отрегулированной, если внутренний конус пламени
достигает высоты от 3 до 4 мм, а температура в
центре духовки должна быть максимально 160°C.
РЕГУЛЮВАННЯ МІНІМАЛЬНОЇ
ПОТУЖНОСТІ КОНФОРКИ ДУХОВКИ
Дотримуйтеся наступних правил:
Зніміть дно духовки.
Ручка духовки
Зніміть ручку роботи духовки.
Вимкніть прилад з електромережі.
Зніміть регулятор температури.
Для пропану/бутану повністю затягніть гвинт G, для
природного газу – викрутіть гвинт G на ½ або ¾
повороту для природного газу
Запаліть конфорку духовки та зачиніть дверцята.
Встановіть ручку роботи духовки в положення
МАКСИМАЛЬНА ПОТУЖНІСТЬ та нагрійте духовку
впродовж 15 хвилин. Потім встановіть ручку роботи
духовки в положення ЗБЕРЕЖЕННЯ та за допомогою
гвинта G відрегулюйте полум’я .
Регулятор температури
Встановіть регулятор температури в положення 8 та
нагрійте духовку впродовж 15 хвилин. Потім
встановіть регулятор температури в положення 1 та
за допомогою гвинта G відрегулюйте полум’я.
Поворот вправо зменшує висоту полум’я, поворот
вліво – збільшує висоту полум’я. Регулювання
вважається коректним, якщо висота полум’я сягає 3-
4 мм.
Переустановіть ручки та встановіть у вимкнене
положення, помістіть на попереднє місце дно
духовки.
Якщо сенсор полум’я працює неправильно,
перевірте його розміщення згідно мал.