Страница 2 из 20 GB RU BY OPERATING AND MAINTENANCE INSTRUCTIONS РУКОВОДСТВО ПО ЭКСПЛУАТАЦИИ Dear customer! Thank you for purchasing the appliance from our new range of gas cookers. The following information will help you understand the features of the appliance and use it safely. We hope the appliance will serve
Страница 3 из 20 • Never use naked light to detect gas leakage! • If you detect any defects on the gas installation of the appliance, never attempt to repair it by yourself. Switch the appliance off, cut the gas supply and call authorized personnel to make the repair. • If you plan an absence exceeding 3 days, turn
Страница 4 из 20 Different models are equipped with different accessories. Any additional accessories (grids, baking trays, grill pans, adjustable feet) are available in authorized shops or our service outlets. Различные модели имеют разлчные принадлежности. Другие принадлежности (противень, решётка, принадлежност
Страница 5 из 20 OPERATION CAUTION: • The appliance is not a toy and may be operated only by adult persons in accordance with these instructions. Do not leave small children without supervision in a room where the appliance is installed. • This appliance is not intended for use by persons (including children) with
Страница 6 из 20 COOKING • Use low and wide cookware for preparing food on gas burners. Make sure the burner flames heat the dish bottom and do not go beyond its rim. • The appliance is fitted with different size burners. For optimum (economical) consumption of gas use the recommended cookware bottom diameters: -
Страница 7 из 20 OVEN OPERATION ПОЛЬЗОВАНИЕ ДУХОВКОЙ The gas supply to the oven burner is controlled by a tap protected with a thermoelectric flame sensor. The power input of the oven burner as well as the temperature of the oven space can be controlled by setting the knob to the positions „MAXIMUM POWER“ and
Страница 8 из 20 MINUTE MINDER МЕХАНИЧЕСКИЙ ТАЙМЕР Awaiting cooking time (oven or hob burners) is possible to set on mechanical minute minder in range of 0–115 minute. Required time to be set by turning of the knob. First turn the knob to the right to max. positron and than turn back to required time. When time
Страница 9 из 20 CLEANING THE CABINET ОЧИСТКА ВНЕШНЕЙ ПОВЕРХНОСТИ HOB GRID ОЧИСТКА ВАРОЧНОГО СТОЛА • Clean the exterior with a damp sponge and some detergent. • Fat stains can be removed with warm water and special detergent for enamel. • Never clean enameled surfaces with abrasive agents as they may permanently
Страница 10 из 20 BULB REPLACEMENT • Set all the control knobs to the OFF position and disconnect the range from the mains. • Unscrew the bulb glass cover in the oven by turning it anti-clockwise. • Unscrew the bulb and replace it with a new bulb. • Replace the bulb glass cover. ЗАМЕНА ЛАМПОЧКИ ОСВЕЩЕНИЯ ДУХОВКИ При
Страница 11 из 20 DISPOSAL OF OBSOLETE APPLIANCES ЛИКВИДАЦИЯ ПЛИТЫ ПОСЛЕ ОКОНЧАНИЯ СРОКА СЛУЖБЫ The appliance contains valuable materials which ought to be reused or recycled, so once your appliance is of no use to you deliver it to the authorized scrap dealer for further treatment. This appliance is marked in
Страница 12 из 20 LOCATION УСТАНОВКА ПЛИТЫ The appliance is designed for installation in the line of kitchen cabinets. The cooker can be located in the standard kitchen with a minimum space of 20m3. If the kitchen is smaller (but not less than 15m3 as a minimum) it is necessary to provide a hood. Regarding thermal
Страница 13 из 20 CONNECTION TO GAS SUPPLY ПРИСОЕДИНЕНИЕ ПЛИТЫ К ГАЗОПРОВОДУ Cooker class 1. Плита класса 1. GAS SUPPLY ГАЗОПРОВОД The appliance may be connected to gas supply by only by the authorized personnel. Connection must comply with the local standards and requirements. The gas supply pipe must be fitted
Страница 14 из 20 IMPORTANT PRECAUTION: ВНИМАНИЕ! In case of left side connection (seen from the front) the hose must be connected by means of a clamp fixed in the back cover opening. You will find the fixing clamp in the accessory kit. Подвод газа к плите может быть выполнен с правой или с левой стороны. При
Страница 16 из 20 CONVERSION TO ANOTHER TYPE OF GAS ПЕРЕНАЛАДКА ПЛИТЫ НА ДРУГОЙ ВИД ГАЗА Conversion of cooker to another type of gas can be performed only by qualified technician. Adhere to the following procedure: • Change nozzles of all hob burners. • Adjust or change gas pressure regulator if installed. • Adjust
Страница 17 из 20 ЗАМЕЧАНИЕ : Производитель оставляет за собой право небольших изменений инструкции, исходящих из инновационных или технологических изменений изделия, которые не имеют влияние на функцию изделия. NOTICE The manufacturer reserves the right to make minor changes in these instructions for use resulting
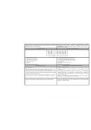
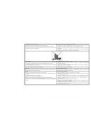
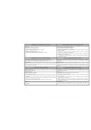
Страница 18 из 20 GB RU Technical data Gas cooker Dimensions: height / width / depth (mm) BY Технические данные Плита газовая Размеры плиты: высота / ширина / глубина (мм) Burner Горелки Left front (kW) Left rear (kW) Right rear (kW) Right front (kW) левая передняя (малая) (кВт) левая задняя (средняя) (кВт) правая