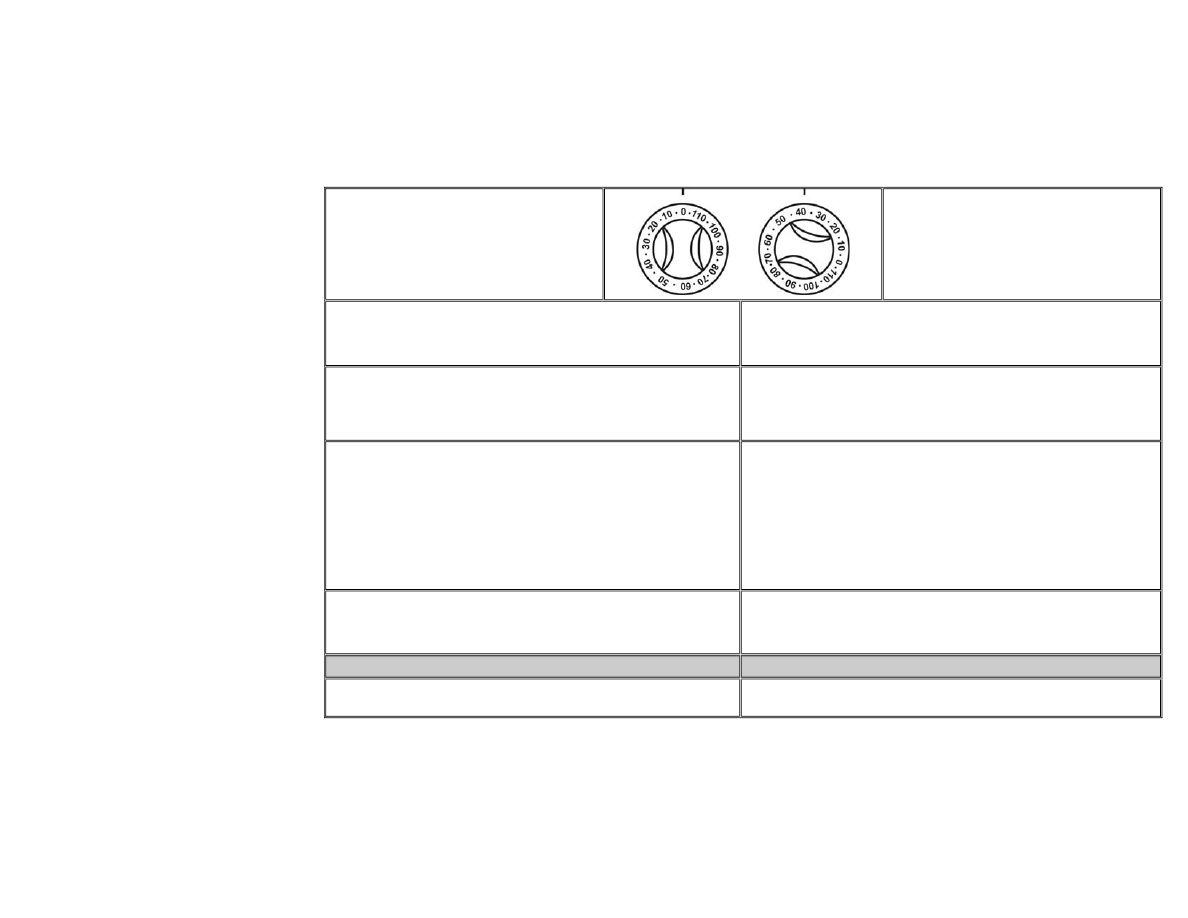
Инструкция для GORENJE MORA MG51203GW

(скачивание инструкции бесплатно)
Формат файла: PDF
Доступность: Бесплатно как и все руководства на сайте. Без регистрации и SMS.
Дополнительно: Чтение инструкции онлайн
background image

7


MINUTE MINDER 

Awaiting cooking time (oven or hob burners) is possible 
to set on mechanical minute minder in range of 0–115 
minute. 
Required time to be set by turning of the knob. First turn 
the knob to the right to max. positron and than turn back 
to required time. 
When time empire the bell rings.   


МЕХАНИЧЕСКИЙ ТАЙМЕР  

Период деятельности духовки и горелок можно 
отследовать с помощью механического таймера 
в интервале от 0 до 115 минут. 


Устанавливается вращением кнопки. сперва, 
направлением вправо в максимальное положение 
(115 минут) и затем снова в заданное время (35 
мин). После истечения срока установленного время 
играет звуковой сигнал. 

BAKING / ROASTING FOOD  

• Preheat the oven for a period of 10 - 15 min before putting yeast dough to bake.  

• Put the baking tray to the centre of oven, keep the distance between back wall 

and baking tray 

ВЫПЕЧКА  

• Перед тем, как начать выпекать, при необходимости, прогрейте духовку в 

течение 10-15 минут. 

• Противень должно поместить в центр духовки, противень не долхен 

прикасаться до задной стены  духовки. 

A TAP PROTECTED 

The oven knob is set to the position „MAXIMUM POWER“. After preheating put the 
food in the oven. Baking/roasting time at MAXIMUM POWER depends on the type 
and mass of food. Then set the oven burner knob to the MINIMUM POWER 
(SAVING) position and keep it there to the end of baking. 

Установите ручку крана горелки духовки в положение “МАКСИМАЛЬНАЯ 
МОЩНОСТЬ” . 
В таком положении ручку крана горелки оставьте на время, которое зависит от 
веса и вида приготавливаемого блюда. 
Затем ручку можете установить в положение “МАЛОЕ ПЛАМЯ”  и выпечку 
докончить. 

• For best baking/roasting results insert the grid with the tray into the second level 

guide from below. 

• Experience says that yeast dough is well baked after 25 – 30 minutes, Christmas 

cake after 45 minutes, and pastry after 12 – 18 minutes. However, these times are 
merely referential and it is necessary to test them individually. 

• If possible, avoid opening the oven door during the baking process if possible. The 

temperature regime within the oven might be disturbed, resulting in prolonged 
baking time or burnt food. 

• If you should detect considerable differences between the set temperature and the 

actual oven temperature, contact qualified service personnel. 

• Для ориентации сообщаем, что время выпечки пирожков из дрожжевого теста, 

приблизительно, 25-30 минут. На выпечку изделий из сдобного дрожжевого 
теста потребуется 45 минут, из слоёного или песочного теста - 12-18 минут. 

• При выпечке высоких пирогов рекомендуем противень или форму с пирогом 

уложить на алюминиевый противень (для более равномерного выпекания) и 
поставить их оба на решётку, вставленную во вторые от дна духовки пазы 
боковых стен. 

• Требуемое время выпечки и выбор температуры зависят от вида и  объёма, 

рецептуры и способа приготовления блюда, а также от величины давления газа 
в сети. Поэтому, время и температура, необходимые для приготовления 
каждого вида блюда, могут быть точно установлены в соответствии с Вашим 
опытом и навыком. 

HELPFUL HINT: 

When baking high rise yeast dough put it on aluminum baking tray and insert it in the 
second guide level from the bottom. 

ВНИМАНИЕ!  

При выпечке высоких пирогов рекомендуем противень или форму с пирогом 
уложить на алюминиевый противень (для более равномерного выпекания) и 
поставить их оба на решётку, вставленную во вторые от дна духовки пазы 
боковых стен. 

CLEANING AND MAINTENANCE 

УХОД ЗА ПЛИТОЙ 

Before attempting any cleaning or maintenance set all gas control knobs and 
temperature selectors to “OFF” position and let the cooker cool down completely. 

При любой манипуляции с плитой, помимо повседневного применения, закройте 
кран подачи газа, расположенный на газопроводе, и отключите плиту от 
электросети. 

1
2
3
4
5
6
7
8
9
10
11
12
13
14
15
16
17
18
19
Оглавление инструкции
  • Страница 1 из 20
  • Страница 2 из 20
    GB RU BY OPERATING AND MAINTENANCE INSTRUCTIONS РУКОВОДСТВО ПО ЭКСПЛУАТАЦИИ Dear customer! Thank you for purchasing the appliance from our new range of gas cookers. The following information will help you understand the features of the appliance and use it safely. We hope the appliance will serve
  • Страница 3 из 20
    • Never use naked light to detect gas leakage! • If you detect any defects on the gas installation of the appliance, never attempt to repair it by yourself. Switch the appliance off, cut the gas supply and call authorized personnel to make the repair. • If you plan an absence exceeding 3 days, turn
  • Страница 4 из 20
    Different models are equipped with different accessories. Any additional accessories (grids, baking trays, grill pans, adjustable feet) are available in authorized shops or our service outlets. Различные модели имеют разлчные принадлежности. Другие принадлежности (противень, решётка, принадлежност
  • Страница 5 из 20
    OPERATION CAUTION: • The appliance is not a toy and may be operated only by adult persons in accordance with these instructions. Do not leave small children without supervision in a room where the appliance is installed. • This appliance is not intended for use by persons (including children) with
  • Страница 6 из 20
    COOKING • Use low and wide cookware for preparing food on gas burners. Make sure the burner flames heat the dish bottom and do not go beyond its rim. • The appliance is fitted with different size burners. For optimum (economical) consumption of gas use the recommended cookware bottom diameters: -
  • Страница 7 из 20
    OVEN OPERATION ПОЛЬЗОВАНИЕ ДУХОВКОЙ The gas supply to the oven burner is controlled by a tap protected with a thermoelectric flame sensor. The power input of the oven burner as well as the temperature of the oven space can be controlled by setting the knob to the positions „MAXIMUM POWER“ and
  • Страница 8 из 20
    MINUTE MINDER МЕХАНИЧЕСКИЙ ТАЙМЕР Awaiting cooking time (oven or hob burners) is possible to set on mechanical minute minder in range of 0–115 minute. Required time to be set by turning of the knob. First turn the knob to the right to max. positron and than turn back to required time. When time
  • Страница 9 из 20
    CLEANING THE CABINET ОЧИСТКА ВНЕШНЕЙ ПОВЕРХНОСТИ HOB GRID ОЧИСТКА ВАРОЧНОГО СТОЛА • Clean the exterior with a damp sponge and some detergent. • Fat stains can be removed with warm water and special detergent for enamel. • Never clean enameled surfaces with abrasive agents as they may permanently
  • Страница 10 из 20
    BULB REPLACEMENT • Set all the control knobs to the OFF position and disconnect the range from the mains. • Unscrew the bulb glass cover in the oven by turning it anti-clockwise. • Unscrew the bulb and replace it with a new bulb. • Replace the bulb glass cover. ЗАМЕНА ЛАМПОЧКИ ОСВЕЩЕНИЯ ДУХОВКИ При
  • Страница 11 из 20
    DISPOSAL OF OBSOLETE APPLIANCES ЛИКВИДАЦИЯ ПЛИТЫ ПОСЛЕ ОКОНЧАНИЯ СРОКА СЛУЖБЫ The appliance contains valuable materials which ought to be reused or recycled, so once your appliance is of no use to you deliver it to the authorized scrap dealer for further treatment. This appliance is marked in
  • Страница 12 из 20
    LOCATION УСТАНОВКА ПЛИТЫ The appliance is designed for installation in the line of kitchen cabinets. The cooker can be located in the standard kitchen with a minimum space of 20m3. If the kitchen is smaller (but not less than 15m3 as a minimum) it is necessary to provide a hood. Regarding thermal
  • Страница 13 из 20
    CONNECTION TO GAS SUPPLY ПРИСОЕДИНЕНИЕ ПЛИТЫ К ГАЗОПРОВОДУ Cooker class 1. Плита класса 1. GAS SUPPLY ГАЗОПРОВОД The appliance may be connected to gas supply by only by the authorized personnel. Connection must comply with the local standards and requirements. The gas supply pipe must be fitted
  • Страница 14 из 20
    IMPORTANT PRECAUTION: ВНИМАНИЕ! In case of left side connection (seen from the front) the hose must be connected by means of a clamp fixed in the back cover opening. You will find the fixing clamp in the accessory kit. Подвод газа к плите может быть выполнен с правой или с левой стороны. При
  • Страница 15 из 20
    1 – Front oven wall 2 – Oven bottom 3 – Ignition tube 4 – Oven burner 5 – Oven burner adjusting screw 6 – Grill burner 1 – передняя стена духовки 2 – дно духовки 3 – трубка запальная 4 – горелка духовки 5 – винт регулировочный 6 – горелка гриля ADJUSTMENT OF OVEN BURNER MINIMUM POWER РЕГУЛИРОВКА
  • Страница 16 из 20
    CONVERSION TO ANOTHER TYPE OF GAS ПЕРЕНАЛАДКА ПЛИТЫ НА ДРУГОЙ ВИД ГАЗА Conversion of cooker to another type of gas can be performed only by qualified technician. Adhere to the following procedure: • Change nozzles of all hob burners. • Adjust or change gas pressure regulator if installed. • Adjust
  • Страница 17 из 20
    ЗАМЕЧАНИЕ : Производитель оставляет за собой право небольших изменений инструкции, исходящих из инновационных или технологических изменений изделия, которые не имеют влияние на функцию изделия. NOTICE The manufacturer reserves the right to make minor changes in these instructions for use resulting
  • Страница 18 из 20
    GB RU Technical data Gas cooker Dimensions: height / width / depth (mm) BY Технические данные Плита газовая Размеры плиты: высота / ширина / глубина (мм) Burner Горелки Left front (kW) Left rear (kW) Right rear (kW) Right front (kW) левая передняя (малая) (кВт) левая задняя (средняя) (кВт) правая
  • Страница 19 из 20
  • Страница 20 из 20