16
English
◯
Do not cut all the way thorough the wood by starting
from the bottom since there is the danger of the guide
bar
fl
ying up out of control when the cut is
fi
nished.
◯
Always prevent the operating chain saw from touching
the ground or wire fences.
2.
Branch
cutting
(1) Cutting branches from a standing tree:
A thick branch should initially be cut o
ff
at a point away
from the trunk of the tree.
First cut in about one third of the way from below, and
then cut o
ff
the branch from above. Finally, cut o
ff
the
remaining portion of the branch even with the trunk of
the tree. (
Fig.
18
)
CAUTION
◯
Always be careful to avoid falling branches.
◯
Always be alert for chain saw recoil.
(2) Cutting branches from fallen trees:
First cut o
ff
branches that do not touch the ground, then
cut o
ff
those which touch the ground. When cutting
thick branches that touch the ground,
fi
rst cut in about
half of the way from above, then cut the branch o
ff
from
below. (
Fig.
19
)
CAUTION
◯
When cutting o
ff
branches which touch the ground, be
careful that the guide bar does not become bound by
pressure.
◯
During the
fi
nal cutting stage, beware of the log
suddenly rolling.
3.
Log
cutting
When cutting a log positioned as shown in
Fig.
20
,
fi
rst
cut in about one third of the way from below, then cut
down all the way from above. When cutting a log that
straddles a hollow as shown in
Fig.
21
,
fi
rst cut in about
two thirds of the way from above, then cut upward from
below.
CAUTION
◯
Ensure the guide bar does not become bound in the log
by pressure.
◯
When working on inclined ground, be sure to stand on
the uphill side of the log. If you stand on the downhill
side, the cut-o
ff
log may roll toward you.
4.
Felling
trees
(1) Undercut (
1
as shown in
Fig.
22
):
Make undercut facing the direction in which you want
the tree to fall.
The depth of the undercut should be 1/3 of the tree’s
diameter. Never fell trees without proper undercut.
(2) Back cut (
2
as shown in
Fig.
22
):
Make a backcut about 5 cm above and parallel to the
horizontal undercut.
If the chain becomes entangled during cutting, stop the
saw and use wedges to free it. Do not cut thorough the
tree.
CAUTION
◯
Trees should not be felled in a manner that would
endanger any person, strike any utility line or cause any
property damage.
◯
Be sure to stand on the uphill side of the terrain as the
tree is likely to roll or slide downhill after it is felled.
SHARPENING
OF
THE
CHAIN
BLADE
CAUTION
Ensure the power source has been disconnected from
the tool before performing the steps below.
Wear gloves to protect your hands.
Dull and worn chain blades will decrease the e
ffi
ciency
of the tool and place unnecessary overload on the
motor and various parts of the machine. In order
to maintain optimum e
ffi
ciency, it in necessary to
check the chain blades often and keep them properly
sharpened and adjusted. Blade sharpening and depth
gauge adjustment should be accomplished at the
center of the guide bar, with the chain properly mounted
to the machine.
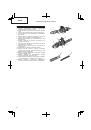
1.
Blade
sharpening
The accessory round
fi
le should be held against the
chain blade so that one-
fi
fth of its diameter extends
above the top of the blade, as shown in
Fig.
23
.
Sharpen the blades by keeping the round
fi
le at a 30°
angle in relation to the guide bar, as shown in
Fig.
24
,
ensuring that the round
fi
le is held straight, as shown
in
Fig.
25
. Ensure that all saw blades are
fi
led at the
same angle, or the cutting e
ffi
ciency of the tool will be
impaired. Appropriate angles for sharpening the blades
correctly are shown in
Fig.
26
.
Keep all cutters the same length.
2.
Adjustment
of
depth
gauge
To perform this work, please use the optional accessory
depth gauge jointer and a standard
fl
at
fi
le obtainable in
local markets. The dimension shown in
Fig.
27
is called
the depth gauge. The depth gauge dictates the amount
of incision (cut-in), and must be accurately maintained.
The optimum depth gauge for this tool is 0.635 mm.
After repeated blade sharpening, the depth gauge
will be decreased. Accordingly, after every 3-4
sharpenings, place the depth gauge jointer as shown in
Fig.
28
, and
fi
le away that portion that protrudes above
the upper plane of the depth gauge jointer.
MAINTENANCE
AND
INSPECTION
1.
Inspecting
the
Chain
(1) Be sure to occasionally inspect the chain tension. If the
chain has become slack, adjust the tension as directed
in the section entitled “Adjusting the Chain Tension”.
(2) When the chain blades become dull, sharpen them
as directed in the section entitled “Sharpening of the
Chain Blade”.
(3) When sawing work has been completed, thoroughly oil
chain and guide bar by depressing the oil button three
or four times while the chain is rotating. This will prevent
rusting.
2.
Cleaning
the
Guide
Bar
When the guide bar groove or the oil hole becomes
clogged with sawdust, oil circulation becomes impaired,
which could result in damage to the tool. Occasionally
remove the chain cover and clean the groove and oil
hole with a length of wire, as shown in
Fig.
29
.
3.
Cleaning
the
inside
of
side
cover
Tension dial and knob operations will become sluggish
if sawdust or other foreign matter builds up inside the
side cover, and there are cases in which they will cease
to move completely. After using the chain saw and
after replacing the saw chain, etc., insert a
fl
at-headed
screwdriver into the gap beneath the tension dial as
shown in
Fig.
30
, lift up the knob and tension dial and
slowly remove the screwdriver to clean the inside of the
side cover and remove all sawdust.
 1
1
 2
2
 3
3
 4
4
 5
5
 6
6
 7
7
 8
8
 9
9
 10
10
 11
11
 12
12
 13
13
 14
14
 15
15
 16
16
 17
17
 18
18
 19
19
 20
20
 21
21
 22
22
 23
23
 24
24
 25
25
 26
26
 27
27
 28
28
 29
29
 30
30
 31
31
 32
32
 33
33
 34
34
 35
35
 36
36
 37
37
 38
38
 39
39
 40
40
 41
41
 42
42
 43
43
 44
44
 45
45
 46
46
 47
47
 48
48
 49
49
 50
50
 51
51
 52
52
 53
53
 54
54
 55
55
 56
56
 57
57
 58
58
 59
59
 60
60
 61
61
 62
62
 63
63
 64
64
 65
65
 66
66
 67
67
 68
68
 69
69
 70
70
 71
71
 72
72
 73
73
 74
74
 75
75
 76
76
 77
77
 78
78
 79
79
 80
80
 81
81
 82
82
 83
83
 84
84
 85
85
 86
86
 87
87
 88
88
 89
89
 90
90
 91
91
 92
92
 93
93
 94
94
 95
95
 96
96
 97
97
 98
98
 99
99
 100
100
 101
101
 102
102
 103
103
 104
104
 105
105
 106
106
 107
107
 108
108
 109
109
 110
110
 111
111
 112
112
 113
113
 114
114
 115
115
 116
116
 117
117
 118
118
 119
119
 120
120
 121
121
 122
122
 123
123
 124
124