Инструкция для HOTPOINT-ARISTON 7HPK 755 D GH

(скачивание инструкции бесплатно)
Формат файла: PDF
Доступность: Бесплатно как и все руководства на сайте. Без регистрации и SMS.
Дополнительно: Чтение инструкции онлайн
background image

6

GB

Installation

!

 Before operating your new appliance please read this 

instruction booklet carefully. It contains important information 

for safe use, installation and care of the appliance.

!

 Please keep these operating instructions for future reference. 

Pass them on to possible new owners of the appliance.

Positioning

!

 Keep packaging material out of the reach of children. It can 

become a choking or suffocation hazard (see Precautions 

and tips).

!

 The appliance must be installed by a qualified professional 

according to the instructions provided. Incorrect installation 

may cause harm to people and animals or may damage 

property.

!

 This unit may be installed and used only in permanently 

ventilated rooms in accordance with current national 

regulations. The following requirements must be observed:

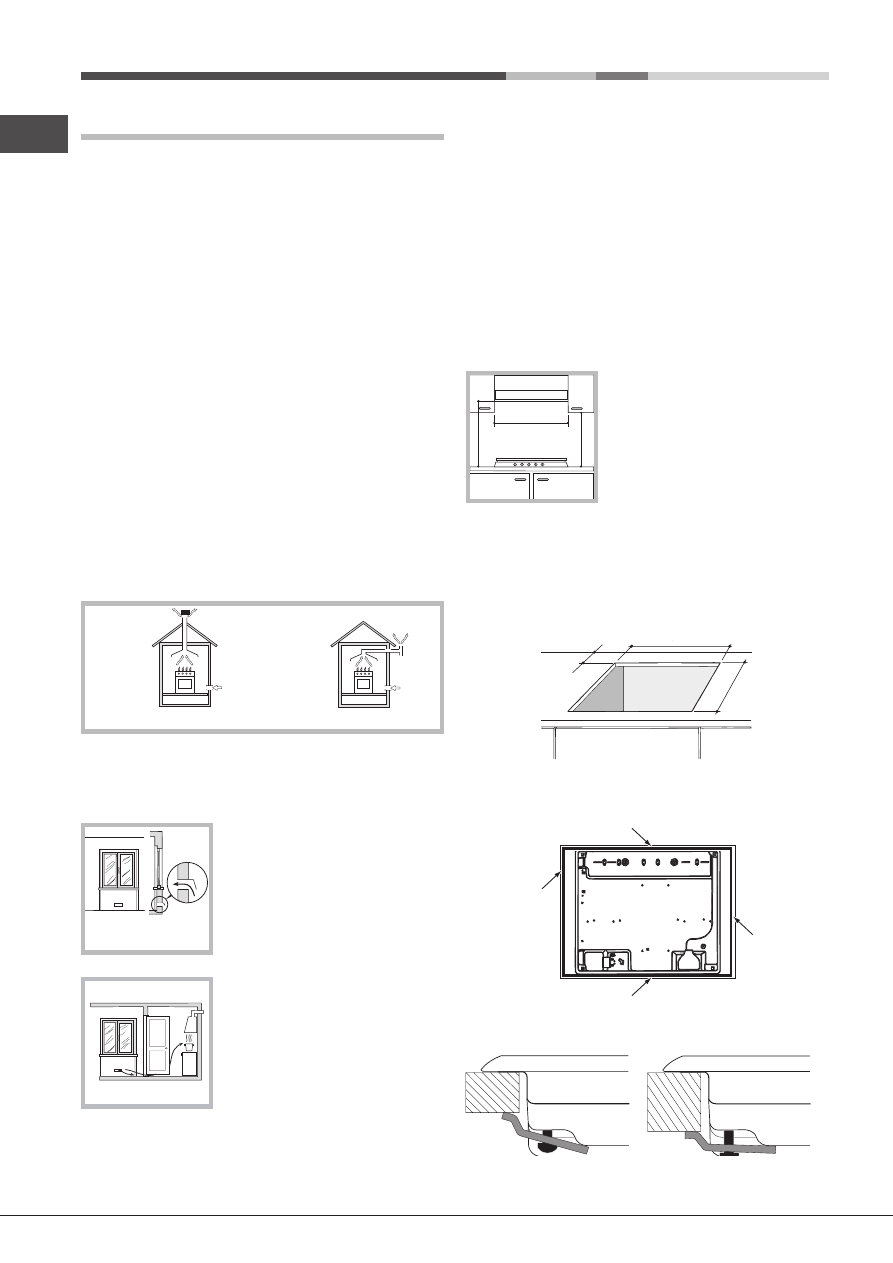
•  The room must be equipped with an air extraction system 

that expels any combustion fumes. This may consist of 

a hood or an electric fan that automatically starts each 

time the appliance is switched on.

In a chimney stack or branched flue. 

(exclusively for cooking appliances)

Directly to 

the Outside

•  The room must also allow proper air circulation, as air is 

needed for combustion to occur normally. The flow of air 

must not be less than 2 m

3

/h per kW of installed power.

The air circulation system may 

take air directly from the outside 

by means of a pipe with an inner 

cross section of  at least 100 cm

2

the opening must not be vulnerable 

to any type of blockages.

The system can also provide the air 

needed for combustion indirectly, 

i.e. from adjacent rooms fitted with 

air circulation tubes as described 

above. However, these rooms must 

not be communal rooms, bedrooms 

or  rooms  that  may  present  a  fire 

hazard.

A

Examples of 
ventilation holes 
for comburant air.

Enlarging the ventilation slot

between window and floor.

Adjacent

Room

Room to be

Vented

Fitting the appliance

The following precautions must be taken when installing 

the hob:

•  Kitchen cabinets adjacent to the appliance and taller than 

the top of the hob must be at least 600 mm from the edge 

of the hob.

•  Hoods  must  be  installed  according  to  their  relative 

installation instruction manuals and at a minimum 

distance of 650 mm from the hob (see figure).

•  Place the wall cabinets adjacent to the hood at a minimum 

height of 420 mm from the hob (see figure).

If the hob is installed beneath a wall 

cabinet, the latter must be situated 

at  a  minimum  of  700  mm  above 

the hob.

•  The  installation  cavity  should  have  the  dimensions 

indicated in the figure.

  Fastening hooks are provided, allowing you to fasten 

the hob to tops that are between 20 and 40 mm thick. 

To ensure the hob is securely fastened to the top, we 

recommend you use all the hooks provided.

555 mm

55 mm

475 mm

•  Before fastening the cooktop in place, position the seal 

(supplied) along the perimeter of the countertop, as 

shown in the figure.

Hook fastening diagram


Hooking position 

Hooking position

for top 

H=20mm


for top 

H=30mm

600mm min.

420mm min.

650mm min.

1
2
3
4
5
6
7
8
9
10
11
12
13
14
15
16
17
18
19
20
21
22
23
24
Оглавление инструкции
  • Страница 1 из 25
    7HPK 644 D GH X /HA 7HPKQ 644 D GH /HA 7HPK 755 D GH X/HA 7HPKQ 755 D GH /HA DFPK 644 GH English Operating Instructions HOB Contents Operating Instructions,1 Warnings,2 Assistance,4 Description of the appliance,5 Installation,6 Start-up and use,9 Precautions and tips,9 Maintenance and care,10
  • Страница 2 из 25
    Warnings WARNING: The appliance and its accessible parts become hot during use. Care should be taken to avoid touching heating elements. Children less than 8 years of age shall be kept away unless continuously supervised. This appliance can be used by children aged from 8 years and above and
  • Страница 3 из 25
    под высоким давлением для чистки изделия. Удалите жидкость из крышки перед открытием. Не закрывать стеклянную крышку (если имеется) с газовыми горелками или электрическая плита еще горячая.            
  • Страница 4 из 25
    Assistance Communicating: • appliance model (Mod.) • serial number (S/N) This information is found on the data plate located on the appliance and/or on the packaging. Сервисное обслуживание Перед тем как обратиться в Центр Технического Обслуживания: • Модель изделия (Мод.) • Номер тех. паспорта
  • Страница 5 из 25
    Description of the appliance Описание изделия Overall view 1. 2. 3. 4. 5. Общии вид Support Grid for COOKWARE GAS BURNERS Control Knobs for GAS BURNERS Ignition for GAS BURNERS SAFETY DEVICES 1. 2. 3. 4. 5. Опорные решетки для КАСТРЮЛЬ И СКОВОРОД ГАЗОВЫЕ КОНФОРКИ Регуляторы ГАЗОВЫХ КОНФОРОК Свеча
  • Страница 6 из 25
    ! Before operating your new appliance please read this instruction booklet carefully. It contains important information for safe use, installation and care of the appliance. ! Please keep these operating instructions for future reference. Pass them on to possible new owners of the appliance.
  • Страница 7 из 25
    Front Before connecting to the power supply, make sure that: GB • The appliance is earthed and the plug is compliant with the law. • The socket can withstand the maximum power of the appliance, which is indicated on the data plate. • The voltage is in the range between the values indicated on the
  • Страница 8 из 25
    GB Checking the tightness of the connection ! When the installation process is complete, check the pipe fittings for leaks using a soapy solution. Never use a flame. DATA PLATE Electrical see data plate connections ! Should the gas pressure used be different (or vary slightly) from the recommended
  • Страница 9 из 25
    Start-up and use Correct positioning of the FTGH burners GB ! The position of the corresponding gas burner is shown on every knob. Gas burners Each burner can be adjusted to one of the following settings using the corresponding control knob: ● Off Maximum Minimum To turn on one of the burners,
  • Страница 10 из 25
    GB • The openings used for ventilation and dispersion of heat must never be covered. • Always make sure the knobs are in the “●”/“○” position when the appliance is not in use. • When unplugging the appliance always pull the plug from the mains socket, do not pull on the cable. • Never carry out any
  • Страница 11 из 25
    • To clean the FTGH burner: GB 1 cream soap BRUSH Spazzolare Brosser 4 SCRUB Strofinare Frotter 3 DRY Asciugare Sécher 2 Avoid soaking NO ammollo Ne pas laisser tremper 40°C RINSE Risciacquare Rincer 1 Cepillar Escovar Borstelen Fırçalayın Прочистить щеткой Щеткамен тазалау Βούρτσισμα Očistit
  • Страница 12 из 25
    GB Gas tap maintenance Over time, the taps may become jammed or difficult to turn. If this happens, the tap must be replaced. ! This procedure must be performed by a qualified technician authorised by the manufacturer. Troubleshooting It may happen that the appliance does not function properly or
  • Страница 13 из 25
    Установка Или же воздухозабор может осуществляться из смежных помещении, оснащенных вентиляционным отверстием, сообщающимся с улицеи, как описано выше, при условии, что это не общие зоны здания, пожароопасные помещения и не спальни. ! Важно сохранить данное руководство для его последующих
  • Страница 14 из 25
    Электрическое подключение RS Варочные панели, оснащенные трехполярным сетевым кабелем, расчитаны на функционирование с переменным током с напряжением и частотои электропитания, указанными на паспортнои табличке (расположеннои снизу варочнои панели). Провод заземления сетевого кабеля имеет
  • Страница 15 из 25
    ! Производитель не несет ответственности за последствия несоблюдения перечисленных выше требовании. RS Подсоединение к газопроводу д а н н о е и зд ел и е м о ж ет б ы т ь у с т а н о вл е н о и использоваться только в помещениях с постояннои вентиляциеи в соответствии с положениями деиствующих
  • Страница 16 из 25
    RS Характеристики конфорок и форсунок Природный газ (Г13/13 мбар) Taблица 1 Диаметр Теплотворная (мм) способность кВт (p.c.s.*) Kонфорка Регуляциа првичного воздуха конфорок Байпас Форсунка Расход* 1/100 1/100 л/час (мм) (мм) Номин. Сокращ. (Г13) (мм) Большая (R) 157 3.00 1.00 80 143 286 10.6
  • Страница 17 из 25
    Включение и эксплуатация ! Н а к а ж д о и р у к о я т к е п о к а з а н о п ол о ж е н и е соответствующеи конфорки на варочнои панели. Газовые конфорки При помощи соответствующего регулятор можно выбрать один из следующих режимов конфорки: ●      
  • Страница 18 из 25
    RS • Не прикасаитесь к изделию влажными руками, босиком или с мокрыми ногами. • Изделие предназначено для приготовления пищевых продуктов, может быть использовано только взрослыми лицами в соответствии с инструкциями, приведенными в данном техническом руководстве. Любое другое его использование
  • Страница 19 из 25
    тряпкои и высушить духовку. Кроме того следует незамедлительно удалять возможные утечки воды. RS ! Н е и с п ол ь зо ва т ь н а г а зо в ы х ко н фо р к а х рассеиватели, тостеры или решетки для мяса из нержавеющей стали. 19
  • Страница 20 из 25
    RS • To clean the FTGH burner: 1 cream soap BRUSH Spazzolare Brosser 4 SCRUB Strofinare Frotter 3 DRY Asciugare Sécher 2 Avoid soaking NO ammollo Ne pas laisser tremper 40°C RINSE Risciacquare Rincer 1 Cepillar Escovar Borstelen Fırçalayın Прочистить щеткой Щеткамен тазалау Βούρτσισμα Očistit
  • Страница 21 из 25
    Уход за рукоятками газовои варочнои панели RS Со временем рукоятки варочнои панели могут заблокироваться или вращаться с трудом, поэтому потребуется произвести их внутреннюю чистку и замену всеи рукоятки. ! Данная операция должна выполняться техником, уполномоченным производителем. Неисправности и
  • Страница 22 из 25
    RS 22
  • Страница 23 из 25
    RS 23
  • Страница 24 из 25
    195114016.00 05/2013 - XEROX FABRIANO RS 24
  • Страница 25 из 25