Инструкция для HOTPOINT-ARISTON 7OFHR640

(скачивание инструкции бесплатно)
Формат файла: PDF
Доступность: Бесплатно как и все руководства на сайте. Без регистрации и SMS.
Дополнительно: Чтение инструкции онлайн
background image

6

GB

Installation

!

 Please keep this instruction booklet in a safe place for 

future reference. If the appliance is sold, given away or 

moved, please make sure the booklet is also passed on to 

the new owners so that they may benefit from the advice 

contained within it.

!

 Please read this instruction manual carefully: it contains 

important information concerning the safe operation, 

installation and maintenance of the appliance.

Positioning

!

 Do not let children play with the packaging material; it 

should be disposed of in accordance with local separated 

waste collection standards (see Precautions and tips).

!

 The appliance must be installed by a qualified professional 

in accordance with the instructions provided. Incorrect 

installation may damage property or cause harm to people 

or animals.

Built-in appliances

Use an appropriate cabinet to ensure that the appliance 

operates properly:

•  The panels adjacent to the oven must be made of heat-

resistant material.

•  Cabinets with a veneer exterior must be assembled with 

glues which can withstand temperatures of up to 100°C.

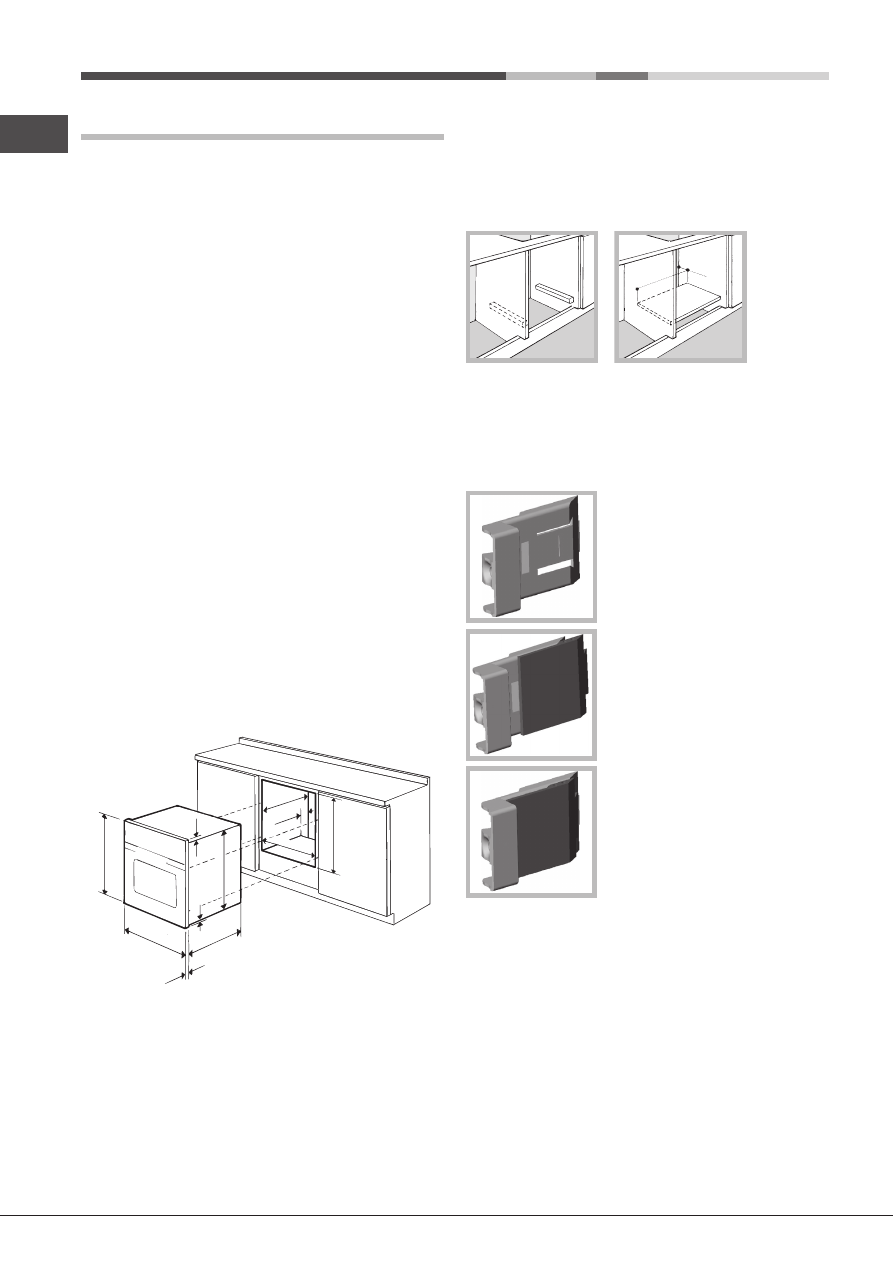
•  To install the oven 

under the counter

 (see diagram) or 

in a 

kitchen unit

, the cabinet must have the following 

dimensions:

595 mm.

595 mm.

25 mm.

545 mm.

5 mm.

567 mm.

23 mm.

575-585 mm.

45 mm.

558 mm.

547 mm. min.

!

 The appliance must not come into contact with electrical 

parts once it has been installed. 

The indications for consumption given on the data plate 

have been calculated for this type of installation.

Ventilation

To ensure adequate ventilation, the back panel of the 

cabinet must be removed. It is advisable to install the oven 

so that it rests on two strips of wood, or on a completely 

flat surface with an opening of at least 45 x 560 mm (see 

diagrams).


560 mm

.

45 mm.

Centring and fixing

Position the 4 tabs on the side of the oven so that they are 

lined up with the 4 holes on the outer frame. Adjust the 

tabs according to the thickness of the cabinet side panel, 

as shown below:

20 mm thick: take off the removable 

part of the tab (

see diagram

).;

18 mm thick: use the first groove, 

which has already been set in the 

factory (

see diagram

).

16 mm thick: use the second 

groove (

see diagram

).

Secure the appliance to the cabinet by opening the oven 

door and putting 4 screws into the 4 holes on the outer 

frame.

!

 All parts which ensure the safe operation of the appliance 

must not be removable without the aid of a tool.

Electrical connection

Ovens equipped with a three-pole power supply cable are 

designed to operate with alternating current at the voltage 

and frequency indicated on the data plate located on the 

appliance (see below).

1
2
3
4
5
6
7
8
9
10
11
12
13
14
15
16
17
18
19
20
Оглавление инструкции
  • Страница 1 из 21
    7OFHR 640 RU/HA S English Operating Instructions OVEN Contents Operating Instructions,1 Warnings,2 Assistance,3 Description of the appliance,4 Description of the appliance,5 Installation,6 Start-up and use,8 Modes,9 Precautions and tips,11 Maintenance and care,11 Русскии Руководство по эксплуатации
  • Страница 2 из 21
    Warnings Предупреждения WARNING: The appliance and its accessible parts become hot during use. Care should be taken to avoid touching heating elements. Children less than 8 years of age shall be kept away unless continuously supervised. This appliance can be used by children aged from 8 years and
  • Страница 3 из 21
    Assistance ! Never use the services of an unauthorised technician. Please have the following information to hand: • The type of problem encountered. • The appliance model (Mod.). • The serial number (S/N). The latter two pieces of information can be found on the data plate located on the appliance.
  • Страница 4 из 21
    Description of the appliance 9 Overall view 8 5 7 3 1. 2. 3. 4. 5. 6. 7. 8. 9. POSITION 1 POSITION 2 POSITION 3 POSITION 4 POSITION 5 GUIDES for the sliding racks DRIPPING PAN GRILL Control panel Описание изделия Общии вид 1. 2. 3. 4. 5. 6. 7. 8. 9. 4 ПОЛОЖЕНИЕ 1 ПОЛОЖЕНИЕ 2 ПОЛОЖЕНИЕ 3 ПОЛОЖЕНИЕ 4
  • Страница 5 из 21
    Description of the appliance Control panel 1. 2. 3. 4. 5. SELECTOR Knob TIMER Knob* Indicator light THERMOSTAT THERMOSTAT Knob COUNTRY STYLE TIMER Knob* * Only available in certain models. Описание изделия Панель управления 1. 2. 3. 4. 5. Рукоятка ПРОГРАММЫ Рукоятка ТАЙМЕРА* Индикатор ТЕРМОСТАТА
  • Страница 6 из 21
    Installation ! Please keep this instruction booklet in a safe place for future reference. If the appliance is sold, given away or moved, please make sure the booklet is also passed on to the new owners so that they may benefit from the advice contained within it. ! Please read this instruction
  • Страница 7 из 21
    Fitting the power supply cable 1. Open the terminal board by inserting a screwdriver into the side tabs of the cover. Use the screwdriver as a lever by pushing it down to open the cover (see diagram). L N 2. Install the power supply cable by loosening the cable clamp screw and the three wire
  • Страница 8 из 21
    GB Start-up and use pull (2). WARNING! The oven is provided with a stop system to extract the racks and prevent them from coming out of the oven (1). As shown in the drawing, to extract them completely, simply lift the racks, holding them on the front part, and ! The first time you use your
  • Страница 9 из 21
    Modes ! A temperature value can be set for all cooking modes between 60°C and Max, except for • GRILL (recommended: set only to MAX power level); • GRATIN (recommended: do not exceed 200°C). / / BAKING mode The rear heating element and the fan are switched on, thus guaranteeing the distribution of
  • Страница 10 из 21
    GB Cooking advice table Modes Foods Weight (in kg) Rack position Preheating time (minutes) Recommended temperature Cooking duration (minutes) 1 1 1 1 3 3 3 3 3 15 15 15 15 15 200 200 200 180 180 65-75 70-75 70-80 15-20 30-35 15 10 10 15 10 10 10 10 10 10 15 230 180 180 200 180 170 190 180 170 170
  • Страница 11 из 21
    Precautions and tips ! This appliance has been designed and manufactured in compliance with international safety standards. The following warnings are provided for safety reasons and must be read carefully. General safety • The appliance was designed for domestic use inside the home and is not
  • Страница 12 из 21
    GB detergent, then rinse well and dry with a soft cloth. Do not use abrasive products. • All accessories can be washed like everyday crockery, and are even dishwasher safe. • We recommend that detergents are not sprayed directly onto the control panel, but that a sponge is used instead. ! Never use
  • Страница 13 из 21
    Установка ! Важно сохранить данное руководство для его последующих консультации. В случае продажи, передачи изделия или при переезде на новое место жительства необходимо проверить, чтобы руководство оставалось вместе с изделием, для того чтобы его новыи владелец мог ознакомиться с правилами
  • Страница 14 из 21
    RS Электрическое подключение Духовые шкафы, укомплектованные трехполюсным сетевым кабелем, расчитаны на функционирование с переменным током с напряжением и частотой электропитания, указанными на паспортной табличке с данными (см. ниже). Подсоединение сетевого кабеля 1. Откройте зажимную коробку,
  • Страница 15 из 21
    Включение и эксплуатация ВНИМАНИЕ! Д уховой шк аф ук омплек то ва н системой бл окировки решеток, позволяющей вынимать их из духовки не полностью (1). Для полного вынимания р е ш ет о к д о с т а т о ч н о поднять их, как показано на схеме, взяв их за передний край, и потянуть на себя (2). ! При
  • Страница 16 из 21
    RS Символ ТАЙМЕР продолжает мигать в течение 10 секунд после последнего вращения рукоятки. Настройку можно подтвердить, нажав на рукоятку НАСТРОЙКА ЧАСОВ или по истечении 10 секунд, при условии, что была задана хотя бы 1 минута приготовления. Включенный символ ТАЙМЕР означает, что настройка
  • Страница 17 из 21
    ! При использовании ГРИЛЬ и ПОДРУМЯНИВАНИЕ, особенно с функцией вертела, поместите противень на 1-ый уровень для сбора жидкостей, выделяемого при жарке (сок и/или жир). • Рекомендуется выбрать максимальную мощность духовки. Не беспокойтесь, если верхний элемент не остается постоянно включенным: его
  • Страница 18 из 21
    RS Предосторожности и рекомендации ! Изделие спроектировано и изготовлено в соответствии с международными нормативами по безопасности. Необходимо внимательно прочитать настоящие предупреждения, составленные в целях вашеи безопасности. Общие требования к безопасности • Данное изделие предназначается
  • Страница 19 из 21
    Техническое обслуживание и уход Отключение электропитания Перед началом какой-либо операции по обслуживанию или чистке отсоедините изделие от сети электропитания. Чистка изделия • Причиной незначительных различий в оттенках на фасаде духового шкафа является использование разных материалов: стекла,
  • Страница 20 из 21
    195114221.00 05/2013 - XEROX FABRIANO RS Замена лампочки Замена лампочки в духовом шкафу:                        3       ! Не используйте
  • Страница 21 из 21