GB
11
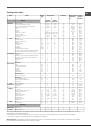
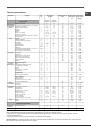
Modes
Foods
Weight
(Kg)
Preheating
Manual
standard
guide rails
sliding
guide rails
Multilevel*
Pizza on 2 racks
Pies on two racks/cakes on 2 racks
Sponge cake on 2 racks (on the dripping pan)
Roast chicken + potatoes
Lamb
Mackerel
Lasagne
Cream puffs on 3 racks
Biscuits on 3 racks
Cheese puffs on 2 racks
Savoury pies
1+1
1
1
1
2 and 4
2 and 4
2 and 4
1 and 2/3
2
1 or 2
2
2 and 4
1 and 3
1 and 3
1 and 3
1 and 3
1 and 3
1
1
1
1 and 3
1 and 3
yes
yes
yes
yes
yes
yes
yes
yes
yes
yes
yes
20-25
30-35
20-25
65-75
45-50
30-35
35-40
20-25
10-20
20-25
20-30
Grill*
Mackerel
Sole and cuttlefish
Squid and prawn kebabs
Cod fillet
Grilled vegetables
Veal steak
Sausages
Hamburgers
Toasted sandwiches (or toast)
Spit-roast chicken using rotisserie spit (where present)
Spit-roast lamb using rotisserie spit (where present)
1
0,7
0,7
0,7
0,5
0,8
0,7
n° 4 or 5
n° 4 or 6
1
1
4
4
4
4
3 or 4
4
4
4
4
-
-
3
3
3
3
2 or 3
3
3
3
3
-
-
no
no
no
no
no
no
no
no
no
no
no
300
300
300
300
300
300
300
300
300
300
300
15-20
10-15
8-10
10-15
15-20
15-20
15-20
10-12
3-5
70-80
70-80
Fan grilling*
Grilled chicken
Cuttlefish
Spit-roast chicken using rotisserie spit (where present)
Spit-roast duck using rotisserie spit (where present)
Roast veal or beef
Roast pork
Lamb
1,5
1
1,5
1,5
1
1
1
2
2
-
-
2
2
2
2
2
-
-
2
2
2
no
no
no
no
no
no
no
210
200
210
210
210
210
210
55-60
30-35
70-80
60-70
60-75
70-80
40-45
Fast cooking*
Frozen food
Pizza
Courgette and prawn pie
Country style spinach pie
Turnovers
Lasagne
Golden rolls
Chicken bites
0.3
0.4
0.5
0.3
0.5
0.4
0.4
2
2
2
2
2
2
2
1
1
1
1
1
1
1
-
-
-
-
-
-
-
250
200
220
200
200
180
220
12
20
30-35
25
35
25-30
15-20
Pre-cooked food
Golden chicken wings
0.4
2
1
-
200
20-25
Fresh Food
Biscuits (shortcrust pastry)
Sponge cake made with yoghurt
Cheese puffs
0.3
0.6
0.2
2
2
2
1
1
1
-
-
-
200
180
210
15-18
45
10-12
Low
temperature*
Baking*
Tarts
Fruit cakes
Sponge cake made with yoghurt
Small cakes on 2 racks
Sponge cake
Cream puffs on 3 racks
Biscuits on 3 racks
Filled pancakes
Meringues on 3 racks
Cheese puffs
0,5
1
0,7
0,7
0,6
0,7
0,7
0,8
0,5
0,5
2 or 3
2 or 3
2 or 3
2 and 4
2 or 3
1, 3 and 5
1, 3 and 5
2
1, 3 and 5
2
1 or 2
1 or 2
1 or 2
1 and 3
1 or 2
1, 2 and 4
1, 2 and 4
1
1, 2 and 4
1
yes
yes
yes
yes
yes
yes
yes
yes
yes
yes
180
180
170-180
180-190
160-170
180-190
180
200
90
210
25-35
40-50
45-55
20-25
30-40
20-25
20-25
30-35
180
20-25
Pizza*
Pizza
Focaccia bread
0,5
0,5
2
2
1
1
yes
yes
15-20
20-25
Automatic**
Baked cakes
Baked cakes
1
2 or 3
2
no
Bread***
Bread (see recipe)
1
1 or 2
1
no
* The cooking times listed above are intended as guidelines only and may be modified according to personal tastes. Oven preheating times are set as
standard and may not be modified manually.
** The duration of the automatic cooking functions are set by default. The values can be modified by the user, starting with the default duration.
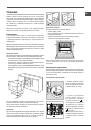
*** As stated in the recipe, pour 50 g (0,5 dl) water into the dripping pan in position 5.
! ECO programme:
This programme guarantees sensible energy saving – is recommended for dishes such as fish fillets, small pastries and vegetables.
It is also suitable for warming foodstuffs and for completing cooking.
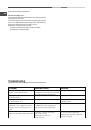
Cooking advice table
Rack position
Recommended
Temperature
(°C)
Cooking
duration
(minutes)
1 and 3 and 5
1 and 3 and 5
1 and 2 and 4
1 and 2 and 4
210-220
190-200
210-220
180
160-170
200-210
190-200
180
180-190
190
180
210
190-200
Proving / Defrosting
White meringues
Meat / Fish
-
-
-
2
2
2
1
1
1
no
no
no
40
65
90
-
8-12 ore
90-180