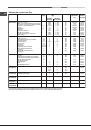
Инструкция для HOTPOINT-ARISTON MH 99.1 IX

(скачивание инструкции бесплатно)
Формат файла: PDF
Доступность: Бесплатно как и все руководства на сайте. Без регистрации и SMS.
Дополнительно: Чтение инструкции онлайн
background image

16

IT

 Programma 

BARBECUE

Ruotando la manopola TERMOSTATO, il display indicherà 

livelli di potenza impostabili, che vanno da 50% fino a 100%. 

La temperatura elevata e diretta del grill è consigliata per gli 

alimenti che necessitano di un’alta temperatura superficiale. 

Effettuare le cotture con la porta del forno chiusa.

 Programma 

GRATIN

Si attiva l’elemento riscaldante superiore e durante  una 

parte del ciclo anche l’elemento riscaldante circolare, 

entrano in funzione la ventola e il girarrosto (ove presente). 

Unisce all’irradiazione termica unidirezionale la circolazione 

forzata dell’aria all’interno del forno. 

Ciò  impedisce  la  bruciatura  superficiale  degli  alimenti 

aumentando il potere di penetrazione del calore. Effettuare 

le cotture con la porta del forno chiusa.

 Programma 

BASSA TEMPERATURA

Questo tipo di cottura consente di lievitare, scongelare, di 

preparare lo yogurth, riscaldare più o meno rapidamente, 

cuocere lentamente a bassa temperatura. Le temperature 

selezionabili sono: 40, 65, 90 °C.
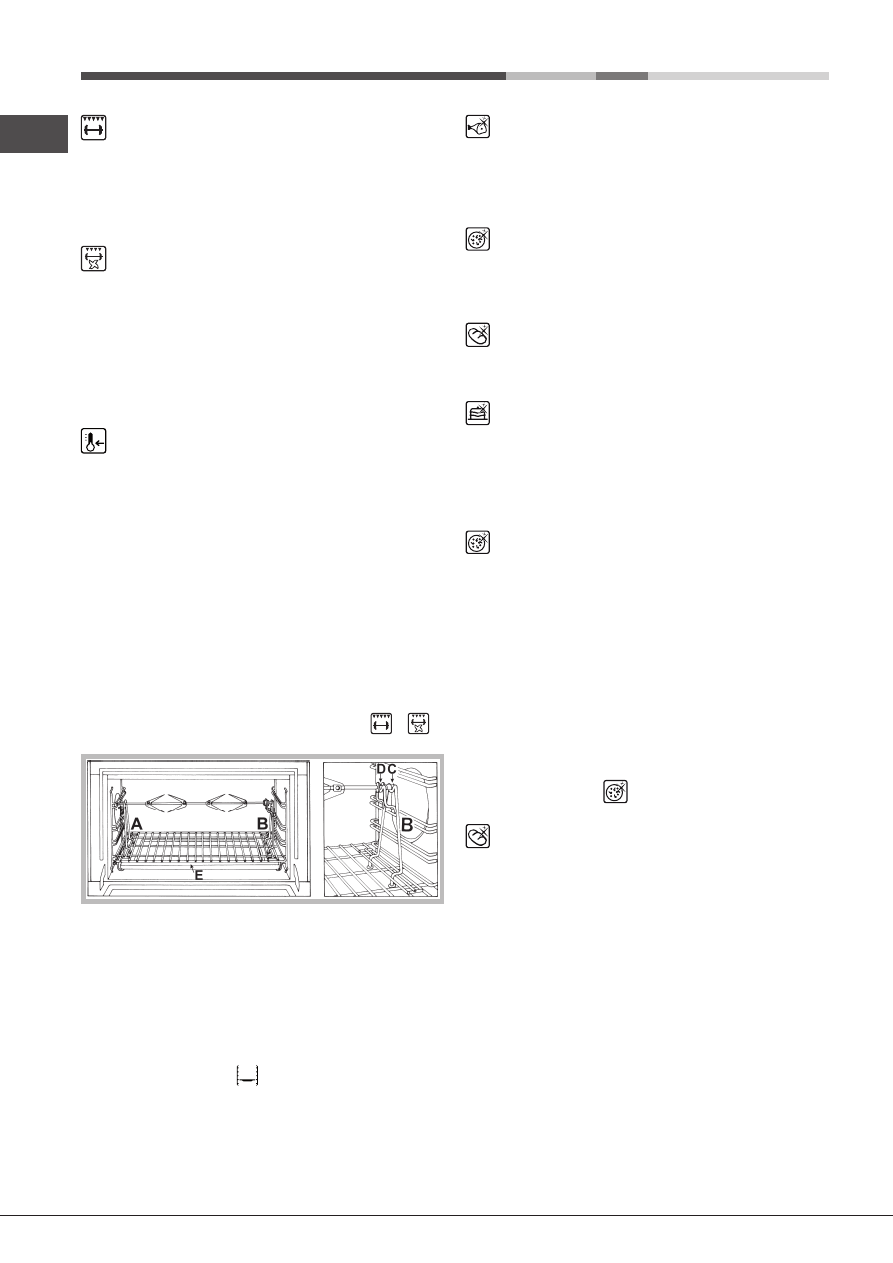
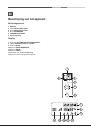
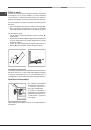
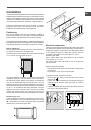
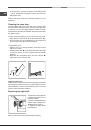
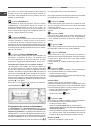
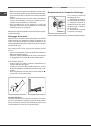
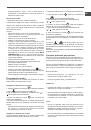
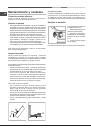
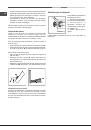
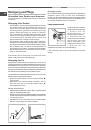
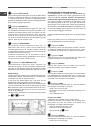
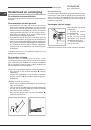
Girarrosto

Questo accessorio è da utilizzare esclusivamente per 

cotture  al  grill.  Procedere  come  segue:  infilare  la  carne 

da cuocere nell’asta trasversale, nel senso della sua 

lunghezza, bloccandola con le apposite forchette regolabili. 

Introdurre i supporti “

A

” e “

B

” nei fori predisposti sulla 

leccarda “

E

”, appoggiare la gola dell’asta sulla sede “

C

” 

e infilare la griglia nella prima guida più bassa del forno; 

infilare ora l’asta nel foro del girarrosto, portando in avanti 

la gola nella sede “

D

” (vedi figure). Azionare il girarrosto 

selezionando con la manopola PROGRAMMI 

 o 

;

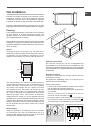
Programmi di cottura automatici

!

 Le 

temperature 

sono 

prestabilite

 e non possono essere 

modificate  tramite  il  sistema 

C.O.P.® (Cottura Ottimale 

Programmata)

 che garantisce automaticamente un 

risultato perfetto. La cottura si interrompe automaticamente 

e il forno avvisa quando la pietanza è cotta. La cottura può 

essere effettuata infornando a 

freddo 

o a 

caldo

;  per  il 

posizionamento della teglia si consiglia di far riferimento al 
livello indicato dall’icona 

.

!

 Al raggiungimento della fase di cottura il forno emette un 

segnale acustico.

!

 Non aprite la porta forno per evitare di falsare i tempi e le 

temperature di esecuzione delle cotture.

 Programma 

CARNE

Utilizzare questa funzione per cuocere carni di vitello, 

maiale, agnello. Infornare a forno freddo. E’ comunque 

possibile infornare anche a forno caldo.

!

 E’ possibile modificare la durata della cottura ±10 minuti.

 Programma 

PIZZA

Utilizzare questa funzione per realizzare della pizza. Fare 

riferimento al capitolo seguente per la ricetta e dettagli.

!

 E’ possibile modificare la durata della cottura ±5 minuti.

 Programma 

PANE

Utilizzare questa funzione per realizzare del pane. Fare 

riferimento al capitolo seguente per la ricetta e dettagli.

 Programma 

DOLCI

Questa funzione è ideale per la cottura di dolci sia a base di 

lievito naturale, sia a base di lievito chimico e senza lievito.

Infornare a forno freddo. E’ comunque possibile infornare 

anche a forno caldo.

!

 E’ possibile modificare la durata della cottura ±10 minuti.

 Programma 

PIZZA

Per ottenere i migliori risultati vi consigliamo di seguire 

attentamente le indicazioni sotto riportate:

•  rispettare la ricetta;

•  il peso dell’impasto deve essere da 500g a 700g.

•  imburrare leggermente la leccarda.

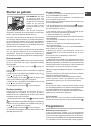
Ricetta per la PIZZA :

1 Leccarda, Ripiano basso, a Forno Freddo o Caldo

Ricetta per 3 pizze di circa 550g : 1000g Farina, 500g 

Acqua, 20g Sale, 20g Zucchero, 10cl Olio di Oliva, 20g 

lievito fresco (oppure 2 bustini in polvere)

•  Lievitazione nell’ ambiente : 1 ora.

•  Infornare a forno freddo o caldo
•  Lanciare la cottura 

 PIZZA

 Programma 

PANE

Per ottenere i migliori risultati vi consigliamo di seguire 

attentamente le indicazioni sotto riportate:

•  rispettare la ricetta;

•  il 

peso massim

o per leccarda;

• 

non dimenticare di mettere 1,5 dl di acqua fredda 

sulla leccarda alla posizione 5

;

•  la  lievitazione  del  impasto    va  fatto  a  temperatura 

ambiante per 1 ora o 1 ora e mezzo, in funzione della 

temperatura della stanza, e in pratica, fino al raddoppio 

del impasto.

Ricetta per il PANE :

1 Leccarda di 1000g Max, Ripiano basso

2 Leccarde di 1000g Max, Ripiani basso e medio

Ricetta per 1000g d’impasto : 600g Farina, 360g Acqua, 

11g Sale, 25g lievito fresco (oppure 2 bustini in polvere)

Processo:

1
2
3
4
5
6
7
8
9
10
11
12
13
14
15
16
17
18
19
20
21
22
23
24
25
26
27
28
29
30
31
32
33
34
35
36
37
38
39
40
41
42
43
44
45
46
47
48
49
50
51
52
53
54
55
56
57
58
59
60
61
62
63
64
65
66
67
68
Оглавление инструкции
  • Страница 1 из 69
    MH 99.1 IX/HA S Français Mode d’emploi FOUR Sommaire Mode d’emploi,1 Avertissements,4 Assistance,7 Description de l’appareil,9 Description de l’appareil,10 Installation,29 Mise en marche et utilisation,31 Programmes,31 Précautions et conseils,35 Nettoyage et entretien,35 Italiano Español Istruzioni
  • Страница 2 из 69
    Deutsch Bedienungsanleitung BACKOFEN Inhaltsverzeichnis Bedienungsanleitung,2 Hinweise,5 Kundendienst,8 Beschreibung Ihres Gerätes,9 Beschreibung Ihres Gerätes,11 Installation,53 Inbetriebsetzung und Gebrauch,55 Programme,56 Vorsichtsmaßregeln und Hinweise,59 Reinigung und Pflege,60 Nederlands
  • Страница 3 из 69
    Avvertenze Warnings ATTENZIONE: Questo apparecchio e le sue parti accessibili diventano molto caldi durante l’uso. Bisogna fare attenzione ed evitare di toccare gli elementi riscaldanti. Tenere lontani i bambini inferiori agli 8 anni se non continuamente sorvegliati. Il presente apparecchio può
  • Страница 4 из 69
    Avertissements Advertencias ATTENTION : Cet appareil ainsi que ses parties accessibles deviennent très chauds pendant leur fonctionnement. Il faut faire attention à ne pas toucher les éléments chauffants. Ne pas faire approcher les enfants de moins de 8 ans à moins qu’ils ne soient sous
  • Страница 5 из 69
    Advertências Hinweise ATENÇÃO: Este aparelho e as suas partes acessíveis aquecem muito durante a utilização. É preciso ter atenção e evitar tocar os elementos que aquecem. Manter afastadas as crianças com menos de 8 anos, caso não estejam a ser vigiadas. O presente aparelho pode ser utilizado por
  • Страница 6 из 69
    Belangrijk PAS OP: Dit apparaat en zijn bereikbare onderdelen worden tijdens gebruik zeer heet. Zorg ervoor de verwarmende elementen niet aan te raken. Zorg ervoor dat kinderen die kleiner dan 8 jaar oud zijn niet dichtbij het apparaat kunnen komen, tenzij onder constant toezicht. Het huidige
  • Страница 7 из 69
    Assistenza Attenzione: L’apparecchio è dotato di un sistema di diagnostica automatica che consente di rilevare eventuali malfunzionamenti. Questi vengono comunicati dal display tramite messaggi del tipo: “F” seguito da numeri. In questi casi è necessario l’intervento dell’assistenza tecnica. ! Non
  • Страница 8 из 69
    Esta información se encuentra en la placa de características colocada en el aparato. La siguiente información es válida solo para España. Para otros países de habla hispana consulte a su vendedor. Ampliación de garantía Llame al 902.363.539 y le informaremos sobre el fantástico plan de ampliación
  • Страница 9 из 69
    Descrizione dell’apparecchio Beschreibung Ihres Gerätes Vista d’insieme Geräteansicht 1 Pannello di controllo 2 Vetro porta forno 1 Bedienfeld 2 Backofentürfenster Description of the appliance Beschrijving van het apparaat Overall view Algemeen aanzicht 1 Control panel 2 Glass oven door 1
  • Страница 10 из 69
    Descrizione dell’apparecchio Description de l’appareil Pannello di controllo Tableau de bord 1 2 3 4 5 6 1 2 3 4 5 6 DISPLAY Tasto IMPOSTAZIONE TEMPI Manopola IMPOSTAZIONE TEMPI Manopola PROGRAMMI Manopola TERMOSTATO Tasto LUCE AFFICHEUR Touche SELECTION TEMPS Bouton SELECTION TEMPS Bouton
  • Страница 11 из 69
    Descripción del aparato Beschreibung Ihres Gerätes Panel de control Bedienfeld 1 2 3 4 5 6 1 2 3 4 5 6 DISPLAY Botón FIJACIÓN DE TIEMPOS Mando de FIJACIÓN DE TIEMPOS Mando PROGRAMAS Mando TERMOSTATO Botón LUZ DEL HORNO DISPLAY Taste ZEITEINSTELLUNG Drehknopf ZEITEINSTELLUNG Drehknopf PROGRAMME
  • Страница 12 из 69
    Beschrijving van het apparaat Bedieningspaneel 1 2 3 4 5 6 DISPLAY Toets INSTELLEN TIJDEN Knop INSTELLEN TIJDEN Knop PROGRAMMI THERMOSTAATKNOP Ovenverlichting Display 7 Symbolen AUTOMATISCHE/PROGRAMMA’S 8 Cijfers TEMPERATUREN en TIJDEN 9 Symbool KLOK 10 Symbool EINDE BEREIDING 11 Symbool DUUR 12
  • Страница 13 из 69
    Installazione IT ! È importante conservare questo libretto per poterlo consultare in ogni momento. In caso di vendita, di cessione o di trasloco, assicurarsi che resti insieme all’apparecchio per informare il nuovo proprietario sul funzionamento e sui relativi avvertimenti. ! L’installazione va
  • Страница 14 из 69
    IT Allacciamento del cavo di alimentazione alla rete Montare sul cavo una spina normalizzata per il carico indicato sulla targhetta caratteristiche, nel caso di collegamento diretto alla rete è necessario interporre tra l’apparecchio e la rete un interruttore omnipolare con apertura minima fra i
  • Страница 15 из 69
    Avvio e utilizzo parte anteriore e tirarle. (2) 3. Quando si spegne l’indicatore del preriscaldamento ATTENZIONE! Il forno è dotato di un sistema di arresto griglie che consente di estrarle senza che queste fuoriescano dal forno. (1) Per estrarre completamente le griglie è sufficiente, come
  • Страница 16 из 69
    IT Programma BARBECUE Ruotando la manopola TERMOSTATO, il display indicherà livelli di potenza impostabili, che vanno da 50% fino a 100%. La temperatura elevata e diretta del grill è consigliata per gli alimenti che necessitano di un’alta temperatura superficiale. Effettuare le cotture con la porta
  • Страница 17 из 69
    • • • • • • • • • • • Mescolare la farina ed il sale in un grande recipiente. Diluire il lievito nell’acqua leggermente tiepida (circa 35 gradi). Aprite la farina a fontana. Versare il miscuglio di acqua e lievito Lavorare fino ad ottenimento di un impasto omogeneo e poco colloso, stirandolo col
  • Страница 18 из 69
    IT Tabella cottura in forno Programmi Alimenti Peso (Kg) Peso (Kg) guide guide standard scorrevoli Multilivello* Barbecue* Gratin* Pizza su 2 ripiani Crostate su 2 ripiani/torte su 2 ripiani Pan di spagna su 2 ripiani (su leccarda) Pollo arrosto + patate Agnello Sgombro Lasagne Bignè su 2 ripiani
  • Страница 19 из 69
    Precauzioni e consigli ! L’apparecchio è stato progettato e costruito in conformità alle norme internazionali di sicurezza. Queste avvertenze sono fornite per ragioni di sicurezza e devono essere lette attentamente. Sicurezza generale • L’apparecchio è stato concepito per un uso di tipo non
  • Страница 20 из 69
    IT Pulire la porta Pulire il vetro della porta con spugne e prodotti non abrasivi e asciugare con un panno morbido; non usare materiali ruvidi abrasivi o raschietti metallici affilati che possono graffiare la superficie e causare la frantumazione del vetro. Per una pulizia più accurata è possibile
  • Страница 21 из 69
    Installation GB ! Please keep this instruction booklet in a safe place for future reference. If the appliance is sold, given away or moved, please make sure the booklet is also passed on to the new owners so that they may benefit from the advice contained within it. 472 mm 0 ! Do not let children
  • Страница 22 из 69
    GB Connecting the supply cable to the mains Install a standardised plug corresponding to the load indicated on the data plate. When connecting the cable directly to the mains, install an omnipolar circuit-breaker with a minimum contact opening of 3 mm between the appliance and the mains. The
  • Страница 23 из 69
    Start-up and use WARNING! The oven is provided with a stop system to extract the racks and prevent them from coming out of the oven (1). As shown in the drawing, to extract them completely, simply lift the racks, holding them on the front part, and pull (2). ! The first time you use your appliance,
  • Страница 24 из 69
    GB In the BARBECUE mode, the default power level value is indicated as a percentage (%) And may also be adjusted manually. MULTILEVEL mode All heating elements and the fan are activated. Since the heat remains constant throughout the oven, the air cooks and browns food in a uniform manner. A
  • Страница 25 из 69
    BREAD mode To obtain the best results, we recommend that you carefully observe the instructions below: • Follow the recipe. • Do not exceed the maximum weight of the dripping pan. • Remember to pour 1,5 dl of cold water into the baking tray in position 5. • The dough must be left to rise at room
  • Страница 26 из 69
    GB Oven cooking advice table Cooking modes Foods Weight (Kg) Weight (Kg) standard sliding guide rails guide rails Multilivel* Barbecue* Gratin* Pizza on 2 racks Pies on two racks/cakes on 2 racks Sponge cake on 2 racks (on the dripping pan) Roast chicken + potatoes Lamb Mackerel Lasagne Cream puffs
  • Страница 27 из 69
    Precautions and tips ! This appliance has been designed and manufactured in compliance with international safety standards. The following warnings are provided for safety reasons and must be read carefully. General safety • The appliance was designed for domestic use inside the home and is not
  • Страница 28 из 69
    GB • All accessories - with the exception of the sliding racks - can be washed like everyday crockery, and are even dishwasher safe. ! Never use steam cleaners or pressure cleaners on the appliance. Cleaning the oven door Clean the glass part of the oven door using a sponge and a non-abrasive
  • Страница 29 из 69
    Installation ! Les emballages ne sont pas des jouets pour enfants, il faut les mettre au rebut en respectant la réglementation sur le tri sélectif des déchets (voir Précautions et conseils). ! L’installation doit être effectuée par un professionnel du secteur conformément aux instructions du
  • Страница 30 из 69
    FR Branchement du câble d’alimentation au réseau électrique Montez sur le câble une fiche normalisée pour la charge indiquée sur la plaquette des caractéristiques; en cas de branchement direct au réseau, intercalez entre l’appareil et l’installation électrique un interrupteur omnipolaire ayant au
  • Страница 31 из 69
    Mise en marche et utilisation Pour modifier la température, tourner le bouton THERMOSTAT. AT T E N T I O N ! L e f o u r est équipé d’un système d’arrêts de grilles qui permet de les retirer sans que ces dernières sortent entièrement du four (1). Pour sortir complètement les grilles il suffit,
  • Страница 32 из 69
    FR de la turbine. La chaleur est constante et bien répartie à l’intérieur du four, l’air cuit et dore de façon uniforme en tous points. Il est possible de cuire au maximum sur deux niveaux en même temps. ! Un bip signale que la cuisson est terminée. Programme BARBECUE La résistance de voûte est
  • Страница 33 из 69
    2 Plaques de 1000g Maxi. gradins du bas et du milieu Recette pour 1000g de pâte : 600g de farine, 360g d’eau, 11g de sel, 25g de levure de boulanger fraîche (ou bien 2 sachets en poudre) Procédé : • Mélanger la farine et le sel dans un grand récipient. • Diluer la levure de boulanger dans de l’eau
  • Страница 34 из 69
    FR Tableau de cuisson au four Programmes Aliments Multiniveaux* Pizza sur 2 niveaux Tartes sur 2 niveaux/gâteaux sur 2 niveaux Génoise sur 2 niveaux (sur plateau émaillé) Poulet rôti + pommes de terre Agneau Maquereau Lasagnes Choux sur 2 niveaux Biscuits sur 2 niveaux Friands au fromage sur 2
  • Страница 35 из 69
    Précautions et conseils ! Cet appareil a été conçu et fabriqué conformément aux normes internationales de sécurité. Ces conseils sont fournis pour des raisons de sécurité et doivent être lus attentivement. Sécurité générale • Cet appareil a été conçu pour un usage familial, de type non
  • Страница 36 из 69
    FR • Nettoyer l’enceinte après toute utilisation, quand le four est encore tiède. Utiliser de l’eau chaude et du détergent, rincer et essuyer avec un chiffon doux. Eviter tout produit abrasif. • Tous les accessoires peuvent être lavés normalement comme de la vaisselle courante et passent au
  • Страница 37 из 69
    Instalación ! Es importante conservar este manual para poder consultarlo en todo momento. En caso de venta, de cesión o de mudanza, verifique que permanezca junto al aparato para informar al nuevo propietario sobre su funcionamiento y sobre las advertencias correspondientes. Clavado Introduzca el
  • Страница 38 из 69
    ! Una vez instalado el aparato, el cable eléctrico y la toma de corriente deben ser fácilmente accesibles. ES ! El cable no debe sufrir pliegues ni compresiones. ! El cable debe ser revisado periódicamente y sustituido sólo por técnicos autorizados (ver Asistencia). N L Conexión del cable de
  • Страница 39 из 69
    Puesta en funcionamiento y uso la parte delantera y tirar (2). ATENCIÓN! El horno está dotado de un sistema de bloqueo de las parrillas que permite quitarlas sin que sobresalgan del horno (1). Para quitar completamente las parrillas, como se indica en el dibujo, es suficiente levantarlas
  • Страница 40 из 69
    ES constante en todo el horno, el aire cocina y tuesta la comida de modo uniforme. Es posible utilizar hasta un máximo de dos niveles simultáneamente. Programa BARBACOA Se enciende el elemento calentador superior. Girando el mando TERMOSTATO, el DISPLAY indicará los posibles niveles de potencia que
  • Страница 41 из 69
    ambiente durante 1 hora o 1 hora y media según la temperatura de la habitación y hasta que alcance el doble de la masa inicial. Receta para el PAN : 1 Grasera de 1000g como máximo, Nivel bajo 2 Graseras de 1000g como máximo, Niveles bajo y medio Receta para 1000g de masa: 600g de Harina, 360g de
  • Страница 42 из 69
    ES Tabla de cocción en el horno Programas Alimentos Multinivel* Pizza en 2 niveles Tortas glaseadas en 2 niveles/tortas en 2 niveles Bizcocho en 2 niveles (sobre una grasera) Pollo asado + patatas Cordero Caballa Lasañas Hojaldre relleno con crema en 2 niveles Bizcochos en 2 niveles Bizcochitos
  • Страница 43 из 69
    Precauciones y consejos ! El aparato ha sido proyectado y fabricado en conformidad con las normas internacionales de seguridad. Estas advertencias se suministran por razones de seguridad y deben ser leídas atentamente. Seguridad general • El aparato ha sido fabricado para un uso de tipo no
  • Страница 44 из 69
    ES Mantenimiento y cuidados Cortar la corriente eléctrica Antes de realizar cualquier operación, desconecte el aparato de la red de alimentación eléctrica. Limpiar el aparato • Las partes externas esmaltadas o de acero inoxidable y las juntas de goma se pueden limpiar con una esponja empapada en
  • Страница 45 из 69
    Instalação ! É importante guardar este folheto para poder consultá-lo a qualquer momento. No caso de venda, cessão ou mudança, assegure-se que o mesmo permanece com o aparelho para informar o novo proprietário sobre o funcionamento e sobre as respectivas advertências. Fixação Introduza a
  • Страница 46 из 69
    ! O cabo deve ser verificado periodicamente e substituído somente por técnicos autorizados (veja a Assistência Técnica). PT ! A empresa exime-se de qualquer responsabilidade se estas regras não forem obedecidas. PLACA DAS CARACTERÍSTICAS N L Ligação do cabo de alimentação à rede Monte uma ficha
  • Страница 47 из 69
    Início e utilização ATENÇÃO! O forno está equipado com um sistema de bloqueio das grelhas que permite retirá-las sem que estas ressaiam do forno (1). Para retirar completamente as grelhas, tal como indicado no desenho, basta levantá-las, segurando-as pela parte da frente, e puxá-las (2). ! Quando o
  • Страница 48 из 69
    PT Programa de MULTINÍVEL Ligam-se todos os elementos aquecedores e entra em funcionamento a ventoinha. Como o calor é constante e uniforme em todo o forno, o ar coze e cora os alimentos de maneira uniforme. É possível utilizar até duas prateleiras no máximo contemporaneamente. Programa de BARBECUE
  • Страница 49 из 69
    ambiente por 1 hora ou 1 hora e meia, em função da temperatura da cozinha, e em prática, até a massa dobrar o seu volume. Receita para o PÃO: 1 Bandeja pingadeira de 1.000 g. Máx., prateleira baixa 2 Bandejas pingadeiras de 1000g Máx, prateleiras baixa e média Receita para 1000 g. de massa: 600 g.
  • Страница 50 из 69
    PT Tabela de cozedura no forno Programas Multinível Barbecue* Gratin* Alimentos Pizza em 2 prateleiras Tortas doces em duas prateleiras/bolos em duas prateleiras Pão-de-ló em 2 prateleiras (na bandeja pingadeira) Frango assado com batatas Cordeiro Cavala Lasanha Bignés em 2 prateleiras Biscoitos em
  • Страница 51 из 69
    Precauções e conselhos ! Este aparelho foi projectado e fabricado em conformidade com as normas internacionais de segurança. Estas advertências são fornecidas por razões de segurança e devem ser lidas com atenção. Segurança geral • Este aparelho foi concebido para utilização de tipo não
  • Страница 52 из 69
    PT • O interior do forno deve ser sempre limpo de preferência depois de cada utilização, enquanto ainda estiver morno. Utilize água quente e detergente, enxagúe e enxugue com um pano macio. Evite abrasivos. • Os acessórios podem ser lavados como quaisquer utensílios, inclusive numa máquina de
  • Страница 53 из 69
    Installation 0 n. 55 0m m 52 mi mm 475 mm 85 469 mm ! Lesen Sie bitte folgende Hinweise aufmerksam durch, sie liefern wichtige Informationen hinsichtlich der Installation, dem Gebrauch und der Sicherheit. m 0m 86 472 mm ! Bewahren Sie diese Bedienungsanleitung bitte sorgfältig auf, damit Sie sie
  • Страница 54 из 69
    DE Anschluß des Versorgungskabels an das Stromnetz Versehen Sie das Kabel mit einem Normstecker für die auf dem Typenschild angegebene Belastung; wird das Gerät direkt an das Stromnetz angeschlossen, ist ein allpoliger Schalter mit einer Mindestöffnung von 3 mm, der der Strombelastung und den
  • Страница 55 из 69
    Inbetriebsetzung und Gebrauch ACHTUNG! Der Ofen ist mit einem Arretierungssystem der Roste ausgestattet. Damit lassen diese sich ausziehen, ohne aus dem Ofen hervorzustehen (1). Um die Roste komplett auszuziehen, braucht man sie nur, wie auf der Zeichnung zu sehen, vorne zu greifen und zu ziehen
  • Страница 56 из 69
    DE Programme Manuelle Garprogramme ! Für alle Programme ist eine Gartemperatur voreingestellt. Diese kann von Hand auf einen beliebigen Wert zwischen 40°C und 250°C verändert werden. Bei dem Programm GRILL ist der voreingestellte Wert eine in % angegebene Leistungsstufe. Auch diese lässt sich
  • Страница 57 из 69
    • Aufgehen bei Raumtemperatur: 1 Stunde. • Schieben Sie die Pizza in den kalten oder vorgeheizten Backofen ein. • Starten Sie das Garprogramm PIZZA. Programm BROT Für optimale Ergebnisse befolgen Sie bitte aufmerksam die nachfolgend aufgeführten Anweisungen: • Halten Sie sich bitte an das Rezept. •
  • Страница 58 из 69
    DE GRILL • Schieben Sie den Grillrost in die Position 3 oder 4 ein und geben Sie die zu garenden Speisen in die Mitte des Grillrostes. • Es empfiehlt sich, die höchste Energiestufe zu verwenden. Im Übrigen ist es bei dieser Funktion völlig normal, dass das obere Heizelement nicht ständig rot glüht:
  • Страница 59 из 69
    Vorsichtsmaßregeln und Hinweise ! Das Gerät wurde entsprechend den strengsten internationalen Sicherheitsvorschriften entworfen und gebaut. Nachstehende Hinweise werden aus Sicherheitsgründen geliefert und sollten aufmerksam gelesen werden. Allgemeine Sicherheit • Dieses Gerät ist für den nicht
  • Страница 60 из 69
    DE Reinigung und Pflege Abschalten Ihres Gerätes vom Stromnetz Vor jeder Reinigung und Pflege ist das Gerät vom Stromnetz zu trennen. Dichtungen prüfen Den Zustand der Dichtung an der Backofentür in regelmäßigen Abständen prüfen. Sich im Falle einer beschädigten Dichtung an die nächstgelegene
  • Страница 61 из 69
    Het installeren NL ! Bewaar dit boekje zorgvuldig voor eventuele verdere raadpleging. Wanneer u het product weggeeft, verkoopt, of wanneer u verhuist, dient u dit boekje bij het apparaat te bewaren zodat alle nodige informatie voorhanden blijft. ! Lees de gebruiksaanwijzingen zorgvuldig door: er
  • Страница 62 из 69
    NL Het aansluiten van de voedingskabel aan het net Bevestig een stekker op de voedingskabel, die geschikt is voor de lading die aangegeven wordt op het typeplaatje. In het geval er een directe aansluiting aan het net plaats-vindt, moet men tussen het apparaat en het net een veelpolige schakelaar
  • Страница 63 из 69
    Starten en gebruik De oven starten BELANGRIJK! De oven is uitgerust met een blokkeringssysteem voor de grill dat het mogelijk maakt om de gril naar buiten te trekken zonder dat deze buiten de oven komt (1). Om de grill volledig te verwijderen, de grill aan de voorkant optillen en naar buiten
  • Страница 64 из 69
    NL Programma MULTILEVEL Alle verwarmingselementen gaan aan en de ventilator treedt in werking. Aangezien de warmte in de hele oven constant is, zorgt de lucht dat de gerechten op gelijkmatige wijze gekookt en gebakken worden. Hier is het mogelijkmaximaal twee roosters tegelijk te gebruiken.
  • Страница 65 из 69
    • het maximum gewicht per bakplaat; • vergeet niet 1 dl koud water te gieten in de bakplaat op stand 5; • het deeg moet circa 1 tot 1½ uur op kamertemperatuur rijzen. De exacte duur hangt af van de kamertemperatuur. Het deeg is voldoende gerezen als het volume is verdubbeld. Recept voor BROOD: 1
  • Страница 66 из 69
    NL PIZZA • Gebruik een lichte aluminium ovenschaal en zet hem op het bijgeleverde ovenrooster. Bij gebruik van de lekplaat is de bereidingstijd langer en krijgt u waarschijnlijk geen krokante pizza. • Bij zeer gevulde pizza’s raden wij aan de mozzarella of andere kaas pas halverwege de kooktijd toe
  • Страница 67 из 69
    Voorzorgsmaatregelen en advies ! Dit apparaat is ontworpen en vervaardigd volgens de geldende internationale veiligheidsvoorschriften. Deze aanwijzingen zijn geschreven voor uw veiligheid en u dient ze derhalve goed door te nemen. Algemene veiligheidsmaatregelen • Dit apparaat is vervaardigd voor
  • Страница 68 из 69
    195114063.00 06/2013 - XEROX FABRIANO NL Onderhoud en verzorging De elektrische stroom afsluiten Sluit altijd eerst de stroom af voordat u tot enige handeling overgaat. Het controleren van de afdichtingen Controleer regelmatig de staat van de afdichtingen rondom de ovendeur. In het geval de
  • Страница 69 из 69