18
GB
!
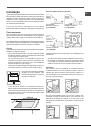
Before using the hotplates for the first time, you should heat
them at maximum temperature for approximately 4 minutes,
without placing any pans on them. During this initial stage, their
protective coating hardens and reaches its maximum resistance.
Precautions and tips
!
This appliance has been designed and manufactured
in compliance with international safety standards. The
following warnings are provided for safety reasons and
must be read carefully.
General safety
• This is a class 3 built-in appliance.
• These instructions are only valid for the countries
whose symbols appear in the manual and on the
serial number plate.
• The appliance was designed for domestic use inside the
home and is not intended for commercial or industrial use.
• The appliance must not be installed outdoors, even in
covered areas. It is extremely dangerous to leave the
appliance exposed to rain and storms.
• Do not touch the appliance with bare feet or with wet or
damp hands and feet.
• The appliance must be used by adults only for the
preparation of food, in accordance with the instructions
outlined in this booklet. Any other use of the appliance
(e.g. for heating the room) constitutes improper use and
is dangerous. The manufacturer may not be held liable
for any damage resulting from improper, incorrect and
unreasonable use of the appliance.
• Ensure that the power supply cables of other electrical
appliances do not come into contact with the hot parts
of the oven.
• The openings used for ventilation and dispersion of heat
must never be covered.
• Always make sure the knobs are in the “●”/“
○
” position
when the appliance is not in use.
• When unplugging the appliance always pull the plug from
the mains socket, do not pull on the cable.
• Never carry out any cleaning or maintenance work
without having detached the plug from the mains.
• In case of malfunction, under no circumstances should
you attempt to repair the appliance yourself. Repairs
carried out by inexperienced persons may cause injury
or further malfunctioning of the appliance. Contact a
Service Centre (see Assistance).
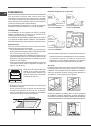
• Always make sure that pan handles are turned towards
the centre of the hob in order to avoid accidental burns.
• Do not leave the electric hotplate switched on without a
pan placed on it.
• Do not use unstable or deformed pans.
• The appliance should not be operated by people (including
children) with reduced physical, sensory or mental
capacities, by inexperienced individuals or by anyone
who is not familiar with the product. These individuals
should, at the very least, be supervised by someone who
assumes responsibility for their safety or receive preliminary
instructions relating to the operation of the appliance.
• Do not let children play with the appliance.
• The appliance is not intended to be operated by means
of an external timer or separate remote-control system.
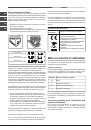
Disposal
• When disposing of packaging material: observe local
legislation so that the packaging may be reused.
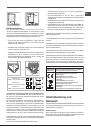
• The European Directive 2012/19/EC on Waste
Electrical and Electronic Equipment (WEEE), requires
that old household electrical appliances must not
be disposed of in the normal unsorted municipal
waste stream. Old appliances must be collected
separately in order to optimise the recovery and
recycling of the materials they contain and reduce
the impact on human health and the environment.
The crossed out “wheeled bin” symbol on the product
reminds you of your obligation, that when you dispose
of the appliance it must be separately collected.
Consumers should contact their local authority or retailer
for information concerning the correct disposal of their
old appliance.
Maintenance and care
Switching the appliance off
Disconnect your appliance from the electricity supply before
carrying out any work on it.
Cleaning the appliance
!
Do not use abrasive or corrosive detergents such as stain
removers, anti-rust products, powder detergents or sponges with
abrasive surfaces: these may scratch the surface beyond repair.
!
Never use steam cleaners or pressure cleaners on the
appliance.
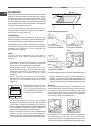
• It is usually enough to wash the hob with a damp sponge
and dry it with absorbent kitchen roll.
• The electric hotplates should be cleaned with a damp
cloth and lubricated with a little oil while still warm.
• Stainless steel can be marked by hard water that has
been left on the surface for a long time, or by aggressive
detergents containing phosphorus. After cleaning, rinse
and dry any remaining drops of water.