16
Adjustment Manual
/
Einstellungsanleitung
/ Réglage manuel
Fig.12
Fig.13
Fig.14
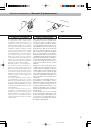
EDGE-PRO TREMOLO
Tremolo arm
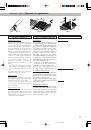
The tremolo arm uses a snap-in/snap-out
design that can be easily attached or re-
moved (Fig.12). To attach the arm, push it
firmly into the arm socket until both of the
white Teflon washers are completely hidden
(Figures 13 and 14). The firmness of the
arm attachment can be adjusted by increas-
ing or decreasing the number of Teflon
washers. Remove a washer by pressing
open the slit, or add a new washer by push-
ing it diagonally into the slit making sure to
observe the correct orientation of the washer
(Fig.15).
* If the arm is no longer held firmly in place
after prolonged use, replace the old Teflon
washers with new ones.
Note: The arm may be damaged if it is in-
completely inserted into the arm socket.
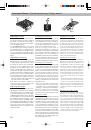
Fine tuning
Even after locking the locking nut, you can
use the fine tuners (Fig.16) to make fine
adjustments to the tuning of each string.
You should adjust all of the fine tuners to
the center of their adjustable range before
you lock the locking nut.
Adjusting the action
To adjust the entire tremolo unit up or down,
use an Allen wrench to turn the stud bolt
(Fig.17 A) located at the left and right of the
tremolo unit. (This cannot be adjusted for
each individual string.)
EDGE-PRO TREMOLO
Tremolostab
Der Tremolobügel kann über einen
Schnappmechanismus leicht angebracht
und entfernt werden (Abbildung 12). Drük-
ken Sie den Stab fest in seinen Sockel, bis
beide Teflonringe vollständig verdeckt sind
(Abbildungen 13 und 14). Die Haltekraft des
Tremolobügels kann durch Hinzufügen
oder Wegnehmen von Teflonringen verän-
dert werden. Entfernen Sie einen Ring
durch Weiten seines Schlitzes oder fügen Sie
einen weiteren hinzu, indem Sie ihn schräg
am Stab ansetzen und dann richtig herum
aufdrücken (Abbildung 15).
* Ersetzen Sie die Teflonringe durch neue,
wenn der Bügel nach längerem Gebrauch
nicht mehr ausreichend fest im Sockel
sitzt.
Hinweis: Der Tremolobügel kann beschä-
digt werden, wenn er nicht vollständig im
Sockel sitzt.
Feinstimmung
Über die Feinstimmschrauben (Abbildung
16) können die einzelnen Saiten auch nach
dem Feststellen der Sicherungsschrauben
am Sattel gestimmt werden.
Vor dem Feststellen der Sicherungsschraube
sollten die Feinstimmschrauben in die Mit-
te ihres Drehweges gestellt werden.
Einstellung des Saitenspielraumes
Verwenden Sie einen Imbusschlüssel, um
die Schraubbolzen links und rechts an der
Tremoloeinheit (Abbildung 17 A) zu drehen
und die gesamte Tremoloeinheit auf oder
ab zu bewegen. (Eine Veränderung des
Spielraumes einzelner Saiten ist hierdurch
nicht möglich.)
VIBRATO EDGE-PRO
Tige de vibrato
La tige de vibrato est conçue pour s’attacher
et se retirer facilement (Fig. 12). Pour la fixer,
enfoncez-la fermement dans la douille jusqu’à
ce que les rondelles de Teflon blanches soient
complètement cachées (Figures 13 et 14). La
tige sera fixée plus ou moins fermement en
fonction du nombre de rondelles Teflon que
vous mettez. Retirez une rondelle en exerçant
une pression dessus de façon à l’ouvrir ou
ajoutez une nouvelle rondelle en l’appuyant
fortement contre la tige en prenant garde de
bien diriger l’ouverture de la rondelle vers la
tige (Fig. 15).
* Si vous sentez après un certain temps d’uti-
lisation que la tige n’est plus fixée aussi soli-
dement, remplacez les rondelles de Teflon
usagées par de nouvelles.
Remarque : La tige risque de s’abîmer si vous
ne l’enfoncez pas complètement dans la
douille.
Accord de précision
Même après que vous ayez fixé les écrous de
blocage, vous pouvez procéder à des accords
de précision (Fig. 16) pour chaque corde.
Il est recommandé de régler grossièrement les
accordeurs de précision avant de bloquer les
écrous.
Réglage de la hauteur
Pour régler toute l’unité du vibrato vers le haut
ou vers le bas, dévissez les vis situées de part
et d’autre de l’unité de vibrato à l’aide d’une
clé Allen (Fig. 17 A). (Ce réglage ne peut pas
être fait individuellement pour chaque corde.)
04.9.21, 4:38 PM
Page 16