8
Maintenance Manual
/
Wartungs- und Pflegehinweise
/ Manuel d’entretien
ACTION
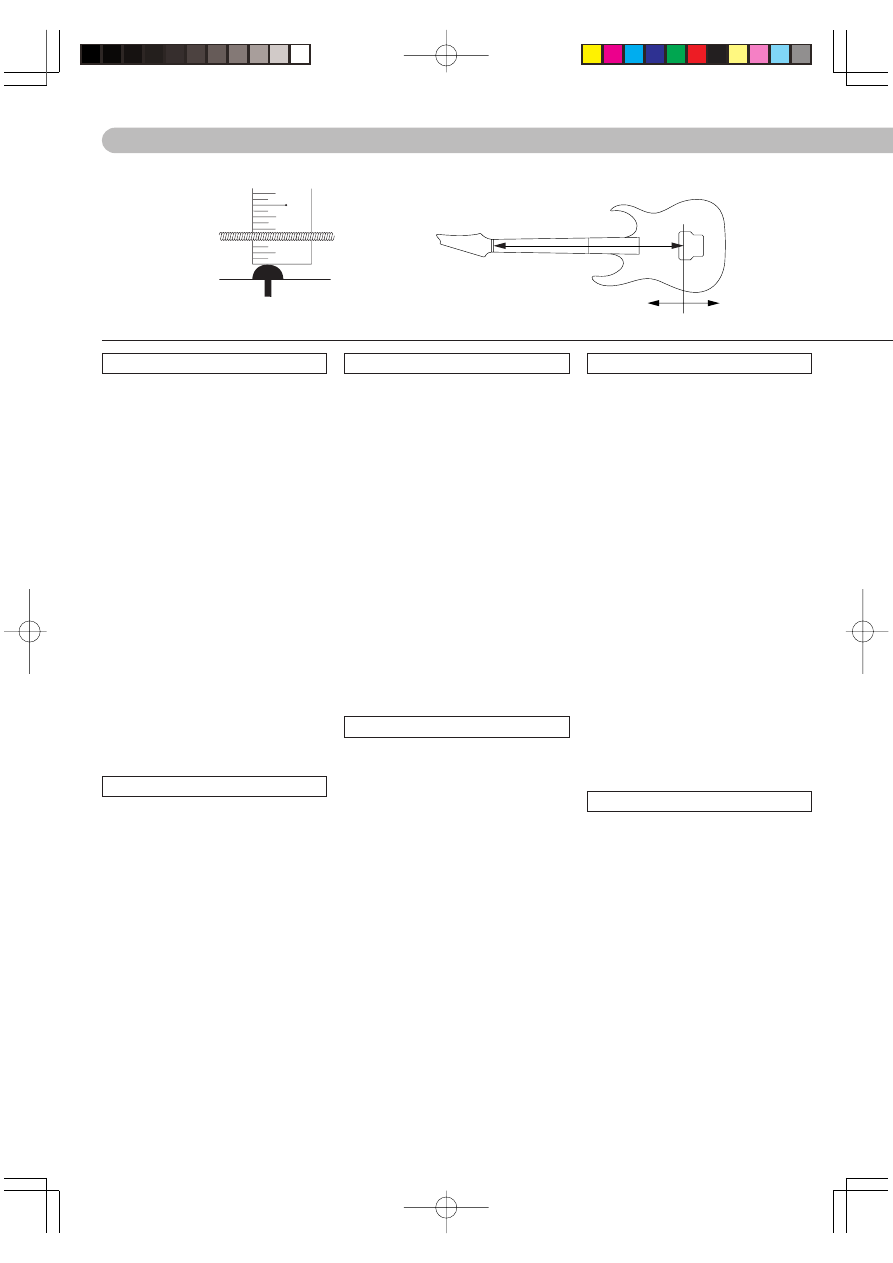
Action refers to the distance between the
frets and the string, and is an important ele-
ment in the playability of the instrument. Af-
ter adjusting the curvature of the neck, tune
the guitar accurately, and then measure the
distance between the frets and the string to
determine whether the action is adjusted
correctly. As shown in Figure 8, place a ruler
at the 14th fret to measure the gap. The table
shows typical gaps. If the action is too high,
the guitar will be more difficult to play. If the
action is too low, strings will buzz or be
muted, and sustain will be poorer.
The method of adjusting the action will de-
pend on the type of bridge your guitar has,
so make adjustments as described in the
adjustment manual for your bridge.
The action will also be affected if you adjust
the neck or change to a different gauge of
strings, so you will need to readjust it.
* For strings not shown in the table, make
adjustments so that the distance increases
gradually between the first string and the
lowest string. A string may break if you sig-
nificantly raise the action, so loosen the
string before you make this adjustment.
INTONATION
After you replace the strings or adjust the
neck, you must make fine adjustments to the
string length (intonation) to ensure that the
correct pitch is sounded at all frets. Tune the
guitar accurately, hold it in playing position,
and compare the pitch of the string pressed
down at the 12th fret with the harmonic
played at the 12th fret. If the pitch played at
the 12th fret is lower than the harmonic, move
the bridge saddle forward (Fig.9 A) to shorten
the string length. Conversely, if the pitch
played at the 12th fret is higher than the har-
monic, move the bridge saddle backward
(Fig.9 B) to lengthen the string length. The
method of adjustment will depend on the type
of your bridge, so make adjustments as de-
scribed in the adjustment manual.
* Use a tuning meter in order to adjust the
intonation accurately.
* The string may break if the saddle is moved
a substantial distance, so be sure to loosen
the string before you adjust the saddle.
A
B
12F
Fig.8
Fig.9
HAUTEUR
La hauteur correspond à la distance séparant les frettes
et la corde, c’est ce qui fait qu’un instrument est plus
ou moins « jouable ». Après avoir réglé la courbe du
manche, accordez correctement la guitare, puis me-
surez la distance entre les frettes et la corde pour dé-
terminer si la hauteur de la corde est correcte ou non.
A l’aide d’une règle, mesurez l’écart au niveau de la
14ème frette, comme l’illustre la figure 8. Le tableau
présente les écarts habituels. Si la hauteur est trop
importante, la guitare sera difficile à jouer. Si elle est
trop faible, les cordes risquent de produire un bour-
donnement, d’être muettes ou encore d’avoir une te-
nue de son (sustain) trop limitée.
La technique de réglage de la hauteur dépend du
type de chevalet de votre guitare, c’est pourquoi
pour ces réglages vous devez suivre les instruc-
tions correspondant à votre chevalet dans le ma-
nuel de réglage.
La hauteur peut également être altérée lorsque vous
réglez le manche ou que vous changez de calibre de
cordes, auquel cas vous devrez la régler à nouveau.
Pour les cordes qui ne figurent pas dans le tableau, ef-
fectuez les réglages de sorte que la distance augmente
progressivement entre la corde la plus aiguë et la corde
la plus grave. Si vous augmentez la hauteur de manière
significative, la corde risque de casser. Pensez donc à
détendre la corde avant de procéder à ce réglage.
INTONATION
Après chaque remplacement de cordes ou réglage de
manche, vous devez ajuster la longueur de corde (in-
tonation) pour assurer la justesse du son à chaque
frette. Accordez correctement la guitare, maintenez-
la en position de jeu et comparez la hauteur du son
de la corde appuyée au niveau de la 12ème frette
avec l’harmonique jouée à la 12ème frette. Si le son
produit à la 12ème frette est plus bas que l’harmoni-
que, bougez le sillet de chevalet vers l’avant (Fig.9 A)
pour raccourcir la longueur de la corde. A l’inverse, si
le son produit à la 12ème frette est plus haut que l’har-
monique, bougez le sillet de chevalet vers l’arrière
(Fig.9 B) pour augmenter la longueur de la corde. La
technique de réglage dépend du type de chevalet de
votre guitare, c’est pourquoi pour ces réglages, vous
devez suivre les instructions correspondant à votre
chevalet dans le manuel de réglage.
* Servez-vous d’un accordeur pour vous assurer
de la justesse du son.
* Si vous bougez trop le sillet du chevalet, la corde
risque de casser, assurez-vous donc de détendre
la corde avant de régler le sillet.
SAITENLAGE
Die Saitenlage beschreibt den Abstand zwischen den Bünden
und der Saite. Dieser ist entscheidend für die Bespielbarkeit des
Instruments. Stimmen Sie die Gitarre nach der Einstellung der
Halskrümmung genau, und messen Sie dann den Abstand
zwischen 14. Bund wie in Abbildung 8 gezeigt an, um den Ab-
stand zu messen. Die Tabelle enthält typische Abstandswerte.
Wenn die Saitenlage zu groß ist, wird das Gitarrespiel
schwieriger. Ist die Saitenlage hingegen zu klein, sind
schnarrende oder gedämpfte Saiten sowie ein schnelleres
Ausklingen des Tones die Folge.
Die Saitenlage wird an der Brücke bezw. am Tremolo ein-
gestellt.
Hinweis:( siehe unten).
Die Saitenlage müssen Sie auch nach der Einstellung des
Halses oder einem Wechsel auf Saiten mit anderer Stärke
überprüfen, da er dadurch verändert wird.
Bei Verwendung von Saiten, die nicht in der Tabelle aufge-
führt sind, sollten Sie die Saitenlage so justieren dass sie schritt-
weise von der ersten zur tiefsten Saite größer wird.(immer
dem Griffbrettradius folgend). Bei Vergrößerung des Abstan-
des von der Saite zum Bund (Saitenlage) kann diese reißen.
Deshalb sollte die Saite vorher gelockert werden.
INTONATIONSEINSTELLUNG:
Nach Ändern der Saitenstärke, Steghöhe oder einer Verstel-
lung des Halses wird im Normalfall eine Neueinstellung
der Intonation mit den Stegreitern erforderlich. Zur Über-
prüfung der Intonation den Ober-bzw Flageoletton
(12.Bund) mit dem gegriffenem Ton (12.Bund) vergleichen.
Da der 12. Bund in der Mitte zwischen Sattel und Steg liegt
wird ein oberton erzeugt,der um eine Oktave höher ist als
der gegriffene Ton. Stimmen Sie die Gitarre genau, zum spie-
len des Obertons den Finger der linken Hand über dem 12.
Bund auf die Saite legen und die Saite mit der anderen Hand
anschlagen. Wenn der danach gegriffene Ton in seiner Stim-
mung dem Oberton entspricht ist keine Einstellung des be-
treffenden Stegsattels erforderlich. Halten Sie die Gitarre in
Spielposition. Wenn die Tonhöhe am zwölften Bund tiefer
ist als die des Flageolet-Tons, müssen Sie den Stegsattel vor-
wärts bewegen (Abbildung 9 A), um die Saitenlänge zu ver-
kürzen. Umgekehrt müssen Sie den Stegsattel zurück ver-
setzen (Abbildung 9 B) und dadurch die Saite verlängern,
wenn die Tonhöhe höher ist als die des Flageolet-Tons.
Die Art und Weise der Einstellung hängt von der Art des
an ihrer Gitarre angebrachten Steges ab. Folgen Sie also
den Anweisungen für ihren Steg (siehe unten).
* Verwenden Sie ein Stimmgerät, um das Instrument prä-
zise zu stimmen.
* Die Saite kann reißen, wenn Sie den Sattel sehr weit ver-
schieben.
* Sie sollten deshalb vorher die Saite lockern.
04.9.21, 4:38 PM
Page 8