26
Adjustment Manual
/
Einstellungsanleitung
/ Réglage manuel
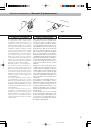
Adjusting the action
To adjust the entire tremolo unit up or down,
use an Allen wrench to turn the stud bolt
(Fig.28 B) ( located at the left and right of
the tremolo unit. (This cannot be adjusted
for each individual string.)
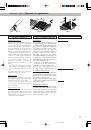
The LO-PRO EDGE tremolo uses a stud
lock mechanism to prevent the stud bolt
from wobbling. Before you tighten the stud
bolt to lower the action, use an Allen wrench
to loosen the stud lock bolt (Fig.29). After
making the adjustment, tighten the stud bolt
lightly.
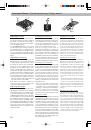
Adjusting the intonation
Before you adjust the intonation, use a 3
mm Allen wrench to loosen the pressure pad
screws (Fig.30) of the locking nut so that
the strings are released. Use a 2 mm Allen
wrench to loosen the saddle lock screws
(Fig.28 D) of each saddle, and move the
saddle. Firmly tighten the saddle lock
screws, tune the guitar, and then check the
intonation. Repeat these adjustments until
the intonation is correct, and then tighten
the pressure pad screws of the locking nut.
• You may install each saddle lock screw in
either the forward or rear position, depend-
ing on the position of the saddle.
Note: When loosening the saddle lock
screws, you must loosen the strings suffi-
ciently before making adjustments.
Replacing the strings
Loosen the string stopper bolt of the lock-
ing nut (Fig.30), completely loosen the string
at the tuning machine, use an Allen wrench
to loosen the string stopper bolt of the bridge
saddle (Fig.28 E), and remove the old string.
Use wire cutters to remove the ball end from
the new string as shown in Figure 31, insert
this end of the string into the bridge saddle,
fasten it firmly, and then tighten the string at
the tuning machine. After tuning, check the
angle of the tremolo unit, and fasten the
string stopper bolt of the locking nut to fin-
ish the procedure.
A
B
D
E
Fig.28
Fig.29
Fig.30
Réglage de la hauteur
Pour régler toute l’unité du vibrato vers le haut
ou vers le bas, tournez les vis situées de part
et d’autre de l’unité de vibrato à l’aide d’une
clé Allen (Fig. 28 B). (Ce réglage ne peut pas
être fait individuellement pour chaque corde.)
Le vibrato LO-PRO EDGE fait intervenir un
mécanisme de verrouillage de la tige qui em-
pêche cette dernière de vibrer ou trembler.
Avant de serrer la vis pour baisser la hauteur,
desserrez le mécanisme de verrouillage de la
tige (Fig. 29). Après avoir procédé aux ajuste-
ments, resserrez-le doucement.
Réglage de l’intonation
Avant de procéder au réglage de l’intonation,
desserrez les vis de serrage (Fig. 30) de l’écrou
de blocage à l’aide d’une clé Allen de 3 mm
pour détendre les cordes. Desserrez les vis de
blocage du pontet à l’aide d’une clé Allen de
2 mm (Fig. 28 D) pour chaque pontet puis
déplacez le pontet. Serrez fermement les vis
de blocage, accordez la guitare et vérifiez l’in-
tonation. Renouvelez ces opérations jusqu’à
ce que vous obteniez une intonation correcte,
puis serrez les vis de serrage l’écrou de blo-
cage.
•Vous pouvez placer la vis de blocage du pon-
tet soit en position avant, soit en position
arrière, en fonction de la positon du pontet.
Remarque : Lorsque vous desserrez les vis de
blocage du pontet, vous devez détendre les
cordes suffisamment avant de procéder aux
réglages.
Remplacement des cordes
Desserrez l’écrou du bloque corde (Fig. 30),
dégagez la corde de la mécanique
d’accordage et, à l’aide d’une clé Allen, des-
serrez le bloque corde du sillet de chevalet
(Fig. 28E), puis retirez la corde usagée. En-
suite à l’aide d’une pince, sectionnez la boule
de blocage de la nouvelle corde comme indi-
qué sur la figure 31, insérez le bout de la corde
dans le sillet du chevalet, fixez solidement et
attachez la corde à la mécanique d’accordage.
Après l’accordage, vérifiez l’angle du vibrato,
et serrez le bloque corde par de l’écrou de
blocage pour terminer la procédure.
Einstellung der Saitenlage
Verwenden Sie einen Imbusschlüssel, um die
Schraubbolzen links und rechts an der Tremolo-
einheit (Abbildung 28 B) zu drehen und die ge-
samte Tremoloeinheit dadurch auf oder ab zu
bewegen. (Eine Veränderung der Saitenlage ein-
zelner Saiten ist hierdurch nicht möglich.)
Beim Lo-Pro Edge Tremolo wird ein
Sicherungsmechanismus verwendet, der
ein Wackeln des Schraubolzens verhindert.
Ver-wenden Sie einen Imbus-Schlüssel, um
diese Sicherung zu lösen (Abbildung 29)
und dadurch ein Absenken des Schraubbol-
zens zur Veränderung der Saitenlage zu er-
möglichen. Drehen Sie nach dieser Einstel-
lung den Schraubbolzen wieder et-was fest.
Einstellung der Intonation
Lösen Sie vor der Einstellung der Intonation mit
einem 3-mm-Imbus-Schlüssel die Schrauben der
Druckplättchen (Ab-bildung 30), um die Saiten
zu lösen. Lösen Sie dann mit einem 2-mm-Imbus-
Schlüssel die Sicherungsschrauben (Ab-bil-dung
28 D) jedes Saitenhalters, um diesen zu bewegen.
Nach Justierung des Saitenhalters müssen Sie
diesen wieder gut fest-schrau-ben, die Gitarre
stimmen und die Intonation prüfen. Wiederho-
len Sie diese Einstellungen, bis die Intonation in
Ordnung ist, und drehen Sie die Schrauben der
Druckplättchen fest.
•Jede der Saitenhalter-Befestigungs-
schrauben kann entweder nach vorne
oder hinten weisend angebracht werden,
abhängig von der Lage des Saitenhalters.
Hinweis: Vor dem Lösen der Saitenhalter-
Befestigungsschrauben und vor der Justierung
müssen die Saiten ausreichend entspannt werden.
Wechsel der Saiten
Lösen Sie die drei Klemmschrauben am Sattel
(Abbildung 30), drehen Sie die Saite an der
Mechanik vollkommen los und verwenden Sie
einen Imbus-Schlüssel, um die Saitenstopper-
schraube des Saitenhalters (Abbildung 28 E)
zu lösen. Entfernen Sie dann die alte Saite.
Verwenden Sie einen Seitenschneider, um das
Kugelende der neuen Seite wie in Abbildung
31 gezeigt zu entfernen. Führen Sie dieses Ende
der Saite in den Saitenhalter, ziehen Sie die
Saitenstopperschraube fest an und spannen Sie
die Saite mit der Mechanik. Prüfen Sie nach
dem Stimmen dass die Tremoloeinheit mög-
lichst parallel zur Decke steht.
04.9.21, 4:39 PM
Page 26