14
Operation and settings
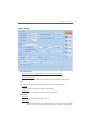
4. Specify the Device Name, Video Stream, Protocol, User ID, Password and click the [OK] but-
ton.
5. Click the [OK] button to exit the window.
Remove the device
1. Select
Tools > Add/Edit Device
option on the menu bar.
2. Select the device name on the device list.
3. Click the [Remove] button. The selected device is removed.
4. Click the [OK] button to exit the window.
Create a device group
You can make the device group to manage it.
Create a new group folder
To create a group under the Device top-level folder, do the following on the Device Tree sec-
tion:
1. Click the right mouse button on the Device or group folder.
2. Select the [Add Group] option. The dialog window is displayed.
3. Overwrite the default name “New Group” with a group name of your choice.
4. Click the [OK] button to confirm it.
The new group folder is created under the folder you selected.
Delete a group folder
1. Select the required group folder and click the right mouse button.
2. Select the [Delete Group] option.
Notes:
It is not possible to delete the Device top-level folder.
•
Deleting a group folder will delete all subgroup folders within the group folder as well.
•
If you delete the group folder, the device in the group folder will be moved to the upper
group folder automatically.
Edit a group folder
1. Select the required group folder and click the right mouse button.
2. Select the [Edit Group] option. The dialog window is displayed.
3. Overwrite the existing group name with a new name of your want.