Workflow
4•4
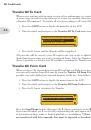
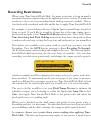
Now save your recording. Press the
•
SAVE
button, navigate to
Save Recording To
Internal
and press the R Arrow. Rename your recording
Beat+Gtr
and confirm.
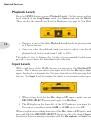
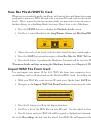
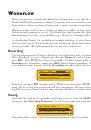
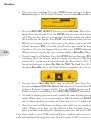
FREE: 32:17:84
SONGS
DRUMS
LOOP: 00:09:96
Beat+Gtr
SD
RECORDINGS
PLAYBACK LEVELS
SONG/DRUMS
MIC/AUX/WAV
100%
90%
GUITAR
OFF
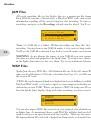
Press the
•
RECORD SELECT
button to select
Mic/Aux
. Plug a bass guitar into the
Spider Jam Aux In jack. Press the
LEVEL
button twice then navigate to the
Aux
tab. Play your bass and set a strong input level by turning the wheel and watching
the level bar in the display. Press
PLAY
and jam along with your track.
When you’re happy with your bass part, play along as the track rolls, pause in the
•
4th bar then press
REC
. Overdub your 4 bar bass part when the loop begins on the
downbeat. If you’re not happy with your take, press
UNDO
and repeat the process.
When you have a good take, save your recording as
Beat+Bas
(like you did before).
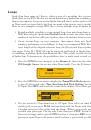
Now it’s time for a Mixdown. Press the
•
LEVEL
button then press
PLAY
to hear your
recording. Mute the Guitar track by turning the wheel to
Off
. Reduce the Drum
track to 90% or whatever level works with your Bass track at 100%. Press the
SAVE
button and navigate to
Save Rec Mix As WAV To Card
. Press R Arrow and keep
the name
Beat+Bas
. Press the Down Arrow to complete the save to your SD card.
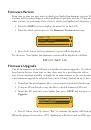
You now have a
•
Beat+Bas
WAV loop on your SD card. Press the
SAVE
button,
navigate to
Import WAV File From Card
and press R Arrow. Select
WAV:Beat+Bas
and press R Arrow to import the file. Press the
SONG
button; you’ll see the track is
loaded, ready for overdubbing. Press
RECORD SELECT
and select
Guitar
.
Go back to playing guitar now and overdub the same rhythm guitar part you played
•
earlier. When done, save your recording as
Gtr2
. Reload your
WAV:Beat+Bas
track
and overdub a melody guitar line for 4 bars and save it. Overdub a harmony part.
Now do a series of Mixdowns, isolating each track you just recorded by muting the
•
others. When you’re done, you should have a Bass & Drums loop, 2 rhythm guitar
parts, a melody guitar line plus a harmony guitar line, all saved as WAV files.
Copy these tracks to your DAW and you’ll have a multi-track session to work on, with
each track playing back in perfect sync. Pan the guitars L & R to create a stereo mix.