- 28
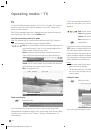
Operating modes – EPG
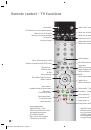
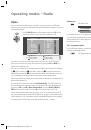
In front of the programme’s title, the system places an
. This station is switched
later to this programme when the set is switched on. If the TV is off, it switches on
again automatically at the beginning of the marked programme if this has been
set in the EPG menu. If you are out, a security prompt prevents the TV set staying
on unattended.
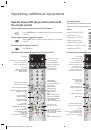
Before leaving the upper selection lines using the
blue coloured key
, select a
specific line. If you have switched back to the programme list, you can change this
menu line using
without having to leave the programme list.
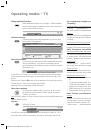
Programming recording for recorders
The programme marked using the
buttons can be prepared for recording by
pressing the
red coloured key
. In the following menu, confirm the timer data or
change them as required. Then a red dot is set in front of this programme in the
EPG programme list as an identification (if timer data is being transferred to the
recorder, no red dot is set). If you select this programme, you can delete it from
the timer using the red coloured key (if the timer data has been transferred to a
recorder, the timer has to be deleted there).
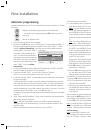
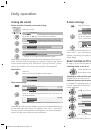
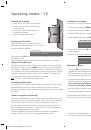
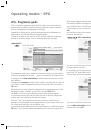
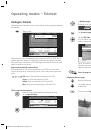
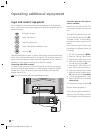
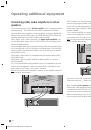
EPG menu
Call EPG menu
You will find the following settings in the EPG menu:
• Select provider • Station selection • Timer list • Data capture
• Switch on TV when marked
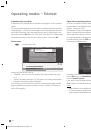
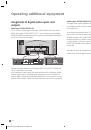
Selecting providers and stations
If you want to change the provider for analogue TV reception (the station which
transmits EPG data) to have other stations evaluated, you can do this under
“Select provider“.
Select “Select provider“ and call this menu using
OK
. If the station you want to
switch to is not listed in the “Select provider“ list, then use the
yellow coloured
key
to start the automatic search for stations with EPG data. This takes a while.
Or, if you know the station that transmits EPG data, press the
blue coloured key
to compile manually. Select the provider in the station list and adopt it by using
OK
and return to the provider selection using .
Select the provider in “Select provider“ and adopt it using
OK
. Then a station list
search is performed. The stations offered by the provider are displayed in a list.
First, all stations are marked with the
symbol so that their data is display-
ed in the programme guide (precondition: provided EPG data is broadcast for
the respective station). Stations indicated by
are analogue terrestrial/cable
stations, stations indicated by
are DVB-T stations, stations indicated by
are
DVB-C stations and stations indicated by
are DVB-S stations. These stations are
available for evaluation in the programme guide.
Select the stations you want to omit from the programme guide one after another
and deactivate each one by using
OK
. The
symbol is removed.
Data capture
After these settings or after each time the set is switched off using the mains
switch, the data must first be collected, before switching on the set.
To do this, select the station you have defined as a provider and leave the TV
set switched on for about one hour or switch the set to the standby mode. After
about two minutes in standby mode, the indicator on the set turns orange. The
data acquisition begins and lasts about 1 hour. When data acquisition is termi-
nated, the indicator turns red again. The data are also automatically captured
between 2 a.m. and 5 a.m. when the TV is switched to standby.
A prerequisite for data capture is that “Data capture“ is “on“ (for DVB + analogue)
in the EPG menu.
Note: If the TV set is switched off using the mains switch or the mains plug is
pulled out, all EPG data are lost.
If, for example, you cannot receive any analogue EPG providers or if you only use
DVB, you should set the data capture to “on (only for DVB)“.
Switch on TV when marked
You can have the TV switched on automatically from standby at the beginning of
the marked programme. If you are not present at the time, a safety prompt makes
sure the TV switches off again after 5 minutes.
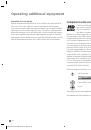
INFO
END
Switch
Data capture
Station select Timer list
EPG menu
Select provider
OK
BA32789_021XelosModusRel_5_GB.in28 28
BA32789_021XelosModusRel_5_GB.in28 28
15.01.2007 16:56:19
15.01.2007 16:56:19